Friday, November 30, 2012

Passionfruit Cupcakes


Recipe adapted from Jo's Deli
Ingredient
  • 120gm passion fruit pulp and seeds (from approx. 3 fruits)
  • 2 tbsp castor sugar
  • 6 tbsp water
Batter:
  • 60gm unsalted butter, melted
  • 80gm castor sugar
  • 3 large eggs
  • 130gm passion fruit puree
  • 50gm cake flour
  • 1 tsp baking powder
  • 120gm ground almond

Method

To prepare passion fruit puree:
Combine passion fruit pulp, seeds, sugar and water in a saucepan. Heat up till all sugar is melted. Let the mixture cool down a little before puree in a food processor. Sieve puree through a fine sieve to get rid of the seeds. Weigh the puree again. You should have about 130gm.  Add water to top up if necessary.

To prepare cupcakes:
  1. Sift cake flour and baking powder into a mixing bowl. Add in ground almond and use a hand whisk to mix well. Use a fork to break up the lumps if any.
  2. With a electric whisk, beat sugar and eggs at high speed till light and pale.
  3. Add in passion fruit puree and melted butter.
  4. Make a well in the centre of dry ingredients.
  5. Pour in (2) in and stir with a spatula. The batter is watery.
  6. Fill cupcake cases with batter 80-90% full. Bake in preheated oven at 180 deg cel for 20 mins or until golden brown.
  7. Cool completely and iced with homemade apricot & passionfruit jam!


一口牛奶....


再来一口蛋糕! 真幸福!!

Beef Stew

I bought a new thermal cooker recently and I never try using this kind of cooker before. Therefore I've chosen this recipe which requires long hours of stewing to test out the result of the thermal cooker :D Yumz! The beef stew is very flavourful and tender and taste even better the next day!


Recipe adapted from Table for 2
Ingredient
  • 1 kg beef, cut into 1" cube
  • 400gm carrots, cut into chunks
  • 200gm tomato, cut into large cubes
  • 3 ribs celery, sliced
  • 2 cloves garlic
  • 1 cup chopped red onion
  • 2 bay leaves
  • few sprigs of fresh thyme
  • 1 tsp dried rosemary
  • 1 tsp white peppercorns, crushed
  • 1 tsp black peppercorns, crushed
  • 1 beef stock cube
  • 2 cups of water

Method (I use thermal cooker)
  1. Heat slow cooker on high.
  2. Heat 2 tbsp oil in wok. Brown beef cubes in batches, if necessary. Dish up, drain well, the beef and transfer to the preheating slow cooker. Retain oil in wok.
  3. Add garlic and onion and saute until fragrant, put in crushed peppers. Cook until onions are soft and translucent. Put in bay leaves, rosemary and thyme.
  4. Put in carrots and celery and cook until they are heated through.
  5. Put tomato onto beef in pot. No need to stir.
  6. Then place the cooked carrots, celery and everything else from the wok.
  7. Put 1 cup water in wok, bring to boil (to deglaze the wok), pour the boiling water into the slow cooker.
  8. Add beef stock and more water until it almost covers the vegetables.
  9. Let it cook on high for 2 hours, then turn to low for another 4 hours. Add more salt if needed.

Apricot & Passionfruit Jam

Made this batch of apricot & passionfruit jam few months back. Fresh apricots is not always readily available in supermarket here and it is usually quite steep for a punnet. So that time when I saw this turkish fresh apricots was on sale, I quickly grab a few packs for jam making.


Ingredient

  • 600gm fresh apricots, stones removed
  • 80gm passionfruit pulp
  • 1 tbsp lemon juice
  • 250gm sugar

Method
  1. Cut the apricots into quarters and place in a large pan with 50ml water. Cover and cook over low heat for 10mins until tender.
  2. Remove from heat and add the sugar, passionfruit pulp and lemon juice.
  3. Heat slowly, stirring, for 5 min until all the sugar has dissolved. Return to boil and cook for 30mins, stirring often. Remove any scum during cooking.  When the jam falls from a tilted wooden spoon in thick sheets without dripping, it is ready.
  4. Spoon the hot jam immediately into clean, warm jars and seal. Turn the jars upside down for 2 mins, then invert and leave to cool. Can be place in cool dark place for 6 months, store in fridge upon opening.


Topo Map Love Cake

I was so fascinated by the layers of this butter cake when I saw the recipe from Wendy's blog :D I could not wait to see how my cake turns out after baking! My cake was rather short as I did not thaw the eggs well enough and it affected the volume of the batter. At first glance, I thought my cake was rather ugly >.< Nevertheless it is still a nice butter cake with firm crumbs :D 


Recipe adapted from Wendy from Table for 2
Ingredient
  • 250gm butter
  • 250gm sugar (I used 220gm)
  • 5 medium eggs
  • 300gm cake flour
  • 1 tsp baking powder
  • 125ml evaporated milk
  • 1 tsp vanilla extract
  • 1 tsp pandan paste
  • Cocoa powder for creating the topo lines (I used approximately 3 Tbsp)

Method
  1. Cream butter and sugar until pale and fluffy.
  2. Beat in eggs, one by one, beating well after each addition.
  3. Sift half the flour into the butter mixture and beat on low speed until well combined.
  4. Mix in the evaporated milk until well combined.
  5. Sift the balance of flour into the mixture and beat on low speed until combined.
  6. Divide the batter to two. Mix vanilla extract to one part and pandan paste to the other.
  7. Preheat oven to 180 deg cel and lined a 7" square pan.
  8. Spread 1/2 the pandan batter (or vanilla whichever you prefer) into pan. Level it.
  9. Evenly sift a thin layer of cocoa powder over.
  10. Very very gently dollop half of the other colour over and gently level it. Repeat the sifting of cocoa powder.
  11. Repeat layering with both colours, with the final layer clean (no cocoa powder on top).
  12. Bake for 45 minutes or until toothpick comes out clean.

Different variations : Divided batter into 4 equal portions : add vanilla paste into 2 plain portions, 1/2 tsp pandan paste into 1 portion and 1/2 tsp strawberry paste into another portion :)


姜葱鱼片


Ingredient
  • 200gm fish fillet, 生鱼
  • 40gm ginger, sliced
  • 150gm spring onion, sliced
  • 50ml water
  • 2 tbsp chinese wine
Marinate:
  • 1 tsp oyster sauce
  • 1 tsp light soy sauce
  • 1/2 tbsp corn flour
  • 1 tbsp cooking oil
  • 2 tbsp water
  • 1/2 tsp pepper
  • 1 tsp sesame oil
Seasoning :
  • 1 tbsp oyster sauce
  • 1/2 tbsp light soy sauce
  • 1/2 tsp sugar
  • 1 tsp chicken stock powder

Method
  1. Marinate fish fillet for 15mins.
  2. Heat 1 tbsp oil in wok. Add ginger and fry till fragrant. Add water, fish fillet, spring onion and seasoning over high heat until well combined. When sauce is almost reduce, add in chinese wine and mix well. Serve.

Steamed Chicken in Fragrant Oil


Ingredient
  • 1 kampong chicken
  • 2 tbsp Knorr chicken powder
  • 1 red chilli, deseeded
  • 1 small onion, sliced
  • thumb sized ginger, julienned
  • 1 tbsp corn oil
  • 3 tbsp low sodium soy sauce
  • 1 tbsp fish sauce
  • 1 tbsp sugar
  • bunch of spring onions, shredded

Method
  1. Rub the chicken powder evenly over the chicken. Set aside for 30mins.
  2. Place the chicken in a preheated steamer and steam for 30mins until cooked through. Meanwhile prepare a large bowl of ice water. Once the chicken is cooked, plunge it into the cold water. Drain well and cut up the chicken in pieces and arrange on a serving plate. Arrange chilli, onion, ginger and spring onion on top.
  3. Heat up oil in a saucepan. Add in soy sauce, fish sauce and sugar and cook till sugar is dissolved.
  4. Pour the hot sauce onto the chicken and serve immediately.


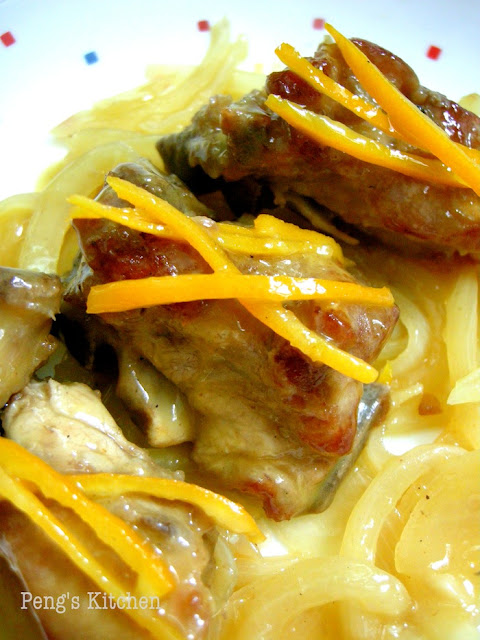
香橙排骨


Ingredient
  • 500gm prime ribs, chopped into bite size
  • 1 small onion, sliced
  • 2 garlic, chopped
  • 1 tbsp light soy sauce
  • 1 tbsp wine
  • 1 tbsp corn flour
  • 2 oranges, juice extracted approx 1 cup
  • 1/2 fresh orange peel, julienned
  • 2 tbsp cointreau
  • 1/2 tsp sugar
  • 1/2 tsp salt
  • corn starch water

Method
  1. Rinse ribs and pat dry, marinate with soy sauce, wine & corn flour for 30mins.
  2. Deep fry marinated ribs in hot oil until golden brown. Drain well on kitchen paper.
  3. Heat 1 tbsp oil in pan, add garlic and onion and saute till fragrant.
  4. Add in ribs and orange peel and mix evenly.
  5. Stir in orange juice, cointreau, sugar and salt and bring to boil.
  6. Simmer until gravy reduce, sitr in corn starch water to thicken. 

红烧马铃薯鸡丝

A simple and kids friendly dish which my mother used to cook for us quite frequently  :D


Ingredient
  • 300gm chicken breast, sliced thinly
  • 3 potatoes, peeled and sliced thinly
  • 1/2 tsp cornflour
  • 1/2 cup water
  • 1 tbsp bean paste
  • 1 tbsp hot bean paste
  • 1 tbsp minced garlic
  • 1/2 tbsp minced ginger
  • 1/2 tbsp wine

Method
  • Marinate chicken sliced with 1 tsp sesame oil, 1 tsp light soy sauce, 1 tsp wine and cornflour for 30mins.
  • Rinse potato shreds with water to remove excess starch.
  • Heat 2 tbsp oil in wok, add garlic, ginger and bean paste and fry till fragrant for 2mins.
  • Add in potato and chicken and mix evenly, fry for 2min.
  • Add in water and bring to boil. Cover and braise for 10mins until potato is tender. Add in wine and cook till sauce is reduced to your preference.

客家南乳猪肉

Oh so sinful and delicious crispy fried pork belly! Can help to nibble on the fried pork belly before tossing into the pot for braising :P Even my boy enjoys this dish to the max! :D


Hakka Braised Pork Belly


Recipe source (with modifications) : Pig Pig's Corner
Ingredient
  • 500g pork belly - cut into small pieces
  • 60g black fungus - soaked till softened, cut into small pieces
For marinade:
  • 1 tbsp minced garlic 
  • 1 tbsp chinese wine
  • 1 tbsp sugar
  • 1 tbsp oyster sauce
  • 1 tsp sesame oil
  • 1 tbsp nam yee juice
  • 2 cubes nam yee 南乳
  • 1/2 tsp five spice powder
  • 1 tsp baking soda
  • 1 egg, lightly beaten
  • 1 tbsp plain flour
  • 3 tbsp corn flour
For gravy:
  • 3 cubes nam yee 南乳
  • 1 tbsp oyster sauce
  • 2 1/2 cups water

Method

  1. Mix together pork belly and all ingredients for marinade. Leave this to marinade for about 2 hrs, overnight preferably.
  2. Deep fry marinated pork belly until golden browned.
  3. Place deep-fried pork belly, black fungus and all ingredients for gravy into a pot.
  4. Bring to boil and lower heat to simmer for 1 hr.


Friday, November 23, 2012

Coq Bantal / Pillow Fritters

This is my 2nd attempt on Kedah dish for this month theme for Malaysian Food Festival :D As you can see from the picture that the Coq Bantal or known as pillow fritters, simply fried bread, are in all sorts of shapes >.< Nevermind of the appearance, this fried bread is a hit for my kids. 'very nice and crispy' commented by my son :D 10 little pillow fritters are gone in a short while :D 

I loves this sambal sardines! This reminds me of Old Chang Kee sardine curry puff which I adore :D hmmm if one day I try making some curry puffs I will use this recipe as the fillings :D


Pillow Fritters served with Sambal Sardines


Coq Bantal / Pillow Fritters
Ingredient
  • 250gm bread flour
  • 2 tsp instant yeast
  • 1.5 tsp salt
  • 1/3 cup warm water
  • 2 tbsp sugar
  • 1 egg
  • 2 tbsp butter

Method
  1. Dissolve yeast in warm water and leave aside for 10mins.
  2. Combine flour, slat, sugar and butter in a mixing and mix briefly.
  3. Add in eggs and mix till breadcrumbs formed.
  4. Pour in yeast mixture and mix till a soft dough formed.
  5. Cover and proof for 1 hour until double in bulk.
  6. Knead lightly. Divide dough into 2 portions. Roll out dough into a rectangle. Roll up like a swiss and cut into 5 portions. Repeat with the remaining dough. With your palm, roll each 10 pieces into a slim long log.
  7. Heat some oil in wok, turn down heat and pan fry the dough, in batches, until golden brown. Drain well on kitchen paper.


Sambal Sardine
Ingredient
  • 1 x 425gm canned sardines
  • 2 cloves garlic, finely chopped
  • 1 large onion, sliced
  • 2 cm ginger, thinly sliced
  • 1 tbsp chilli boh
  • 1 heap tbsp tamarind, dissolved in 1/2 cup water
  • salt, sugar to taste
  • spring onion, chilli for garnish

Method
  1. Heat some oil in pan, saute ginger, garlic and onion until fragrant.
  2. Add in chilli boh and mix evenly and fry for 1 min.
  3. Add in sardines and break up lightly with a spatula. Stir in tamarind water and bring to boil. Simmer briefly and add salt and sugar to taste.
  4. Remove and garnish with spring onion and chilli. Serve with pillow fritters.


I am submitting this to MFF Kedah Perlis Month hosted by Table for 2...or more


Wednesday, November 21, 2012

Lempiang Ikan/Fried Fish Cake

Starting of the December school holidays and been in lazy mode for the past few days as no need to rush here and there :D Cooking also becoming lazy, fish porridge, minced pork porridge, fried rice, fried meehoon hehehe...Back to this dish :D Oh it is so delicious! It is quite similar the Thai Fish Cake, though I've yet to attempt to cook this, but I think this Kedah style fried fish cake is not much difference  from the Thai style :D


Ingredient
  • 300gm fish paste
  • 30gm long beans, diced
  • 3 pieces kaffir lime leave, finely chopped
  • 1 spring onion, diced
  • 1 small egg
  • 1 red chilli, diced
  • 1 tbsp chilli boh
Seasoning :
  • 1 tbsp osyter sauce
  • 1/2 tsp white pepper
  • 1/2 tsp sugar
For coating : 3 tbsp cornflour

Dipping sauce : Combine all sauce ingredients and bring to boil till reduce slightly and thickens.
  • 2 fresh red chilli, ground into paste
  • 4 tbsp white vinegar
  • 3 tbsp sugar
  • 1 tbsp ground peanuts
  • 2 tsp cornflour
  • 1 cup water
  • salt to taste

Method
  1. Combine fish paste, chilli paste, kaffier lime leaves, egg and all seasonings. Mix well and stir in long beans. Set aside for 15mins.
  2. Wet your hand, take about 1 heap tbsp of the mixture and form into flat round shape.
  3. Heat some oil in a frying pan. Coat the fish cake with some cornflour and pan fry on both sides until golden brown. Remove and drain well on kitchen paper.
  4. Serve with dipping sauce.

I am submitting this to MFF Kedah Perlis Month hosted by Table for 2...or more

Tuesday, November 20, 2012

Cooking with Cekur Root, 沙姜

Another interesting herb I want to introduce today :D I first get to know this ingredient is through my mother-in-law. She uses it to marinate seafood especially prawn as she said that it helps to mask the fishy smell, if any, and to enhance the taste of the seafood. It is indeed an interesting herb with a very intense earthy fragrant, much more flavorful than galangal 南姜 and old ginger 老姜. 

I googled on web and find out that this sand ginger is commonly used on chicken dished as they matches very well! So one fine day I try to experiment some of the powder by baking a chicken. It turns out fantastic!! My hubby commented that it tasted exactly the baked chicken we had in Hangzhou by a famous stall called 吴山烤鸡!! hehehe so maybe this is the main ingredient that they used that made their baked chicken so popular for the last 20 over years!? Besides baking chicken, it can be used in stir-frying and steaming. I've tried the stir-fried version and it taste good also! Will try out the steaming version soon :D


沙姜 Sand Ginger or 山奈, also known as Cekur Root in Malay

 Fresh Version

Dried Version which is toasted

Toasted and grind into powder


Stir-fry Cekur Root with Chicken


沙姜炒鸡丁
Ingredient
  • 3 boneless chicken leg, cubed
  • 2 tbsp cekur root powder
  • 1 tbsp chopped ginger
  • 1 egg white
  • 1/2 tsp salt
  • 1 tbsp cornflour
  • dash of sesame oil and pepper
  • 1/2 tbsp light soy sauce
  • 1/2 tbsp oyster sauce

Method
  1. Marinate chicken cube with cekur powder, egg white, salt, cornflour, sesame oil and pepper for at least 30mins.
  2. Heat 1 tbsp oil in pan, saute ginger until fragrant and golden brown.
  3. Add in marinated chicken cube and fry until golden brown. Add in seasoning and mix well. Dish up and serve.

Baked Cekur Chicken, 山奈烤鸡


I baked the chicken over the stove using my grill pan, which is quite similar to Happy Call Pan, but I got this Korean brand pan much more earlier before the craze of HCP! 


Before & After Baking over stove...


山奈烤鸡
Ingredient
  • 1 small chicken, spatchcocked (butterfly)
  • 2 tbsp cekur root powder
  • 1 tsp five spice powder
  • 1/2 tbsp sesame oil
  • 1 tsp salt
  • 1 tsp pepper
  • 1 tbsp honey

Method

  1. Mix all the marinate together to form into a paste.
  2. Rub the seasoning all over the chicken inside out. Marinate overnight.
  3. Thaw completely before baking. Bake over stove for 35mins on medium low heat or bake in oven at 200 deg cel for 35 mins until golden brown.


Monday, November 19, 2012

茶香排骨

Braised Pork Ribs in Tea Leaves....This is not a dish which may appeal to anyone, do not attempt this dish if you are not adventurous enough! Hubby commented slightly bitter, maybe I've added too much tea leaves, but overall it taste fine with me, I should say it taste 甘甜 rather than bitter!  It taste slightly herby with fragrant from the green tea leaves and five leaf ginseng (JiaGuLan). 


绞股蓝 also known as 七叶参  or  known in several English terms as Five Leaf Ginseng, Poor Man's Ginseng, Sweet Tea Vine....
This may looks alien to you but this herb tea is believed to reduce blood cholesterol, keep blood pressure in normal range. It has a component which is related to whats being present in ginseng, therefore it was named as Poor Man's Ginseng :D This is the first time I experiment this herb into cooking other than drinking it as a tea :D 


fresh JiaoGuLan : pic extract from Wikipedia


This is a premium green tea leaves from Hangzhou, 千岛湖 known as 千岛银针, you may use other chinese tea leaves e.g.. 普洱茶 Pu'er tea which is a black tea.


Ingredient
  • 500gm prime ribs
  • 10gm dried green tea leaves or Pu'er tea
  • 10gm Jiaogulan
  • 4 tbsp oyster sauce
  • 2 tbsp dark soy sauce (omit this if using Pu'er, I added this for deep coloured gravy as I'm using green tea leaves thus the gravy colour is on the lighter side)
  • 2 stalk spring onions
  • 10gm ginger
  • 3 cloves garlic, roughly chopped
  • 650-800ml water (depends on how much gravy you like)
  • salt to taste

Method
  1. Blanch ribs in boiling water for 1 min. Rinse and drained well.
  2. Place tea leaves in a disposable muslin bag.
  3. Place all ingredients, except salt, in a pot and bring to boil. Lower heat and simmer for 1 hour and gravy reduce. Add salt to taste.


Related Posts with Thumbnails