Showing posts with label Little Thumbs Up. Show all posts

Sunday, September 13, 2015

Milo Cupcakes

Such hazy weather for the past one week, so just stay put and lazying around at home :P Make this little cute Milo cupcakes for the kids' tea break. These subtle Milo flavour cupcakes though not as rich as the usual chocolate cuppies, they are still very tasty and inviting. 


Ingredient (6 cupcakes)
  • 50gm self-raising flour
  • 2 tbsp Milo powder
  • 60gm unsalted butter, softened
  • 50gm light brown sugar
  • 1 egg, lightly beaten
  • 2 tbsp evaporated milk
  • 100gm whipping cream
  • Coco Crunch cereal for decorating

Method
  1. Sift flour and milo together and set aside.
  2. Using a electric whisk, cream butter and sugar until light and fluffy.
  3. Beat in egg till well incorporated.
  4. Fold in flour mixture, alternate with milk until just combined. To not over mix.
  5. Spoon batter into lined cup cases until 3/4 full. Bake in preheated oven at 180 deg cel for 20 mins or until a skewer inserted comes out clean Cool completely before frosting.
  6. In a clean dry bowl, beat cream until firm. Spread over cooled cupcakes and top with Milo cereal. 
Recipe ref : Good Food Magazine Jul 2012


Little Thumbs Up September (Milo) hosted by


Monday, September 7, 2015

Eggless Milo Tiramisu

This is another non-baked cake which all of us adored! This is not the classic version which consist of alcohol and eggs. I wanted a kids friendly version of Tiramisu which the kids can enjoy too! Glad that I tried out this Eggless Milo Tiramisu by Sharon of Delishar. It was a hit! It tasted light and creamy with touch of Milo flavour, wonderful!


A really simple Tiramisu which is fuss-free in preparation

Oops....I did not wait for it to set for 8 hours hahaha.....

Ingredient (24cm x 7cm x 10cm)
  • 250ml dairy whipping cream
  • 2 tbsp condensed milk
  • 250gm Mascarpone cheese
  • 1 tsp vanilla paste
  • 16 pieces ladyfinger biscuits
  • 250ml Milo (3 tbsp milo powder + 1 tbsp condensed milk dissolved in hot water)
  • 2 tbsp Milo powder

Method
  1. Using a electric whisk, beat whipping cream in a clean dry bowl until firm. Beat in condensed milk till well combined.
  2. In another bowl, whisk Mascarpone and vanilla till creamy. Divide into 2 equal portions.
  3. Fold in whipped cream into Mascarpone mixture in 3 additions till well incorporated.
  4. Dip ladyfinger biscuits into prepared Milo. Lay it onto the prepared container. (I loved my loaf pan which can fit in perfectly 8 pcs of the ladyfingers in a single layer)
  5. Spread 1 portion of the cheese mixture onto the biscuits. Sieve a tbsp of Milo powder over.
  6. Continue layering with another biscuits layer (dipped into milo) and cheese. Sieve another tbsp of Milo powder over. 
  7. Cling wrap the container and chill in fridge for at least 8 hours before serving.


Little Thumbs Up September (Milo) hosted by


Wednesday, September 2, 2015

Kek Batik (Hedgehog Slice)

Wanting to bake a cake but do not own an oven? Fret not...try making this non-baked layer cake which make up with chocolatey custard and cookies! 


total 6 ingredients in making this non-bake cake

Making of the chocolate custard

 Layering in the cooked custard and marie biscuits into cake pan


I like this! Taste like Kit Kat to me hahaha....it is rich, sweet & chocolatey. No the cookie is not crunchy or dry as it has absorbed the moisture from the custard making the texture cakey.


Recipe ref : WendyinKK
Ingredient
  • 250gm mini Marie biscuits
  • 200gm Milo powder
  • 1 can 397gm sweetened condensed milk
  • 4 large eggs
  • 1 tsp vanilla paste
  • 150gm butter, sliced into 0.5" thick

Method
  1. Fully lined a 7"x7" cake pan with baking paper. Make sure the paper is much higher than the pan.
  2. Lightly beat eggs. Add in Milo and condensed milk and whisk until well combined.
  3. Pour egg mixture into a medium pan, add in butter. Cook over medium low heat, stirring constantly until mixture thickens. Reduce to low heat.
  4. When the egg custard is cooked, it looks grainy and thick. Remove from heat.
  5. Spread a thin layer of custard into the base of the prepared pan. Arrange marie biscuits (16 pcs) onto custard.
  6. Spread another layer of custard over the biscuits. Continue with the layering of biscuits and custard. (total 4 layers of biscuits)
  7. When the layerings is all done, fold in the high collars of the baking paper. Press down and compact the cake with your hand. Chill in fridge overnight before slicing.

Little Thumbs Up September (Milo) hosted by

Monday, August 24, 2015

Sweet & Spicy Roast Chicken + Duo Potato Crisp Bake


I was supposed to follow Jamie Oliver's Sweet & Spicy Beer Can Chicken but alas my tiny table-top oven could not fit the 'standing' chicken....hahaha. So I gave up that beer can idea and just adapt part the spice rub as the marination :D No stuffing of beer can, try lemons! This is another good method to yield  tender and juicy chicken breast too! See my previous attempt on Lemony Rosemary Chicken which I also stuffed it with sliced lemons :D


Sweet & Spicy Roast Chicken 
Ingredient
  • one 1.4kg chicken
  • 1 lemon, halved
  • 3 tbsp Korean bbq sauce (pineapple)
  • 1 tbsp olive oil
  • 1 tbsp paprika
  • 2 tsp dried chilli flakes
  • 1 tbsp coriander powder
  • 1 tbsp fennel seeds
  • 1 tbsp fresh black peppercorns
  • 1 tbsp dark brown sugar

Method
  1. Crush fennel seeds and black pepper in a pestle & mortar. Combine with the rest of the spice and sugar evenly. 
  2. Drizzle oil all over the chicken. Rub the spice mixture all over the chicken including the cavity. Cover and let it marinate overnight in fridge.
  3. On the day of baking, bring the chicken to room temperature. Stuff the lemon halves into the chicken cavity. Place the chicken on a lined baking sheet. Bake in preheated oven at 200 deg cel for 60mins. Remove the chicken from oven. Brush the bbq sauce evenly over the chicken. Return the chicken to oven and bake for another 10 mins until dark & sticky.


This is a Duo Potatoes Crisp Bake (russet & purple sweet potatoes) which is well received by everyone! It takes quite time to layer it neatly into the casserole. So while the chicken is roasting in the oven, I take my own sweet time to do the layerings :D 


Duo Potatoes Crisp Bake
Ingredient
  • 650gm russet potatoes
  • 350gm purple sweet potatoes
  • 60gm unsalted butter
  • 40gm olive oil
  • 3/4 tsp salt
  • 1 tsp dried italian mixed herbs

Method
  1. Peel both potatoes and slice thinly. Place the sliced sweet potatoes in a preheated steamer and steam for 10mins till slightly soften. 
  2. Prepare a 8" square casserole. Combine butter and olive oil in a small saucepan. Dissolve the butter over low heat. 
  3. Pour the oil over the potatoes, mix well together with salt and dried herbs.
  4. Arrange the sliced potatoes (together with the oil mixture) vertically into the casserole and fully fill up the space. Gently tuck the steamed purple sweet potatoes between the potatoes layers. 
  5. Bake in preheated oven at 200 deg cel for 45 mins until the edge of the potatoes are browned and crisp.


As the roast chicken and potatoes are already flavourful in taste, I just prepare a real simple Garlicky Angel Hair Aglio Olio. Just saute 1 tbsp of minced garlic with 3 tbsp olive oil till fragrant, toss in 250gm cooked Angel Hair and mix them up evenly. Throw in a handful of halved cherry tomatoes for a touch of colours :D 


This post is linked to the event Little Thumbs Up ~ August 2015 Event Theme : Brown Sugar and Molassses organised by Zoe of Bake for Happy Kids and Doreen of My Little Favourite DIY and hosted by Jess of Bakericious

Friday, August 14, 2015

京都排骨 Peking Ribs

This is another finger licking good braised pork ribs! The ribs are marinated before coating with flour followed by deep frying till golden brown and cooked through. Thereafter it is then dunked into the prepared sauce and cook briefly till well coated and sticky. Complicated taste as the sauce consist of chinese dark vinegar, Worcestershire sauce, tomato sauce, plum sauce, soy sauce, chilli oil, sugar....complex right!? But is guaranteed 100% delicious! ^0^


Homemade Peking Sauce

Recipe source : '煮炒酱料大公开' Angela Cheng
Peking Sauce
Ingredient
  • 1 tbsp Zhejiang vinegar
  • 1 tbsp black vinegar
  • 2 tbsp worcestershire sauce
  • 2 tbsp tomato sauce
  • 2 tbsp plum sauce
  • 1 tsp chilli oil
  • 1 tbsp dark soy sauce
  • 1 tbsp brown sugar
  • 100ml water

Method
  1. Combine all the ingredients in a saucepan and bring to boil until sugar is well dissolved. Ready for use.


Peking Ribs
Ingredient
  • 500gm pork ribs (I used soft bones)
  • 1 tbsp brown sugar
  • 1 tbsp lemon juice
  • 3/4 tsp salt
  • 1 tbsp water 
  • 1 tbsp plain flour
  • 1 tbsp potato starch
  • 1/2 cup peking sauce

Method
  1. Rinse and pat dry pork ribs. Marinate with sugar, lemon juice & salt for at least 1 hour.
  2. Combine water, plain flour and potato starch. Mix well with ribs and set aside for 30mins.
  3. Heat some oil in a wok. Deep fry ribs over medium low heat until lightly brown and cooked through. 
  4. Retain 1 tbsp oil in wok, add in peking sauce and bring to boil. Add in ribs and gently mix till well combine and sauce thickens. Dish up and serve.


I'm submitting this post to Cook-Your-Books#26 organized by Joyce of kitchen flavours


This post is linked to the event Little Thumbs Up ~ August 2015 Event Theme : Brown Sugar and Molassses organised by Zoe of Bake for Happy Kids and Doreen of My Little Favourite DIY and hosted by Jess of Bakericious

Sunday, August 9, 2015

Red Velvet Sandwich Cookies

H A P P Y   50th   B I R T H D A Y   S I N G A P O R E !!!

Majulah Singapura!


Creamy & fluffy cream cheese frosting sandwich between two pieces of cake-like texture (soft & slightly chewy) cookie. I've been spotting the red spots icon all around Singapore and it inspires me to decorate this red velvet cookies which resembles the icon. Hahaha but this cookie is one big red dot as the cookie batter spread out quite a lot! 


The cookie taste good on its own, but a little cream over makes it even more irresistible! P.S : I've used a star tip to pipe a a swirl of frosting over the cookies ^.*

Recipe ref : Paula Deen
Ingredient (approx. 14 sandwich cookies)
  • 160gm plain flour
  • 2 tbsp cocoa powder
  • 1 tsp baking powder
  • 1/4 tsp baking soda
  • 1/2 tsp salt
  • 50gm unsalted butter
  • 100gm fine sugar
  • 100gm light brown sugar
  • 2 eggs
  • 2 tbsp buttermilk
  • 2 tsp apple cider vinegar
  • 1 tsp vanilla paste
  • 1/2 tbsp red food colour (paste)
Cream Cheese Frosting
  • 227gm cream cheese
  • 110gm unsalted butter
  • 1 tsp vanilla paste
  • 200gm icing sugar

Method
  1. Sift flour, cocoa powder, baking powder, baking soda and salt in a medium bowl.
  2. Cream butter and sugar until light, for about 3 mins. 
  3. Add in eggs, one at a time, beat till well combined.
  4. Add in buttermilk, vinegar, vanilla and food colouring and beat well.
  5. Add in dry ingredients and fold in thoroughly. Chill the cookie batter in fridge for 30 mins.
  6. Preheat oven to 180 deg cel. Drop batter, 1 tbsp flat scoop (you can use 1/2 tbsp to yield a smaller cookie), onto a lined baking sheet. (cookie will spread a lot, so allow ample space between each cookie).
  7. Bake for 12 mins. Cool for 5 mins before transferring onto a wire rack to cool completely before frosting.
  8. To make frosting : Using a electric whisk, beat cream cheese, butter and vanilla together until smooth. Using low speed, beat in icing sugar. Increase speed to high and beat the mixture until light and fluffy. Spread the cream cheese frosting between 2 cooled cookies. Store in air-tight container, in single layer, and chill in fridge till serve.

How did you spend this long Golden Jubilee Weekends? Did you hop over to the Marina Bay area to view the spectacular fireworks?! This is your last chance to view it tonight if you are happened to be in Singapore :D


This post is linked to the event Little Thumbs Up ~ August 2015 Event Theme : Brown Sugar and Molassses organised by Zoe of Bake for Happy Kids and Doreen of My Little Favourite DIY and hosted by Jess of Bakericious


Saturday, August 8, 2015

Moist Carrot Cake

It's been a very long time I've bake a carrot cake! Since my man happens to bring home a large bag of fresh carrots, I used up some for juicing and some for making this moist carrot cake! Yumz...this moist carrot cake indeed really moist and tender and the spice flavour is not overpowering. I like raisins in the carrot cake therefore I've thrown in some into the cake batter together with the chopped pecans. I've also reduced the brown sugar level slightly and the sweetness turned out just right with the creamy and sweet cream cheese frosting! 


Ingredient
  • 150gm light brown sugar
  • 180ml rice bran oil
  • 60gm plain yogurt
  • 3 large eggs
  • 2 tsp vanilla paste
  • 250gm plain flour
  • 1 tsp baking soda
  • 2 tsp ground cinnamon
  • 1/4 tsp ground nutmeg
  • 1/2 tsp salt
  • 260gm finely grated carrots
  • 2/3 cup raisins
  • 2/3 cup chopped pecans 

Cream Cheese Frosting
  • 227gm cream cheese, softened
  • 110gm unsalted butter, softened
  • 1 tsp vanilla paste
  • 200gm icing sugar

Method
  1. To make the carrot cake : Combine flour, baking soda, spice and salt together.
  2. Using a electric whisk, beat oil and brown sugar till combine.
  3. Add in yogurt and beat for 1 min till thick. Add in eggs, one at a time, beating well after each addition. Mix in vanilla.
  4. Sift in dry ingredients, in batches, using a spatula and fold into the egg mixture until just combine. Do not overmix.
  5. Fold in shredded carrots, raisins and pecans. 
  6. Pour batter into a lined 8" square pan. Bake in preheated oven at 180 deg cel for 40 mins or until a skewer inserted comes out clean. Do not overbake.
  7. Cool cake completely before frosting. Decorate as desired. Keep frosted cake in air-tight container and chill in fridge for up to 5 days.
  8. To make frosting : Using a electric whisk, beat cream cheese, butter and vanilla together until smooth. Using low speed, beat in icing sugar. Increase speed to high and beat the mixture until light and fluffy. 


This post is linked to the event Little Thumbs Up ~ August 2015 Event Theme : Brown Sugar and Molassses organised by Zoe of Bake for Happy Kids and Doreen of My Little Favourite DIY and hosted by Jess of Bakericious

Monday, July 20, 2015

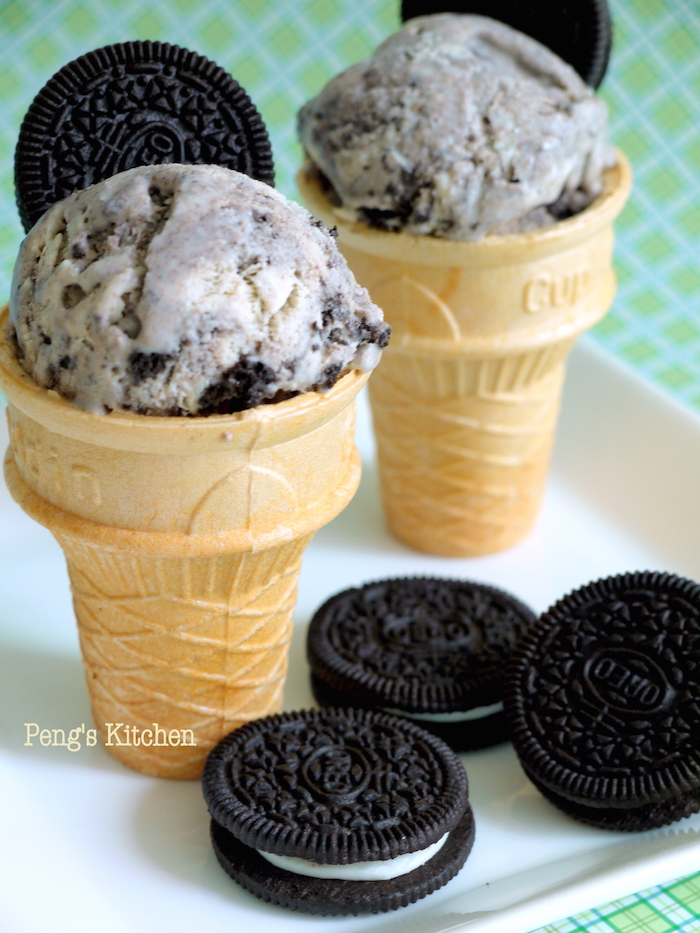
Cake Waffles + Oreo Ice-cream

These waffles are called cake waffles as the preparation of the batter is similar to making a sponge cake. i.e. Beating the eggs and sugar till double in volume, fold in flour and melted butter. The batter is then ladled into heated a waffle maker. The cake waffle (original flavour)  is really fragrant with a rich egg flavour, crisp crust and moist crumbs! I really loved the texture and taste of this cake waffles that I re-create the recipe by adding matcha powder and cocoa powder. Tasted so heavenly with a scoop of homemade oreo ice-cream...thumbs up!


Unlike the convention way of waffle making, this cake waffle batter is not allowed keep in fridge overnight or in room temperature for too long. You need use it immediately if not the waffles will turn out flat.

Ingredient (2 servings)
  • 1 large egg
  • 35gm fine sugar
  • 1/2 tbsp warm milk
  • 50gm cake flour
  • 35gm warm melted butter

Method
  1. Using a electric whisk, beat egg and sugar until double in volume, about 8 mins.
  2. Beat in milk. Sift cake flour into egg mixture and fold till well combined.
  3. Stir in melted butter. Divide batter into 4 portions.
  4. Preheat lightly greased waffle maker for 2-3 mins. Ladle in each portion of batter into waffle maker and cook for 3-5 mins until golden brown. (duration of cooking will depend on the model of your waffle maker)
  5. Serve immediately with fresh fruits, ice-cream or whipped cream.
Green Tea Cake Waffles: 50gm cake flour + 5gm green tea powder
Chocolate Cake Waffles : reduce cake flour to 45gm and add 5gm cocoa powder.


No-Churn Oreo Ice-Cream
Ingredient
  • 600ml double cream
  • 500ml milk
  • 1 can condensed milk
  • 1 cup Oreo cookie crumbs (cream removed)

Method
  1. Using a electric whisk, beat cream till thick and double in volume.
  2. Whisk in milk until well blended.
  3. Fold in cookie crumbs briefly.
  4. Pour mixture into a container, cover and freeze overnight till firm up.

Smooth, creamy homemade Oreo ice-cream without the need of an ice-cream machine. No need to stir the mixture every hour or so to break up the icy crystal! I've actually added more crushed cookie into the mixture, each mouthful you can taste the bits of the cookies! Yum!


This post is linked to the event Little Thumbs Up (July 2015 Event: Tea
and hosted by Cheryl of Baking Taitai

Sunday, July 19, 2015

Herbal Tea Leaves Egg 茶叶蛋

This herbal tea leaves egg is a simple dish which I prepare quite often at home as the big kid and small kids simply love eggs! One carton of 12 eggs usually disappear very fast that my hubby ask me to buy a big tray of 30 eggs instead >.<


Ingredients for the spice broth : Chinese tea leaves, rock sugar, star anise, liquorice root

Boil the broth for a while before adding in tea leaves and hardboiled egg and continue to simmer for another 1 hour or more.

Love the marbling on the eggs!


Ingredient
  • 12 large eggs
  • 1 tbsp salt
  • 30gm Chinese tea leaves
Spice
  • 5 pcs star anise
  • 5gm liquorice root
  • 120ml light soy sauce
  • 1 tbsp dark soy sauce
  • 50gm crushed rock sugar
  • 1200ml water

Method
  1. Wash and clean eggs thoroughly. Place the eggs into a pot together with salt. Add water enough to submerge all the eggs. 
  2. Bring to boil and lower heat, simmer for 5 mins and remove from heat. Transfer eggs into a bowl of icy cold water to stop the cooking process.
  3. When the eggs have cooled completely, lightly crack the shells with the back of a metal spoon.
  4. Combine spices and water in a pot and bring to boil for 5 mins. 
  5. Add in eggs and tea leaves, bring to boil again. Cover and simmer on low heat for 1 hour.
  6. Turn off heat and continue to steep the eggs for at least 30mins, with lid on. Serve warm or at room temperature.
Note : For unfinished portion, remove the eggs from the broth and keep in a air-tight container. Strain the broth, discard the tea leaves. Keep the broth in another separate container. Keep both containers in fridge. To serve, take some eggs and place in a heatproof bowl. Ladle some broth over. Cover the bowl and microwave for 3-5 mins until heated through. Best consume within 3 days.


This post is linked to the event Little Thumbs Up (July 2015 Event: Tea
and hosted by Cheryl of Baking Taitai
Related Posts with Thumbnails