Wednesday, June 28, 2017

Teochew Bak Kut Teh 潮州肉骨茶

What a scrumptious spread! Actually is very simple to get this set meal done! I always prefer Teochew Bak Kut Teh which has a garlicky and peppery soup base unlike the dark version (Hokkien version) which is made with herbal soup base. To prepare a pot of peppery Teochew bak kut teh, you just need a large amount of fresh garlic, white peppercorns and fresh pork ribs, that's simple! After the soup base is done, you can add in whatever ingredients you like e.g., sliced pork loin, pork liver, pork stomach etc....


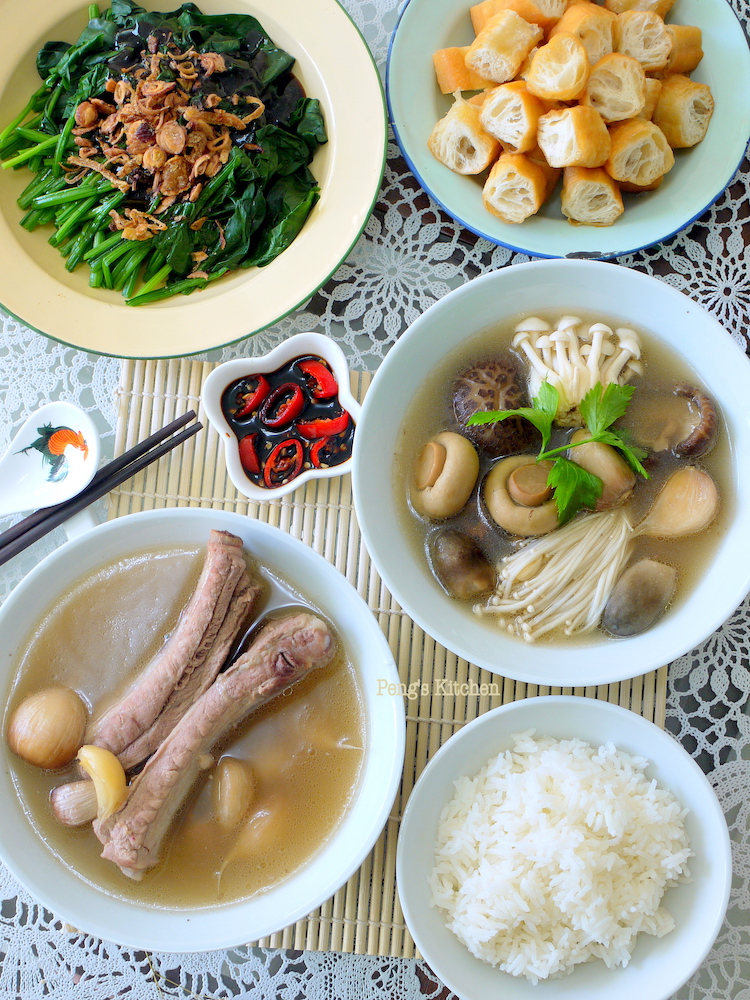
Ignore the homemade smoked black garlic hahaha....I tried adding some of the black garlic in the soup but it did not turn out well. After smoking the garlic, the garlicky fragrant actually  diminish significantly. So is not an ideal substitution to make this Teochew bak kut teh. 


Ingredient
  • 1 kg pork bones
  • 2 kg pork prime ribs
  • 4 whole bulbs of garlic
  • 50gm white peppercorns
  • salt to taste
  • 3L water
Method
  1. Place the white peppercorns in a dry pan and fry till fragrant. Cool the peppercorns and lightly crushed with a mortar.  Place the crushed peppercorns in a muslin bag.
  2. Blanch the pork bones and ribs in boiling water. Rinse well.
  3. Place the blanched pork bones, whole garlic and peppercorns in a stock pot. Add in water and bring to boil. Reduce heat to medium and simmer for 1 hour.
  4. Add in blanched pork ribs and salt. (at this point you may like to remove the bag of peppercorns if its too spicy) Continue to simmer for another 1 hour.
  5. Serve hot with rice and side dishes if desired.


Monday, June 26, 2017

Teo Chew Png Kueh 潮州饭粿

My mini version Teochew Png Kueh which is a nice portion for kids! Gosh I spent almost the whole morning just to make this batch! *sweat* Not the perfect looking "kueh" but I'm satisfy with the taste. The filling tasted great which can be eaten on its own! The "skin" can be further improved though....


Not a simple task to prepare this Png Kueh. All ingredients have to be chopped finely. ^-^"" The glutinous rice have to be soaked overnight. On the day itself the grain is steamed briefly, followed then fried the ingredients and mix with the steamed rice and finally steamed everything together again. 


recipe ref from annieliciousfood
Ingredient

Dough
  • 400gm rice flour
  • 80gm tapioca flour
  • 1 tbsp fine sugar
  • 560ml hot boiling water
  • 1/2 tsp salt
  • 2 tbsp oil
Glutinous rice filling
  • 300gm glutinous rice, soaked overnight
  • 60gm dried Chinese mushroom, softened
  • 25gm dried shrimps, soaked till soften
  • 12 shallots
  • 1 can braised peanuts 
Seasoning
  • 1 tbsp oyster sauce
  • 1/2 tsp sesame oil
  • 3 tbsp light soy sauce
  • 1.5 tsp sugar
  • 1/2 tsp salt
  • 1.5 tsp pepper
  • 6 tbsp water
While the filling is cooling down, prepare the dough! 

To cook the filling :
  1. Chop the shrimps and shallots finely. Cut mushroom into small pieces.
  2. Drain soaked glutinous rice, place on a large plate and steam for 25 mins. Sprinkle some water over the rice every 10 mins steaming interim. Set aside.
  3. Heat 4 tbsp oil in a hot wok. Saute shallots and dried shrimps over low heat until fragrant.
  4. Add in mushroom and fry briefly until heated through.
  5. Add in steamed glutinous rice and fry over low heat. Use the frying spatula to break up any lumpy glutinous rice.
  6. Pour in seasoning and stir well to mix. Add in braised peanuts and mix well.
  7. Transfer the glutinous rice mixture to a steamer and steam for another 10mins. Remove from steamer and leave to cool before wrapping.

As I'm using a mini mould, is rather tricky to get a nice proportion of filling and dough. 

To prepare the dough :
  1. Combine rice flour, tapioca flour, sugar and salt in a large mixing bowl. Mix well.
  2. Add in hot boiling water and oil into the flour mixture in two intervals. Stir the mixture with a wooden spoon till a rough dough is formed. Add in red food colouring and mix into the dough. 
  3. Knead the dough with both palm until the dough is smooth and pliable. 
  4. Divide the dough into small portions (30gm), cover it with damp cloth to prevent the dough from drying. 

Wrapping and Steaming the Dumpling : 
  1. Form the dough into ball shape then flatten it. Spoon in some glutinous rice filling (30gm) and wrap up. Seal the edge firmly.
  2. Put the wrapped dumpling into the mould and press if firmly then invert the dumpling. 
  3. Place the dumplings on a greased steaming plate. 
  4. Steam the dumplings over medium low heat for 10mins or until it is cooked. Cool down the dumplings slightly and brush some cooking oil over to prevent them from sticking to each other. 
  5. Serve the dumpling hot from the steamer or pan fry till crisp. 

After hours of messy and tiring work, is finally ready! 


Wednesday, June 21, 2017

Mini High Tea Set : Honey Theme

This is the first time I've attempted a mini high tea so that I can make use of my newly bought 2 tier display tray from Ikea...hahaha...pretty isn't it? Back to the snacks and dessert I've prepared, the common ingredient for each item is the Huiji honey I've incorporated!  Huiji honey is made from natural raw honey and infused with jasmine flower scents. My whole kitchen is bursting with lovely sweet honey fragrant while baking in process! 


Light and refreshing Honey Lemon Konnyaku to enjoy in this hot weather! 

Honey Lemon Konnyaku
Ingredient
  • 10gm konnyaku powder
  • 200gm fine sugar
  • 850ml water
  • 50gm honey
  • 50gm fresh lemon juice
Method
  1. Combine konnyaku powder and sugar together till well incorporated. Bring water to boil. Gradually add in konnyaku mixture into boiling water, stirring at the same time. Cook the mixture for 5 mins. 
  2. Turn off heat. Add in honey and lemon juice. Stir well till honey is dissolved. 
  3. Pour the mixture into jelly mould to set. Serve chill. 
Nobody can resist this Honey Mustard Mini Sausage Roll! Its so simple to prepare with ready rolled puff pastry sheet, some good quality sausages, dijon mustard and of course Huiji Honey! 

Honey Mustard Mini Sausage Roll
Ingredient (12 mini rolls)
  • 1 sheet frozen puff pastry
  • 1 tbsp honey
  • 1 tbsp dijon mustard
  • 4 good quality pork sausages
  • 1 egg, lightly beaten
Method
  1. Cut the puff pastry into 4 equal squares. Whisk honey and dijon mustard together. Brush the mixture over the puff pastry, leaving a 1 cm gap at one edge. 
  2. Place a sausage on each pastry square. Roll up the pastry encasing the sausage, seal the edge with egg wash. You will get 4 sausage roll. Slice each roll into 3 small portions. 
  3. Place the cut portions, seam sides down on a lined baking sheet. Make two scores on each small roll. Brush egg wash. Sprinkle some black pepper over. 
  4. Bake in preheated oven at 220 deg cel for 25 mins until crisp and golden brown.
Buttery and melty tart base with sweet nutty filling! Yummylicous! 

Ingredient (11 small tarts)

Sweet Pastry Crust
  • 75gm unsalted butter
  • 35gm icing sugar
  • pinch of salt
  • 1 tsp vanilla extract
  • 25gm beaten egg
  • 25gm ground almonds
  • 125gm plain flour
Fillings
  • 10gm unsalted butter
  • 1 tbsp fine sugar
  • 4 tbsp honey
  • 1 sprig thyme leaves
  • 1 egg, lightly beaten
  • 1 tsp vanilla extract
  • 100gm pine nuts

Method
  1. Prepare the tart base : Cream butter, icing sugar and salt till creamy. Beat in egg and vanilla. Add in ground almond and plain flour and beat till mixture just incorporated. Use a spatula to fold the mixture together to form a soft dough. Gather the dough into a ball and place in a ziplog bag. Flatten the dough into a round disc. Chill in fridge for 30 mins. 
  2. Roll out the dough to about 0.5cm thick. Cut out the dough using a round cutter. Press the dough into tart tins, prick the base with fork. Blind bake at 180 deg cel for 12 mins. Set aside to cool down.
  3. Meanwhile prepare the fillings. Combine butter, sugar, honey and thyme leave in a small saucepan. Simmer over low heat till butter and sugar is well dissolved. Set aside to cool down before adding in egg and vanilla. Stir in pine nuts.
  4. Scoop the pine nut mixture evenly over the tart base. Return to oven and bake at 180 deg cel for 15 mins until the filling is set and golden brown. 


Monday, June 19, 2017

Honey Apple Cake

Tea anyone? Super love this apple cake which infused with lovely honey flavour! This is not a sponge cake or rich butter cake. Its more like a pudding cake with layers of thinly sliced apples enveloped in custard batter. A quick easy cake to assemble except for the slicing and layering of the apples. ^0^ Luckily I tossed the apple slices in some lemon juice if not by the time I layered the apples in the pan all oxidises hahaha...


Ingredient
  • 4 red apples
  • 1 lemon juice, optional
  • 5 tbsp plain flour, sifted
  • 3 tbsp fine sugar 
  • 5 tbsp olive oil
  • 1 tsp baking powder
  • 4 large eggs
  • 2/3 cup honey
Method
  1. Peel and core the apples. Slice thinly and toss in lemon juice. Arrange the apple slices in a lined 8" loose based pan.
  2. Combine flour, sugar, baking powder, olive oil and 2 eggs in a mixing bowl. Whisk till smooth.
  3. Pour the batter over the apples. Bake in preheated oven at 180 deg cel for 30 mins. Remove pan from oven and increase oven temperature to 220 deg cel.
  4. Whisk 2 eggs and honey together till well incorporated. Pour the mixture over the cake and continue to bake for another 20-25 mins until golden brown and a skewer inserted comes out clean. Serve warm or cold.


Sunday, June 18, 2017

Herman Focaccia

Still exploring various ways of using my herman starter which I need to harvest it weekly. Guess is time for me to take a break with this herman starter for the coming weeks as I will be busier with new school term starting! Besides this herman focaccia I'm sharing today, I've attempted several recipes using herman starter which turned out well. I will slowly share it on my blog if time permits. Meanwhile let's enjoy these two lovely herman focaccia : Rosemary & Garlic Focaccia and Cheese & Onion Focaccia!  


Soft & fluffy crumbs!

Hearty focaccia served along with creamy mushroom soup!

Proofing overnight till double in bulk

Ingredient
  • 1 cup herman starter
  • 1.5 cups water
  • 2 tbsp olive oil
  • 1.5 tsp sea salt
  • 500gm bread flour
toppings for Rosemary & Garlic Focaccia :
  • 1 tbsp fresh rosemary, finely chopped
  • 3 cloves garlic, finely chopped
  • 1 tbsp parmesan cheese
  • 1 tbsp olive oil
  • salt 
toppings for Onion & Cheese Focaccia :
  • 1 small onion, thinly sliced
  • 1/4 cup grated cheddar cheese
  • 1 tbsp olive oil
  • black pepper
  • salt

Method
  1. Combine herman starter, water, salt and olive oil in a large mixing bowl. Add flour and mix with a spatula until a soft dough is formed. Fold the soft dough for a few minutes. The dough will be sticky. Cover the bowl with a damp cloth and allow it to ferment for at least 12 hours or until doubled in bulk.
  2. Lined 2 baking sheet. Carefully divide the dough into 2 portions. Turn the dough out onto each baking sheet. Spread out the dough gently by pressing the dough. Floured your hands for eased of handling as the dough may be sticky. Use your fingers to create indentations on top of the dough.
  3. Drizzle tbsp of olive oil and sprinkle the toppings over. Let the dough rest for 30 mins.
  4. Bake in preheated oven at 220 deg cel for 25-30 mins until golden brown. Serve warm.


Thursday, June 15, 2017

Ipoh Beansprout Chicken 芽菜鸡

"Where's the ginger sauce?" exclaimed my the other half. *Ahem* "This is 芽菜鸡 Ipoh style, not Hainanese style lah!" I answered. ^0^" Everyone enjoyed this light and hearty meal I've prepared. My girl even commented the chicken tasted just the like restaurant one...I'm flattered! hahaha...To be truth , the chicken is indeed tender and smooth. Give the recipe a try, I'm sure your family would love this dish as much as we do!


Use kampong chicken instead of the normal farmed chicken. The meat texture is more firm and sweeter. After poaching and cold-water shocking the chicken, I carefully deboned the meat and plate it. The carcass?....not wasted. I've returned it to the pot of broth, together with some dried anchovies, spring onion and parsley roots, and boiled for another 1 hour for a light and tasty soup base for the rice noodles.


Ingredient
  • 1 kampong chicken
  • 1.5 tsp salt
  • 6 slices ginger
  • 6 stalks spring onion
  • 1 chicken carcass
  • 1/4 cup dried anchovies, rinsed
  • 300gm thick rice noodle
  • 320gm beansprouts, trimmed
Gravy
  • 6 tsp oyster sauce
  • 5 tbsp light soy sauce
  • 1 tsp fine sugar
  • 1 cup chicken stock
  • 1 tsp sesame oil
  • dash of pepper
Garnishing : spring onion, chinese parsley, red chilli, cucumber

Method
  1. Trim away excess fats from the chicken. Rinse and pat dry. Rub salt all over chicken and let it sit for 30 mins. Stuff ginger and spring onion into the chicken cavity. Bring a pot of water about 2.5L, enough to submerge the whole chicken, to boil. Slowly add in chicken, cover pot, let it cook over medium high heat for 10 mins. Turn off heat and let the chicken steep in the pot for 30mins. Do not open the cover!
  2. Prepare a pot of icy cold water. Transfer the chicken from the hot pot and place it into the cold water, for 30 mins. 
  3. Bring the chicken stock to boil. Add in chicken carcass and dried anchovies and simmer for one hour. Season with salt and pepper to taste. Blanch the beansprouts in the chicken stock. I prefer to blanch the thick rice noodle separately in another saucepan.
  4. Meanwhile prepare the gravy. Combine all the ingredients in a small saucepan and bring to a simmer. 
  5. Remove the chicken from the cold water and drain well. Cut it up and place it on a serving plate. Drizzle the prepared gravy over the chicken and beansprouts. Divide the blanched rice noodle into individual serving bowl. Ladle in prepared chicken broth. Serve immediately. 


Tuesday, June 13, 2017

Marmite Oyster Mee Sua


This is a really simple and straight forward noodle dish to prepare!! Get ready a good pot of simple homemade chicken stock (make in advance or prepare on the day itself) and the dish will be done in minutes! I decided to give it a twist by adding some marmite to the gravy for an extra umami flavour. Wow the marmite really goes well with in this savoury oyster mee sua! The vinegar taste is still the primary flavour with hint of marmite...absolutely delicious!  


Ingredient
  • 5 bundles mee sua
  • 2 chicken breast, cooked and shredded
  • 350gm frozen oysters
  • garnishing : fried shallots, Chinese parsley, chilli

 Marmite Oyster Gravy
  • 4 cups homemade chicken stock
  • 2 stalk spring onion, cut into sections
  • 3 slices ginger 
  • 3 cloves garlic, finely minced
  • 2 tbsp Chinese cooking wine
  • 2 tbsp marmite
  • 3 tbsp light soy sauce
  • 1 tbsp dark soy sauce
  • 2 tbsp oyster sauce
  • 3 tbsp dark vinegar
  • dash of pepper
  • 3 tbsp sweet potato starch, dissolved in 2 tbsp water


Method
  1. Thaw oysters and drain the liquid. Do not rinse the oyster. Coat the oyster with 1 tbsp corn flour, mix well. Bring a pot of water to boil. Add oyster and blanch briefly. Reserve 1 cup of the broth. Remove oysters and place into a bowl of icy cold water. Set aside.
  2. Heat 2 tbsp oil in a pot. Add spring onion and ginger. Saute till fragrant. Add in reserved oyster broth and chicken stock. Bring to boil.
  3. Add in all seasoning. Adjust taste if desire. Gradually drizzle in starch solution and stirring at the same time. Simmer till gravy thickens. Turn off heat.
  4. To serve : blanch mee sua in boiling water. Divide mee sua among 4 serving bowls. Ladle in gravy. Top with blanched oyster and shredded chicken. Garnish with parsley and fried shallots. Drizzle in more dark vinegar if desired, serve immediately!


Saturday, June 10, 2017

Potato & Pumpkin Marmite Gratin

This is another dish infused with marmite! Marmite...either you hate it or love it! You belong to which group? ^0^ Personally we really enjoyed this light and creamy dish. 


Ingredient
  • 350gm potatoes
  • 200gm pumpkin
  • 2 tbsp unsalted butter
  • 2 tbsp plain flour
  • 1.5 cups fresh milk
  • 1/2 tsp fresh thymes
  • 1/2 tsp black pepper
  • 2 tsp marmite
  • 1 tsp chicken seasoning powder


Method
  1. Peel and slice potato and pumpkin thinly. Arrange them in a oven proof casserole.
  2. Melt butter in a pan. Add flour and fry over low heat till lightly brown for about 5 mins. Pour in milk, stirring at the same time, and bring to a simmer.
  3. Add in thyme, pepper, marmite and seasoning powder. Cook over low heat till sauce thickens, for about 5 mins. 
  4. Pour the marmite roux over sliced potato and pumpkin. Bake in preheated oven at 180 deg cel for 35-40 mins. 


Related Posts with Thumbnails