Showing posts with label Cook Your Books. Show all posts

Tuesday, August 25, 2015

Minced Chicken Curry Rice

A sudden downpour in the afternoon helps to cool down the weather slightly. Let's has a plate of hearty and spicy minced chicken curry rice for dinner! No preparation of rempah is required and minced chicken is used in this recipe, so it won't take too long to cook. Fast, simple and delicious dish which I like. :D 


Recipe ref : Famous Cuisine Feb 2012
Ingredient
  • 400gm minced chicken
  • 1 large potato, peeled and diced
  • 1 large onion, peeled and diced
  • 1 lemongrass, (white ends) finely chopped
  • 1 sprig curry leaf
  • 1 cinnamon
  • 2 cardamons
  • 1 star anise
  • 2 tbsp chicken curry powder
  • 1/2 tbsp chilli boh (I've reduced to suit my kids)
  • 2 cloves garlic, chopped
  • thumb sized ginger, chopped
  • 300ml water
Marinade :
  • 1 tsp turmeric powder
  • 1 tbsp oil
  • 2 tsp pepper
  • 1/2 tsp salt
Seasoning :
  • 1/4 tsp salt
  • 1 tsp chicken stock powder
  • 1 tsp sugar
  • 1 tbsp grated coconut, toasted

Method
  1. Combine minced chicken with marinade and set aside for at least 20 mins.
  2. Heat 3 tbsp oil in wok. Saute garlic and garlic over low heat until fragrant.
  3. Add in curry leaves, lemongrass, onion, cinnamon, cardamons & star anise, stir-fry until aromatic.
  4. Add in marinated minced chicken, potatoes, curry powder and chilli boh. Stir fry for 5 mins until chicken meat turn white. Add water and bring to boil.
  5. Cover, simmer on medium heat for 25 mins. Add in seasoning and mix well. Cook for another 2-3 mins till thickens. Remove from heat and serve with hot rice.

I'm submitting this post to Cook-Your-Books#26 organized by Joyce of kitchen flavours


Friday, August 14, 2015

京都排骨 Peking Ribs

This is another finger licking good braised pork ribs! The ribs are marinated before coating with flour followed by deep frying till golden brown and cooked through. Thereafter it is then dunked into the prepared sauce and cook briefly till well coated and sticky. Complicated taste as the sauce consist of chinese dark vinegar, Worcestershire sauce, tomato sauce, plum sauce, soy sauce, chilli oil, sugar....complex right!? But is guaranteed 100% delicious! ^0^


Homemade Peking Sauce

Recipe source : '煮炒酱料大公开' Angela Cheng
Peking Sauce
Ingredient
  • 1 tbsp Zhejiang vinegar
  • 1 tbsp black vinegar
  • 2 tbsp worcestershire sauce
  • 2 tbsp tomato sauce
  • 2 tbsp plum sauce
  • 1 tsp chilli oil
  • 1 tbsp dark soy sauce
  • 1 tbsp brown sugar
  • 100ml water

Method
  1. Combine all the ingredients in a saucepan and bring to boil until sugar is well dissolved. Ready for use.


Peking Ribs
Ingredient
  • 500gm pork ribs (I used soft bones)
  • 1 tbsp brown sugar
  • 1 tbsp lemon juice
  • 3/4 tsp salt
  • 1 tbsp water 
  • 1 tbsp plain flour
  • 1 tbsp potato starch
  • 1/2 cup peking sauce

Method
  1. Rinse and pat dry pork ribs. Marinate with sugar, lemon juice & salt for at least 1 hour.
  2. Combine water, plain flour and potato starch. Mix well with ribs and set aside for 30mins.
  3. Heat some oil in a wok. Deep fry ribs over medium low heat until lightly brown and cooked through. 
  4. Retain 1 tbsp oil in wok, add in peking sauce and bring to boil. Add in ribs and gently mix till well combine and sauce thickens. Dish up and serve.


I'm submitting this post to Cook-Your-Books#26 organized by Joyce of kitchen flavours


This post is linked to the event Little Thumbs Up ~ August 2015 Event Theme : Brown Sugar and Molassses organised by Zoe of Bake for Happy Kids and Doreen of My Little Favourite DIY and hosted by Jess of Bakericious

Friday, July 24, 2015

Vegan Patties Burger

Who say eating healthy and meat-free diet is boring and bland? This moreish vegan patty is awfully delicious and filling at the same time. Herbs and spices, Tahini paste, low sodium soy sauce and sweet medjool dates added helps to flavour up this vegan patties, no salt or sugar is needed. To make it healthier the patties are baked instead of frying. With extra effort, I've baked some sweet potato buns to sandwich this yummy vegan patties. Sounds great right?


Ingredients for making the Vegan Patties : mixed grains, rolled oats, cannellini beans, medjool dates, portobello mushroom

After shaping and baking

Vegan Patties
Ingredient
  • 6 big portobello mushroom, roughly chopped
  • 1 tbsp fresh thyme leaves
  • 400gm tin of cannellini beans, drained well
  • 4 medjool dates, pitted
  • 2 cloves garlic, finely chopped
  • small bunch of fresh parsley, finely chopped
  • 2 tbsp tahini
  • 2 tbsp low sodium light soy sauce
  • 200gm brown rice, cooked and cooled
  • 50gm rolled oats
  • zest of 1 large lemon
Toppings :
  • homemade sweet potatoes bun, halved & toasted
  • avocado, mashed
  • cheese slices
  • tomato slices
  • red cabbage, sliced
  • lettuce, shredded
  • chilli sauce

Method
  1. Heat 1 tbsp olive oil in a pan. Add mushroom and thyme. Fry until the mushroom have dried out and lightly browned. Season with some salt and pepper. Remove from pan and set aside to cool.
  2. Place cannellini, dates, garlic, parsley, tahini and soy sauce in a food processor. Process mixture till smooth. Transfer the mixture into a mixing bowl.
  3. Add rice, oats, zests and cooled mushrooms into beans mixture. Mix well and chill in fridge for 30mins to firm up.
  4. Divide mixture into 8 equal portions and shape into patties. Place them on a lined baking tray. 
  5. Bake in preheated oven at 230deg cel for 15 mins until nicely brown.
  6. To serve : Spread toasted sweet potatoes buns with mashed avocado, layer with tomato slice, red cabbage, lettuce, vegan patties and cheese slices.


After layering with mashed avocado, fresh lettuce, tomatoes, cheese, red cabbage, it became a whoopie 5" tall Vegan Burger! ^0^

Homemade Sweet Potato Buns


Recipe ref: 'Original Flavour' by Carol
Ingredient
  • 150gm orange sweet potato, wgt after steaming
  • 250gm bread flour
  • 50gm wholemeal flour
  • 1 tsp instant yeast
  • 20gm sugar
  • 1/4 tsp salt
  • 1 tbsp olive oil
  • 150ml unsweetened soy milk (need not use up all)
  • white sesame seeds

Method
  1. Mash steamed sweet potato while its still hot. Cool down before using.
  2. Combine all ingredients into a mixing bowl. (Reserve 50ml milk)
  3. Knead till dough is smooth and elastic. Add more milk if dough is too dry.
  4. Cover the dough with cling wrap and place in a warm place. Proof till double in bulk for about 1 hour.
  5. Lightly punch down dough to release gas. Knead lightly on a floured surface.
  6. Divide dough into 8 equal portions. Shape into round shape. Place onto lined baking sheet.
  7. Cover and let it to proof for another 50-60 mins.
  8. Lightly brush surface with water. Sprinkle white sesame seeds over. 
  9. Bake in preheated oven at 180 deg cel for 20-25 mins.
  10. Remove buns from oven and cool completely on wire rack.


Cook Your Books #24 by Kitchen Flavours

Thursday, July 9, 2015

Milk Tea Cupcakes

Which cuppa of tea you prefer, Teh-O, Teh-Si or Teh Si Sui-Dai? hehehe Most of the time I will order my favourite milk tea with less sugar i.e.. Teh Si Sui-Dai. If you are a tea lover, you should like this fusion cupcake which infuse with milk tea flavour, and serve along a cup of   Kopi-Oh or Teh-O. 


Ingredient
  • 1 Lipton black tea bag
  • 50ml boiling water
  • 2 tbsp milk
  • 2 tbsp evaporated milk
  • 60gm unsalted butter
  • 50gm brown sugar
  • 1 egg, lightly beaten
  • pinch of salt
  • 1/4 tsp ground cinnamon
  • 75gm self-raising flour
  • 100ml whipping cream
  • 1/4 tsp ground cinnamon + 1 tsp sugar

Method
  1. Place teabag in boiling water and steep for 10 mins. Remove teabag and add in both milk.
  2. Cream butter and sugar until light and creamy.
  3. Beat in egg until well combine. Add in salt and cinnamon.
  4. Beat in flour, alternate with milk mixture, until a smooth and thick batter is formed.
  5. Spoon batter into lined muffin pan. Bake in preheated oven at 180 deg cel for 25 mins or until a skewer inserted comes out clean.
  6. Cool completely before frosting.
  7. Beat whipping cream on high speed until firm peak form. Spread or pipe cream over cooled cupcakes and sprinkle cinnamon sugar over. 
Recipe source : Good Food Magazine Jul 2012
This post is linked to the event Little Thumbs Up (July 2015 Event: Tea
and hosted by Cheryl of Baking Taitai

Tuesday, July 7, 2015

Little Bunny Cookies

Hop...hop..hop....! Here comes the bouncy bunny! ^0^

The making of this bunny cookie was slightly more complex than the little piggy cookies. I was worrying that I would squash the face of the bunny while shaping the log....hahaha luckily they all turned out quite cute looking.

Ingredient (approx. 20 cookies)
  • 70gm unsalted butter
  • 50gm icing sugar
  • 25gm beaten egg
  • 1/2 tsp vanilla paste
  • 1/2 tsp baking powder
  • 140gm cake flour
  • 10gm milk powder
  • 8gm cocoa powder
  • 1 tsp red yeast powder

Method
  1. Cream butter and sugar until light and pale. 
  2. Beat in egg and vanilla till well combined.
  3. Sift in baking powder, cake flour and milk powder and mix till a smooth dough is formed.
  4. Divide dough in 160gm and 140gm. Add 8gm cocoa powder into 160gm dough. Sub-divide cocoa dough into 20gm and 150gm. (approx.) Fig. 1 Chill dough for 15-30 mins.
  5. Add 1 tsp red yeast powder into 140gm dough. Sub-divide the red yeast dough into 20gm x 2 and 100gm. (approx.) Fig. 1 Chill dough for 15-30 mins.
  6. Roll the 20gm cocoa and red yeast dough into 15cm rope. Fig. 2 
  7. Sandwich the cooca dough between the red yeast dough. Fig. 3
  8. Shape the 100gm red yeast dough into a 15cm long square. Fig. 4
  9. Stack up step (7) on top the step 8 dough. Fig. 5 Chill till firm.
  10. Roll out 150gm cocoa dough into a 15cm x 14cm rectangle. Fig. 6
  11. Place the stacked up dough (step 9) over the centre of the cocoa dough. Fig. 7 Enclose both sides to seal up the log. Freeze for at least 1 hour till firm enough to slice.
  12. Slice the cookie log into 0.5mm slices. Fig. 8 approx. 20 pieces. Place the cut cookies on a lined baking sheet. 
  13. Bake in preheated oven at 180 deg cel for 20 mins until lightly brown at the edge.
  14. Cool completely on wire rack before storing. (use edible food marker to draw the eyes and mouth)
Recipe ref : 小本廚房的手繪幸福餅乾

Before baking....

After baking...

It looked cute and tasty too, crunchy and chocolatey at the same time.


Monday, July 6, 2015

Little Piggy Cookies

Oink oink! Here comes the little piggies ^0^

Plain dough for the face, tinted dough for ears and mouth. 

Actually is not that complicated to make, just involve a few tedious steps. As the dough is rather soft,   it requires chilling to firm up the dough before any shaping/moulding.

Ingredient (approx. 20 pcs)
  • 70gm unsalted butter
  • 50gm icing sugar
  • 25gm beaten egg
  • 1/2 tsp vanilla paste
  • 1/2 tsp baking powder
  • 140gm cake flour
  • 10gm milk powder
  • 1 tsp red yeast powder

Method
  1. Cream butter and sugar until light and pale. 
  2. Beat in egg and vanilla till well combined.
  3. Sift in baking powder, cake flour and milk powder and mix till a smooth dough is formed.
  4. Divide dough in 200gm and 100gm. Cling wrap the plain 200gm dough and chill in fridge.
  5. Add 1 tsp red yeast powder into the 100gm dough and mix well. Sub-divide the dough into 60gm, 20gm x 2. Roll into 15cm rope. Shape the 20gm x 2 rope into triangle shape, this is the ear. Fig. 1 Cling wrap and chill them in fridge till hard.
  6. Roll out the plain dough into 15cm x 10cm rectangle. Fig.2 
  7. Place the 60gm coloured dough over the rectangle dough and roll up. Fig. 3 & 4
  8. Press down the 2 triangle rope over the top of the rolled dough. Fig. 5 Cling wrap and freeze the log in freezer for 1 hour until hard.
  9. Slice the cookie log into 0.5mm slices. Fig. 6 Place the cut cookies on a lined baking sheet. 
  10. Bake in preheated oven at 180 deg cel for 15-20 mins until lightly brown at the edge.
  11. Cool completely on wire rack before storing. (use edible food marker to draw the eyes and nose)
Recipe ref : 小本廚房的手繪幸福餅乾


Thursday, June 25, 2015

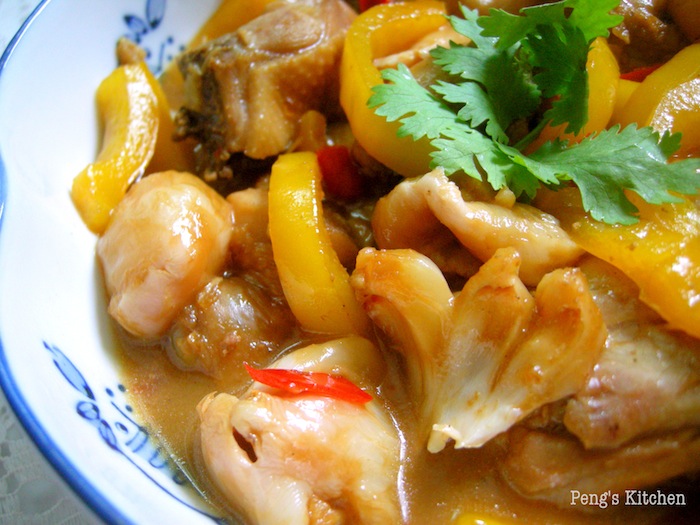
Braised Chicken with Lychees & Capsicum

Oooh lychee season is here again! It reminds me of a recipe which has been in my draft, it is time to share with you this delicious braised chicken dish which incorporate with lychee! Instead of using fresh lychees, canned lychees is used as some of the sweet lychee syrup is needed for the braising sauce. I've used boneless chicken thigh meat as it is more tender and cook really fast too.  Yummilcious to go along with a bowl of warm rice! 


Recipe ref : Good Food Mag Apr 2013
Ingredient
  • 450gm boneless chicken thigh
  • 4 tbsp oil
  • 1 tbsp minced garlic
  • 1 canned lychee, reserved 120ml syrup
  • 80ml water
  • 1 small yellow capsicum, sliced
  • 1 red chill, chopped
Marinade for chicken
  • 1 tsp salt
  • 1/2 tsp pepper
  • 2 tbsp light soy sauce
  • 2 tbsp chinese wine
  • 1 tsp chicken stock powder
Seasoning
  • 1/2 tsp salt
  • 1 tbsp dark soy sauce
  • 1/2 tsp pepper

Method
  1. Cut the chicken thigh into bite sizes. Marinate for 30mins. (I chill it overnight)
  2. Heat oil in wok and sauté garlic.
  3. Add in chicken pieces and fry over high heat until browned.
  4. Add in lychees and toss well.
  5. Pour in water and lychee syrup. Add in seasoning. Cover and simmer for 10 mins.
  6. Remove the lid, add in capsicum and red chilli and toss briefly. Dish up and serve.


Cook Your Books #24 by Kitchen Flavours

Thursday, June 18, 2015

Cherry Cheesecake

I love making non-bake cheesecake as they are easy to assemble and my kids adore it as they think it tasted just like ice-cream. Usually for non-bake cheesecake it requires setting agent like gelatine to firm up the texture. But for this particular recipe from Nigella Lawson, no gelatine is needed! This cherry cheesecake tasted really like ice-cream hehehe....soft and creamy texture with sweet cherry topping!


The easy way out by using ready canned cherry topping. After the cheesecake is well set in fridge, spread on the cherry topping and piped simple patterns along the edge using fresh cream.

oops I was too anxious to slice up the cake therefore the centre was not really well set yet :D 

Recipe ref : Nigella Express
Ingredient
  • 125gm digestive biscuits crumbs
  • 75gm melted butter
  • 250gm cream cheese
  • 60gm icing sugar
  • 1 tsp vanilla extract
  • 1 tbsp lemon juice
  • 300ml thickened cream
  • 300gm cherry pie filling (or cherry conserve)

Method
  1. Blitz the biscuits in a food processor until beginning to turn to crumbs, then add the butter and whiz again to make the mixture clump.
  2. Press this mixture into a 20cm / 8 inch springform tin; press a little up the sides to form a slight ridge.
  3. Beat together the cream cheese, icing sugar, vanilla extract and lemon juice in a bowl until smooth.
  4. Lightly whip the double cream, and then fold it into the cream cheese mixture.
  5. Spoon the cheesecake filling on top of the biscuit base and smooth with a spatula. Put it in the fridge for 3 hours or overnight.
  6. When you are ready to serve the cheesecake, unmould it and spread the black cherry over the top.

Cook Your Books #24 by Kitchen Flavours

This post is linked to the event, Little Thumbs Up organised by Bake for Happy Kids and My Little Favourite DIY, and hosted by Diana from the Domestic Goddess Wannabe

Friday, June 12, 2015

Steamed Cabbage Cake

I've done steamed yam cake and radish cake, and this is the first time I come across this steamed cabbage cake! Surprisingly it turned out really tasty as the texture is not too soft nor stiff. Tasted quite similar to steamed radish cake, but I find this steamed cabbage cake tasted much more sweeter as daikon radish usually gives a bitter after taste. Even my kids love this steamed cabbage cake and we have this for lunch and the leftovers,  I pan-fried it till crisp and golden for breakfast the next day!


The ingredients : rice flour, potato starch, dried mushroom, chinese sausages, black fungus, dried shrimps, carrot, garlic and cabbage

Stir-frying the fillings, add in mixed batter and fry till thickens

Before and after steaming


Recipe ref : Good Food Magazine May 2015
Ingredient
Batter
  • 300gm rice flour
  • 50gm potato flour
  • 1100 ml water
Filling
  • 4 tbsp oil
  • 30gm dried shrimps, softened and chopped
  • 1 tbsp chopped garlic
  • 20gm dried chinese mushroom, softened and diced
  • 80gm chinese sausages, diced
  • 500gm cabbage, thinly sliced
  • 50gm carrot, shredded
  • 5gm black fungus, soaked and shredded
Seasoning
  • 2 tsp salt
  • 1 tsp chicken stock granules
  • 1 tbsp sugar
  • 1/2 tsp pepper
Garnishing
  • fried shallots
  • chopped spring onion
  • toasted sesame seeds
  • sliced red chillies

Method
  1. Mix the batter ingredients and set aside.
  2. Heat oil in a wok. Saute dried shrimps until crisp and fragrant. Add garlic and fry till fragrant.
  3. Add mushroom and sausage and fry for 2 mins.
  4. Add in cabbage, carrot, black fungus and seasoning. Stir fry till cabbage is softened.
  5. Stir the batter and pour it into the wok. Stir over low heat until the mixture thickens.
  6. Pour the mixture into a greased square pan or individual small moulds.
  7. Steam over preheated steamer for 1 hour (big pan) or 25 mins (small moulds) until cooked.
  8. Cool completely before unmoulding and slicing.
  9. Garnish and serve.

Cook Your Books #24 by Kitchen Flavours
Related Posts with Thumbnails