Tuesday, February 27, 2018

Steamed Snow Pear Dessert 冰糖银耳炖雪梨

I've been feeling under the weather again since the start of Chinese Lunar New Year! I think my body is trying to remind me again to rest more. Not been able to sleep well because of my persistent coughing. Hopefully this nourishing snow pear dessert will help to soothe my lungs and heals my coughing.


Ingredient
  • 1 large snow pear
  • 15gm white fungus, softened and tear into small pcs
  • 15gm fresh lily bulbs
  • 10gm chinese almonds
  • 15gm rock sugar
  • 1/2 tsp wolfberries
  • 1/2 tsp dried osmanthus
Method
  1. Rinse snow pear thoroughly. Slice 1/4 from the top of the snow pear. Use a small metal spoon and gently remove the centre core. Scrap away some of the pear flesh to create a deep cavity.
  2. Place the snow pear into a deep bowl. Add in all the ingredients into the pear cavity. If the filling is overflowing, scatter some of the fillings around the pear. Add in sufficient water to fill up the cavity. Put the top back onto the sliced pear. 
  3. Steamed in preheated steamer for 40mins until the pear is tender. Serve warm.
  4. Alternatively, you may sliced the the snow pear in wedges and place all the ingredients in a casserole. Add in sufficient water, simmer on stove for 20mins or steamed for 30mins. This dessert can be served warm or chilled. But as I'm having a cough, so its best to serve it warm!


Tuesday, February 13, 2018

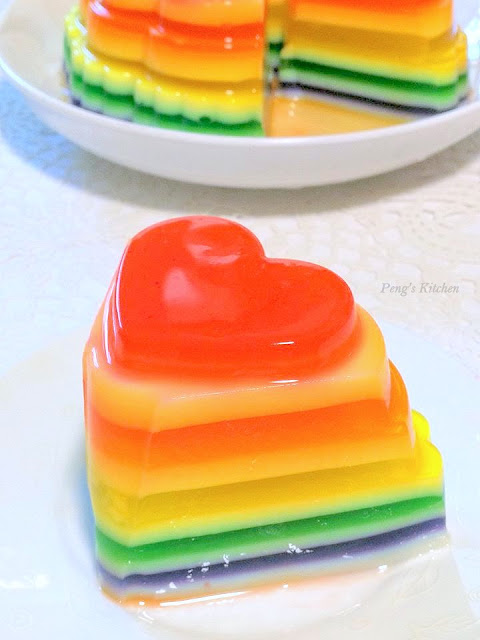
Rainbow Agar Agar


Revisiting my rainbow agar agar recipe made few years ago! Love the cute heart mould which I newly acquired. Instead of using coconut milk for layering, I've replaced with condensed milk this time round. Actually I did not do a good job today. Some of the layers smudge! arrrgghhh....some of the layers too thick resulting I've to skip 2 more layerings. *cry* Only consolation is that it dislodged beautiful onto the serving plate rather then breaking up into pieces. hahaha....


Ingredient (8" square pan or 1.5L container)
Colours Layer
  • 1 packet 10gm agar agar powder
  • 1200 ml water
  • 200gm sugar
  • 2 pandan leaves, knotted
  • wilton colour paste I've used 6 colours : violet, blue, green, yellow, orange & red
Milk Layer
  • 1 packet 10gm agar agar powder
  • 1000ml water
  • 250gm condensed milk
  • 2 pandan leaves, knotted

Method
  1. Colours Layer : Place pandan leaves and water into a pot. Bring to boil and add in sugar and agar agar powder. Boil for 1 minute and turn off heat. Sieve mixture into a bowl. Discard pandan leaves. Place the bowl (covered) over a pot of hot water (double boil) to keep the mixture warm while preparing the milk mixture.
  2. Milk Layer : Place pandan leaves and water into a pot. Bring to boil and add in condensed milk and agar agar powder. Boil for 1 minute. Turn off heat. Sieve mixture into another bowl and discard pandan leaves. Place the bowl (covered) over a pot of simmering hot water (double boil) to keep the mixture warm.

To assemble 12 layers agar agar : milk, violet, milk, blue, milk, green, milk, yellow, milk, orange, milk, red (or reverse order if using the heart mould*)
  1. Measure 200ml of milk mixture  and pour into a 8" x 8" pan. Leave it to set slightly but not harden. The surface will be sticky to feel. Use your finger gently touch on the surface to test out.
  2. Second layer : Measure 200ml of plain mixture and add the violet colour (use a toothpick to swap some colour paste and stir into the agar agar mixture, add more till the desired tone you prefer), stir evenly to dissolve the colouring. Gently spoon the coloured mixture over the milk layer (first layer). Leave to set slightly but not harden.
  3. Repeat Step 1 and 2 till the layers are completed (ending with a red coloured layer).
  4. Leave the whole jelly to cool down in room temperature before refrigerating till cold. Slice and serve!
* For the heart mould, each layer requires approx. 150ml of liquid. 

Monday, February 5, 2018

CNY 2018 Cookies Platter


Revisiting this cute butter cookies recipe I've done previously. I love this recipe as it uses only egg whites which I've a lot in the fridge after a series of CNY baking! Love the crisp and buttery taste of these cute doggie cookies. The cookie cutter makes the cookie look effortlessly adorable. This is the most simpler cookies I've made for this Chinese Lunar New Year! ^0^ Save the easiest job to the last hahahaha.....


Ingredient (approx. 40 pcs) 
  • 180gm salted butter
  • 100gm icing sugar, shifted
  • 30gm egg whites
  • 1 tsp vanilla extract
  • 180gm top flour
  • 80gm rice flour
  • 80gm cornflour

Method
  1. Using a electric whisk, beat butter and icing sugar till creamy. Beat in egg whites and vanilla till well combined.
  2. Sift in plain flour, rice flour & cornflour. Use a spatula to fold in the flour and lighlty knead the mixture with hands till a soft dough is formed.
  3. Place dough between plastic sheet, (I used a large ziplog bag), roll flat. Keep dough sheet in the refrigerator for 30 mins. Remove dough from the refrigerator. Stamp out dough using your desired cookie cutters.
  4. Arrange on lined baking trays. Bake in a preheated oven at 160 deg cel for 20 to 25 minutes. Cool well and store in air-tight container.


Voila....managed to complete my baking on schedule! Coming weeks I can rest and relax and go CNY shopping with my friends! You can refer to the recipes I've made by clicking here...pineapple tarts, salted egg yolks cookies and laksa cookies.


Friday, February 2, 2018

CNY 2018 Pineapple Tarts

Finally completed my pineapple tarts for this coming Chinese Lunar New Year! Not wanting to overwork myself, I only used three kg of store bought pineapple paste to bake some open tarts and pineapple rolls. 


For open tarts, I followed back the recipe here  which I've tried few years ago. I replaced the plain flour with top flour and it yield a better texture! 


Ingredients (approx. 80 pcs)
  • 227gm unsalted butter
  • 30gm icing sugar
  • 2 egg yolks, lightly beaten
  • 1 tsp vanilla essence
  • 400g top flour
  • 1/2 tsp salt
  • 700gm pineapple paste, rolled into small balls
Glaze : 1 egg yolk + 1 tsp water + 1 tsp oil

Method
  1. With an electric mixer, cream butter, icing sugar and salt till the mixture turns pale. Add in the vanilla essence and whisk to combine.
  2. Beat in the egg yolks gradually till fully incorporated.
  3. Sift in the flour into the mixture. Mix the mixture with your hand and gather to form a rough dough. Lightly knead the dough until the dough becomes smooth. Do not over knead the dough. Wrap the dough with cling wrap and chill in the fridge for about 30mins.
  4. Remove dough from fridge. Roll out dough on a lightly floured surface to about 5~7mm thick. Cut out the dough with the tart mould and transfer onto a lined baking tray. Lightly glaze the edges.
  5. Bake in preheated oven at 180 deg cel for 10 mins. Remove from oven, glaze again and place pineapple paste ball on each tart base. 
  6. Return to oven and continue to bake for another 10-12mins. Leave to cool on baking tray for a few minutes before transferring to wire rack. Let cool before storing in air-tight containers.

First time trying out nasilemaklover's melts in the mouth pineapple roll. Wow the pastry is indeed very melty! The pastry is not too sweet and with a tinge of milky flavour, this I like! A lot of bakers are baking doggie pineapple tarts/cookies, me too join in the fun! ^0^ I tinted the dough with some yellow food colouring as I do not want apply any egg wash over the rolled cookies. I'm really satisfied with the 'golden' appearance of these doggies pineapple rolls!


hahaha I'm so tired after shaping and decorating 2 trays of 'doggies'. So I complete the balance dough with rose shape pineapple roll! 

Ingredient (approx 87 pcs)
  • 350gm unsalted butter
  • 100gm condensed milk
  • 2 egg yolks 
  • few drops yellow food colouring (optional)
  • 1/2 tsp salt
  • 510gm top flour
  • pineapple paste (measure in 1 tsp level and shape round)
Method
  1. Cream butter and condensed milk until creamy. Beat in egg yolks, one at a time, until well combined. Beat in salt and food colouring if using.
  2. Sift in flour and mix till a soft dough is formed. Roll dough into 10gm ball, flatten dough and wrap with a ball of pineapple paste. Seal edge and roll between palms to shape round. Decorate as desired. I've omitted the egg wash.
  3. Place pineapple balls on lined baking sheet. Bake in preheated oven at 160 deg cel for 20 mins. Cool on rack completely before storing.


Related Posts with Thumbnails