Sunday, November 30, 2014

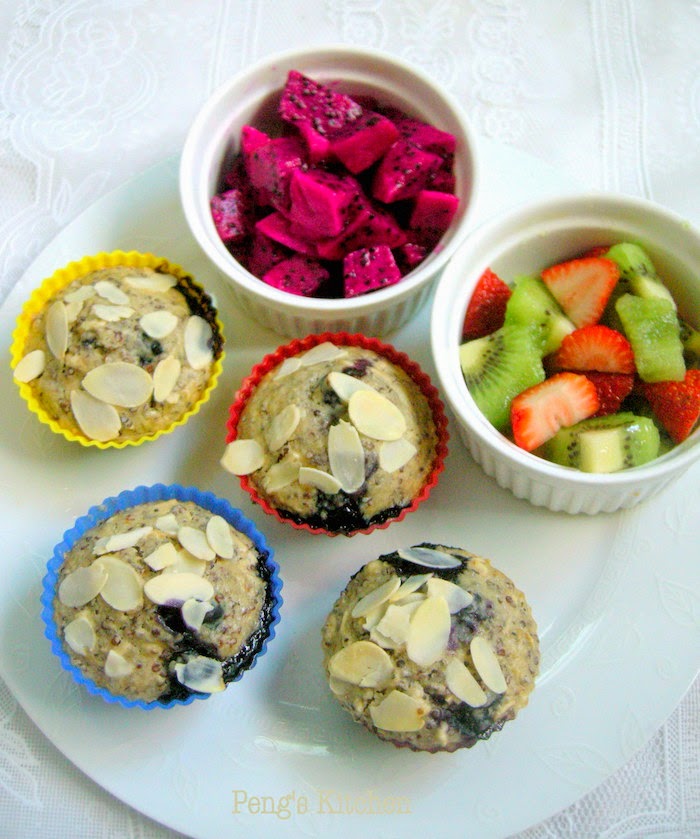
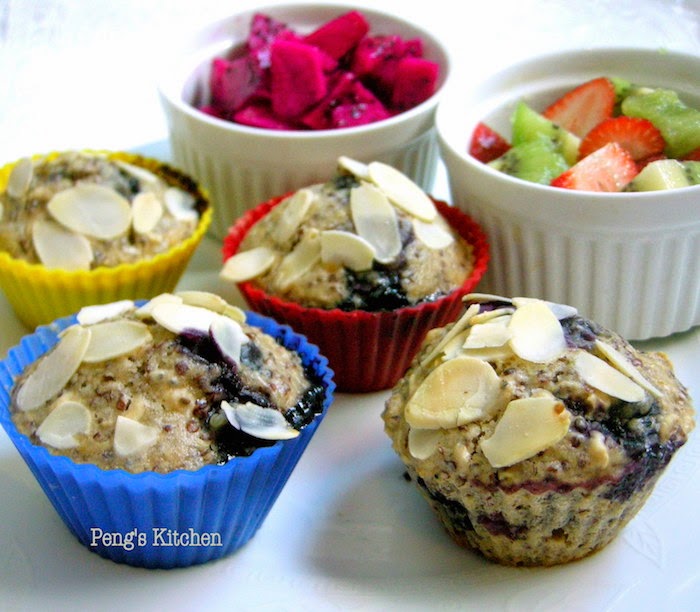
Blueberry Lemon Quinoa Muffins

Healthy snack doesn't mean it has to be boring and tasteless. This healthy butter-free and eggless blueberry quinoa muffin is packed with superfood like quinoa, chia seeds and rolled oats! My hubby whom not a fan of cakes can't stop munching down a couple of them while they are still warm and even requested to bake this frequent in future :D


Cooked red quinoa (kin-wa)

As I do not have lemon on hands, so I substitute with orange juice & zests

Folding in the wet ingredients and blueberries

top with some flaked almonds and ready to send into oven


Fluffy, soft & moist texture! 

Ingredient (8 small muffins)
  • 125gm cake flour
  • 1/4 cup rolled oats
  • 1 tbsp chia seeds
  • 1 cup cooked red quinoa (rinse 1/2 cup dried quinoa and boil in 2 cups water for 20 mins, drain well before using)
  • 65gm brown sugar
  • 1/2 tsp cinnamon powder
  • 1/2 tsp baking powder
  • 1/4 tsp baking soda
  • 1/4 tsp salt
  • 2 tbsp rice bran oil
  • 125ml milk
  • 1 tsp vanilla essence
  • 1 lemon zest
  • 2 tbsp lemon juice
  • 1/2 fresh blueberries
  • handful of almond flakes

Method
  1. Preheat oven to 200 deg cel.
  2. In a mixing bowl, combine flour, oat, chia seeds, cooked quinoa, sugar, cinnamon powder, baking powder/soda and salt together. Whisk well to combine. Make a well in the centre.
  3. In a separate bowl, combine milk, oil, vanilla, lemon zest and juice together.
  4. Pour the liquid into the well and gently stir to combine. Do not over mix,
  5. Gently fold in blueberries. 
  6. Spoon the batter into muffin cups till almost full. Sprinkle some almond flakes over. Reduce oven temp to 180 deg cel and bake for 25 mins until lightly brown and skewer inserted comes out clean.
  7. Remove muffins from oven and cool on wire rack. Serve warm or at room temperature.

Saturday, November 29, 2014

Japanese Quinoa Salad

This is a healthy light lunch which I've prepared just for myself! :D The kids do eat quinoa but only when its mixed into their rice or porridge. I really like this salad as its packed with protein, fibre, iron, calcium etc....indeed a complete healthy meal to enjoy ^0^


Ingredient
Salad Dressing
  • 3 tbsp lemon juice
  • 3 tbsp light soy sauce, low sodium
  • 2 tsp honey
  • 1 tsp sesame oil
  • 1 tbsp fresh ginger, grated
  • 1 clove garlic, mashed
Salad
  • 2 egg (cooked into omelette and sliced)
  • 1 cup cooked red quinoa
  • 1/4 cup Japanese cucumber, sliced
  • 1/4 cup carrot, shredded
  • 1/2 cup edamame beans, cooked and shelled
  • 1 stalk spring onion, chopped
  • 1 tbsp toasted sesame seeds

Method
  1. Whisk dressing ingredients together and set aside to let the flavours develop.
  2. Combine all the salad ingredients in a mixing bowl. Drizzle half of the dressing (remaining can be stored in fridge) and toss gently to mix. Serve immediately.

And I'm submitting this post to "My Treasured Recipes #3 - Taste of Autumn (Oct/Nov 2014)" hosted by Miss B of Everybody Eats Well in Flanders and co-hosted by Charmaine of Mimi Bakery House

Monday, November 24, 2014

Pumpkin Oat & Quinoa Granola

After finishing up my first batch of homemade granola, I could not wait to make another new batch to replenish it ^0^! Compare to the previous recipe, this particular Pumpkin Oat & Quinoa Granola is more nutty and less sweeter. I like the idea of coating the rolled oats with fresh pumpkin puree prior to baking. This is really a healthier and wholesome granola  compared to off-shelf ones which are loaded with sweeteners and other artificial flavourings!


Recipe modified from livingminnaly.com
Ingredient
  • 3 cups old fashioned rolled oats
  • 1/2 cup uncooked red quinoa, rinsed & patted dry (rinse in a fine strainer to get rid of the saponin)
  • 1/2 cup pumpkin seeds
  • 2 tbsp flax seeds
  • 2 tbsp chia seeds
  • 2 tbsp pumpkin pie spice blend (cinnamon, ginger, nutmeg, cloves, cardamon)
  • 1/2 cup fresh pumpkin puree
  • 2 tbsp rice bran oil
  • 2 tbsp honey
  • 3/4 cup dried cranberries
  • 1/4 cup mini dark chocolate chips

Method
  1. Combine oats quinoa, pumpkin seeds, flax seeds, chia seeds and spice blend in a large mixing bowl.
  2. Combine pumpkin puree, oil and honey in another small bowl.
  3. Stir in the wet mixture into the oat mixture and stir until thoroughly combined. Spread the granola mixture evenly on a lined baking sheet. (I separated into 2 batches)
  4. Bake in preheated oven at 200 deg cel for 30-35 mins until golden brown and crisp.
  5. Remove from oven and cool completely before mixing in the cranberries and chocolate chips. Transfer to an airtight container and store in fridge.

Sunday, November 23, 2014

Stuffed Zucchini with Ham & Mushrooms

Hmmm I usually saute zucchini with prawns or stew it,  never try eating zucchini this way by stuffing it with other ingredients and bake it prior to serving :) It tasted refreshing and juicy with the cheesy savoury topping. This is not my kids kind of food so I polished down two whole stuffed zucchini as my lunch ^0^ The balanced can be warm up later in oven when I feel hungry again ;P


  • 2 medium sized zucchini 
  • 2 tbsp butter, divided
  • 1/2 cup finely chopped onion
  • 200gm fresh mushroom, thinly sliced
  • 1/4 cup finely chopped ham
  • 1 tsp chopped parsley
  • 1/2 tsp Worcestershire sauce
  • 1/4 tsp chilli flakes
  • salt & pepper to taste
  • 1/4 cup bread crumbs
  • 1 heap tbsp Parmesan cheese powder

Method
  1. Wash & scrub the zucchini, split each in half lengthwise. Scoop out the seeds and pulp. Steam the zucchini halves until almost tender for about 10 mins. 
  2. While the zucchini is steaming, melt 1 tbsp butter in a pan. Add onions and sliced mushrooms, saute till soft and fragrant. 
  3. Stir in ham, parsley and seasoning. Fill the steamed zucchini shells with the mushroom stuffings.
  4. Mix bread crumbs and cheese together. Sprinkle it over  the stuffed zucchini. Melt 1 tbsp butter and drizzle over the bread crumbs.
  5. Bake in preheated oven at 200 deg cel for 25 mins until golden brown and heated through.

And I'm submitting this post to "My Treasured Recipes #3 - Taste of Autumn (Oct/Nov 2014)" hosted by Miss B of Everybody Eats Well in Flanders and co-hosted by Charmaine of Mimi Bakery House


Friday, November 21, 2014

Zucchini Noodle

Noodle made from fresh zucchini? How interesting! I'm actually browsing on the web to find ways to use up my zucchini and discover this interesting method of cooking :D

Pumpkin, Mushroom Zucchini "Pasta"


Ingredient (1 serving)
  • 1 cup softened zucchini noodle (refer to instructions below)
  • 2 cloves garlic, minced
  • 3/4 cup diced pumpkin
  • 6 small fresh mushroom
  • 1/4 tsp dried thyme
  • salt & pepper to taste
  • truffle oil for drizzling
  • toasted pecans for garnishing

Method
  1. Heat 1 tbsp olive oil in pan. Saute garlic till fragrant.
  2. Add in pumpkin and fry for 5 mins until brown at the edge.
  3. Stir in mushroom and dried thyme, fry for 1 min. Add in 1-2 tbsp of water.
  4. Add in zucchini noodle, salt & pepper and toss to mix well. 
  5. Dish up, drizzle over some truffle oil and garnish with toasted chopped pecans, serve immediately.

Chinese Style Zucchini "Noodle" Soup -  I've prepared another soupy "noodle" as I happened to be boiling some mixed squash soup for lunch. I've reserved some of the soup, add in some egg tofu, fresh shiitake mushroom, crabstick. Add in the zucchini "noodle" and boil briefly. Top with a soft boiled egg, a bowl of hearty zucchini " noodle" soup ready for the kid's dinner :) Phew.... glad that they enjoyed this healthy "noodle" soup dish.


Fresh zucchini

Another useful kitchen gadget for slicing thick strands :D

It does resembles noodle ^0^


How to create Zucchini Noodle?
  1. Peel and julienne the zucchini lengthwise into long thin strands. Slice just until you reach the seeds in the middle then stop. Separate the strands.
  2. Place the julienned zucchini in a colander and toss with some salt. Set aside for 30 mins to remove excess water.
  3. Rinse with running water and drain well. Gently squeeze to remove excess liquid. 
  4. Place in fridge, uncover, for 1 hour to dry up the strands further.
  5. Use as required.

This is how it looks after removing the excess liquid


Thursday, November 20, 2014

Steamed Tofu with Minced Meat

This is another light and healthy tofu dish which my kids always enjoy! They absolutely love tofu therefore I increase the amount of tofu used in the original recipe if not there won't be enough to go around :D 


Ingredient
  • 1 tube silken egg tofu, cut into 1 cm slices
  • 1 tube silken tofu, cut into 1 cm slices
  • 100gm minced pork
  • 1 tbsp light soy sauce
  • 10 wolfberries, soaked in water till puffy
  • 1 stalk spring onion, sliced
(A)
  • 1 stalk spring onion, finely chopped
  • 2 tbsp finely chopped carrots
  • 2 fresh shiitake mushroom, diced
  • 2 tsp light soy sauce
  • 1 tsp sesame oil
  • 1 tsp chinese wine
  • 1 tsp corn flour
  • dash of pepper

Method
  1. Marinate minced pork with ingredients (A) and mix well, chill in fridge for 30mins.
  2. Arrange tofu pieces on a deep steaming plate.
  3. Mould a small amount of marinated meat mixture into a ball and place on top of the tofu slices. Top each meat ball with wolfberry. Drizzle 1 tbsp light soy sauce over the tofu slices.
  4. Place the plate into a preheated steamer and steam for 8 mins. Before serving, use a spoon to drizzle the soy broth collected in the plate over the tofu slices. Garnish with spring onions and serve immediately.

Wednesday, November 19, 2014

Tofu Omelette

I've been wanting to attempt this trick-eye dish for very long time! This whole dish is actually made up with 100% tofu, not a tinge of egg added ^.* Turmeric powder is added to achieve the eggy colour. For a more interesting plating, I've added some red yeast rice powder to a portion of the tofu mixture to create the heart shape tofu omelette :D The taste of the tofu is very distinctive, the natural food colouring powder added did not alter the taste. Not much seasoning is used also, just a pinch of salt & pepper with a dash of sesame oil. A healthy and colourful tofu dish which I would love to prepare often for my family! 


firm tofu, tomato, beech mushroom & fresh basil

 Natural colouring from red yeast rice powder & turmeric powder


Ingredient
  • 2 blocks firm tofu, mashed
  • 1 tomato, skin removed & deseeded, chopped
  • 100gm beech mushroom
  • handful of fresh basil leaves
  • 1 tsp turmeric powder (mixed with 1/2 tbsp water to form paste)
  • optional : 1 tsp red yeast rice powder (mixed with 1/2 tbsp water to form paste)
  • salt & pepper to taste
  • dash of sesame oil

Method
  1. Heat 1 tbsp olive oil in pan, add in mushroom and fry till fragrant and soften.
  2. Add in cubed tomato and basil and fry briefly.
  3. Add in mashed tofu and toss evenly to combine.
  4. Add in seasoning and turmeric paste and mix till the tofu is evenly coated. Remove from fire and serve immediately.
  5. Optional : if using red yeast rice powder, remove about 1/3 of the tofu mixture after adding in the seasoning. In another clean heated pan, add in the tofu mixture and stir in red yeast rice paste and mix evenly. 

Tuesday, November 18, 2014

Sweet & Sour Oat Tofu Balls

Most of us should be familiar with sweet and sour pork dish. How about turning it into a vegetarian dish? It actually taste as good as the meat version one or even better! Even my kids could not get enough of them :D The only thing am not satisfied with this dish is the sweet & sour sauce. The taste is fine, just that the amount is way too little to coat everything evenly though I've adjusted from the original recipe. I will either further fine tune this sauce ingredient or substitute the sauce from this recipe : sweet & sour pork  if I should attempt this dish again :) 


Carrots, vegetarian ham, tofu puffs, walnuts, mushroom and firm tofu

before and after frying the tofu balls


Recipe ref : Yum Yum Magazine Feb 2014
Ingredient
(A)
  • 200gm firm tofu, diced
  • 2 tbsp organic oat milk powder
  • 3/4 tsp salt
  • 1/4 tsp pepper
  • 50gm vegetarian ham, finely diced
  • 3 small tofu puffs, finely diced
  • 2 dried shiitake mushroom, softened and finely diced
  • 50gm carrots, finely diced
  • 5 toasted walnuts, finely chopped
  • 1 egg white, lightly beaten

(B)
  • 1 small white onion, cube
  • 10 pieces canned pineapple cubes
  • 50gm green capsicum, sliced
  • 50gm red capsicum sliced

(C)
  • 10 tbsp juice from canned pineapple
  • 2 tsp plum sauce
  • 2 tbsp thai chilli sauce
  • 1 tbsp light soy sauce

Method
  1. Mash tofu till fine. Combine mashed tofu with remaining ingredients A and mix well. Stir in beaten egg whites and mix well. Chill in fridge for at least 30 mins. 
  2. Remove tofu mixture from fridge and form into small balls. Heat oil in a pan. Gently slide in tofu balls and pan fried till all sides are golden brown. Drain well on kitchen paper.
  3. Using same pan, saute onion till soft and fragrant. Add in remaining ngredients B and saute till fragrant.
  4. Add in ingredients C and cook till sauce slightly thickens. Add in splash of water if necessary. Adjust taste accordingly.
  5. Add in fried tofu balls and toss gently to coat the sauce. Dish up and serve immediately.


Monday, November 17, 2014

Peach Yogurt Cotton Cake

This is another lovely yogurt cake which is really light and cottony! The texture is fluffy and soft like the Japanese cheesecake just without the cheese taste :D The cake is amazingly moist too though no oil is added, guess the yogurt added attribute to the tenderness of the cake. Guess I will play around with this cake recipe to come out with different flavours! ^.*


Recipe source : xiachufang.com
Ingredient
  • 3 eggs, separated
  • 20gm corn flour
  • 40gm cake flour
  • 125gm peach yogurt
  • 1/2 tsp vanilla paste
  • 40gm sugar
  • Apricot jam for glazing
  • Canned peaches for garnishing

Method
  1. Combine egg yolks and peach yogurt together and stir well.
  2. Sift corn flour and cake flour over yogurt mixture and fold till well incorporated. Mix in vanilla paste.
  3. In a clean, dry bowl whisk egg white until foamy. Add in sugar gradually and beat on high speed till stiff peak formed.
  4. Take 1/3 of the beaten meringue and combine with the yolk batter.
  5. Pour the mixture over the balanced meringue and lightly fold till well incorporated.
  6. Pour batter into a lined 7" cake pan (wrapped the pan with foil to prevent water from seeping in). Water-bathe bake at 180 deg cel for 35-40 mins until golden brown.
  7. Remove pan from oven and overturn the pan on a wire rack to cool down.
  8. Unmould cake onto a serving plate. Spread a thin layer of apricot jam over the surface. Garnishing with sliced peaches. 

Sunday, November 16, 2014

Orange Yogurt Cake

What's for tea today? A simple orange yogurt cake! Really love this cake which is moist and tender! The whole house is lingering with the lovely citrus flavour while is baking....smelling so wonderful and inviting. I bet my neighbours upstairs and downstairs could even detect the fragrant as my oven is placed near to my kitchen window! hahaha.....


It does look simple, but bursting with orange flavour. Just nice with a cuppa of hot tea!

Recipe source : WendyinKK
Ingredient
  • 125gm butter
  • 150gm sugar
  • 3 medium eggs
  • 200gm plain yogurt
  • 60ml orange juice
  • 1 tbsp orange zest
  • 250gm plain flour
  • 3/4 tsp baking soda

Method
  1. Cream butter and sugar until pale & fluffy. 
  2. Beat in eggs one at a time, beating well after each addition.
  3. Add in yogurt, zest and orange juice. Mix well.
  4. Sift in flour and baking soda. Fold till well combined.
  5. Pour batter into a loaf pan and bake in preheated oven at 160 deg cel for 40 mins or until a skewer inserted comes out clean. 


Saturday, November 15, 2014

Strawberry Yogurt Cream Buns

A lovely sweet flavoured bread bun for this morning breakfast before rushing my kids for their swimming lessons! I've baked the bun yesterday evening and filled them with SMBC with lemon curd (balanced from making the macarons) just before serving. The bread buns remained soft and fluffy overnight with a lightly sweet strawberry flavoured. This is a good recipe (I've made slight adjustment on the flour and yogurt used) and very versatile whereby you can change the flavour of the yogurt you preferred! 


Ingredient (6 buns)
  • 70gm warmed milk
  • 20gm condensed milk
  • 40gm light brown sugar
  • 230gm bread flour
  • 30gm cake flour
  • 1 tsp instant yeast
  • 1/4 tsp salt
  • 1 whole egg, lightly beaten (25gm for bread, balanced for glazing)
  • 100gm strawberry yogurt
  • 30gm unsalted butter, softened
Filling
Method
  1. Combine milk, condensed milk & sugar together. Stir till sugar is well dissolved.
  2. Add in 25gm beaten egg and yogurt into milk mixture.
  3. Combine flour, yeast & salt in a mixing bowl. Make a well in the centre.
  4. Pour the milk & yogurt mixture into the well. Using a bread scrapper, gently fold the flour into the wet ingredient and mix till a soft dough is formed.
  5. Lightly floured your hands and knead the dough for 5 mins. Add in butter and continue to knead till smooth and elastic, for about 10 mins.
  6. Shape the dough in round, cover the bowl and proof the dough in a warm area for 1 hour until double in bulk.
  7. Lightly punch down the dough and knead lightly. Divide into 6 equal portions. Shape round, cover and rest for 10 mins.
  8. On a lightly floured surface, flatten each dough and roll up like a swiss roll. Flatten the dough again and gather up the dough to form a round ball. Seal the edge firmly and place on a lined baking sheet. 
  9. Cover and proof for another 1 hour until double in bulk.
  10. Lightly brush some beaten egg over the buns. Bake in preheated oven at 180 deg cel for 15 mins or until golden brown.
  11. Remove from oven and cool completely on wire rack before piping in cream.
  12. To assembly : Combine chopped strawberries with SMBC.  Gently make a cut in the centre of the bun. Spread in adequate amount of cream. Pipe extra cream over and garnish with some strawberries. Serve immediately.


Wednesday, November 12, 2014

Pastel Macarons with Swiss Meringue Buttercream & Lemon Curd

Colours make us happy doesn't it? ^0^


Too ambitious this time round to create multi colours macarons!

Not all batches turned out well, almost 50% were flaw, either crack or a hump appear on the surface >.< Plus the purple turned out the least satisfactory (too flat and over baked thus the brown edge). But overall they still look appealing when assembled together :D


Recipe adapted from Tartelette...
Ingredient (makes approx. 30 cookies, 15 macarons)
  • 50gm egg whites (aged for 1-2 days)
  • 25gm granulated sugar
  • 100gm icing sugar
  • 55gm extra fine ground almonds
  • wilton food colour paste

Method

  1. Sift ground almonds and icing sugar together and set aside.
  2. Beat egg whites on high speed till foamy. Add sugar gradually and beat till glossy and stiff peak form. Beat in colourings till well blended.
  3. Fold in almond mixture in batches until well blended.
  4. Transfer batter into piping bag and pipe on baking sheet lined with parchment paper and rest for 30mins until dry.
  5. Baked at preheated oven at 160 deg cel for 12-15mins.
  6. Remove from oven, cool down for 5mins and peel the cookies from parchment paper. Cool completely on wire rack.
* For one batch I've divided the almond mixture into 2 parts and fold in individual colour paste. 


Ready for filling....Swiss Meringue Buttercream & Homemade Lemon Curd


Swiss Meringue Buttercream with Lemon Curd
Ingredient 
  • 50gm egg whites
  • 70gm sugar
  • 115gm unsalted butter, soft but still cold, cut into small cubes
  • 3 tbsp lemon curd

Method
  1. Lightly whisk egg whites in a mixing bowl, place over a pot of simmering water.
  2. Add in sugar in 3 batches, whisk mixture till sugar is fully dissolved (rub some with fingers, if it feels grainy, it hasn't dissolved yet), takes about 2-3mins.
  3. Remove from heat and whisk for 5 mins till stiff peak formed, thick and glossy.
  4. At this point, the mixing bowl should be cook to the touch but still slightly warm at the bottom.
  5. Place the bowl of meringue on top of a large bowl filled with a few ice cubes and water.
  6. With a electric whisk, beat and add in butter cube one by one, ensuring that each addition is well incorporated before adding the next one.
  7. Beat till mixture become curdles, stop the mixer.  Continue beat till mixture becomes creamy and satiny. Beat in lemon curd. Ready to use.
To assembly : Transfer buttercream into a piping bag. Make a small cut on the tip of the piping bag. Pipe 2 rings of cream onto one macaron shells. Fill in extra 1/2 tsp of lemon curd into the middle ring. Sandwich with another macaron shell. Press it down slightly. Store in air-tight container and chill in fridge. Best serve the next day.


I am linking this post to the Bake Along event created by Joyce of Kitchen Flavours, lena of Frozen Wings and Zoe of Bake for Happy Kids

Related Posts with Thumbnails