Sunday, August 31, 2014

Strawberry Magic Custard Cake

Waving my magic wand in the kitchen again....Strawberry Magic Custard Cake! hehehe....I'm just using the usual Magic Custard Cake  I've did previously, replaced the milk with strawberry flavoured milk and added a teaspoon of strawberry paste. Sweet looking! I actually like it when its still warm as the custard layer tasted wobbly soft. Chilling it though makes it easier for slicing but the custard turned slightly dense. Anyway it is still a lovely custard cake to enjoy :)


Ingredient (8" square cake)
  • 120gm unsalted butter
  • 500ml strawberry milk
  • 4 eggs, separated
  • 120gm icing sugar
  • 1 tbsp water
  • 120gm plain flour
  • 1 tsp strawberry paste
  • 1 tsp vanilla paste
  • icing sugar for dusting

Method
  1. Preheat oven to 180 deg cel. Lightly grease and fully line a 8" square pan with baking paper slightly overhang the edge of the pan.
  2. Melt butter and set aside and cool down slightly. Warm the milk to lukewarm and set aside.
  3. Whip the egg whites till stiff peak formed. Set aside.
  4. In a separate mixing bowl, beat the egg yolks and sugar till light and creamy. Beat in melted butter and water for about 2 mins until evenly incorporated.
  5. Sift in flour and beat until combined. Slowly beat in milk and vanilla paste. Mixture will be watery.
  6. Fold in the beaten egg whites, 1/3 at a time. Fold in till all whites are evenly incorporated.
  7. Pour batter into the prepared pan and bake for 45-50 mins until the top is golden brown, or a skewer inserted comes out clean.
  8. Remove cake from the pan and cool down completely on wire rack. Dust with icing sugar before serving. Best serve chill.

This post is linked to the event, Little Thumbs Up organised by Bake for Happy Kids and My Little Favourite DIY, and hosted by Diana from the Domestic Goddess Wannabe

Saturday, August 30, 2014

彰化肉圆 Taiwanese Meatballs (Bawan)

When I first heard of this dish, I thought it is a whole meat balls just like 红烧狮子头 , but is actually a complete different kind of dish :P The skin of the meatballs is made with sweet potato starch and rice flour (to be cooked into paste like) and thereafter encased with the meat fillings like mushroom, bamboo shoot and pork. With the clear instructions and picture from the recipe book which I borrowed from the library, I managed to make this effortlessly :) It tasted very special! Translucent and chewy skin with flavourful fillings, even my girl enjoyed this Taiwanese meatball!


Dissolve the flour with water and cook them till paste liked

Spread the paste like dough into oiled bowl and fill up with meat fillings

Cover with more paste to seal the fillings, and ready for steaming

After steaming, pan fry lightly till golden brown and serve with sauce


Recipe ref : 台湾小吃图解版
Ingredient (4 servings)

Filling :
  • 150gm pork fillet, finely diced
  • 50gm bamboo shoot, finely diced
  • 6 dried shiitake mushroom, softened & finely diced
  • 2 tbsp fried shallots
  • 1 tbsp light soy sauce
  • 1 1 tbsp sugar
  • 1/2 tsp pepper
  • 1/2 tsp five spice powder
Dough
  • 50gm rice flour
  • 150gm sweet potato starch
  • 275ml water

Method
  1. Heat 2 tbsp oil in pan, add mushroom and sauté till fragrant.
  2. Add in bamboo shoots and pork fillet. Fry till meat turn white.
  3. Add in seasoning and fried shallots and mix evenly. Remove from heat and set aside.
  4. Combine flour with water in a small mixing bowl,  stir till well dissolved.
  5. Bring a pot of water to a simmer. Place the bowl of flour batter over the pot. Stirring constantly and cook till batter turns thick. 
  6. Grease 4 small bowls with corn oil. Scoop some cooked batter into each bowl. Lightly grease your fingers and press out the dough to cover the base of the bowl. Fill in meat filling. Top with another layer of cooked dough covering the fillings completely. Using greased fingers to smoothen out the edge and surface.
  7. Steam the meatballs over preheated steamer over high heat for 10mins. Cool down for 10mins.
  8. Heat some oil in pan, remove the meatballs from the bowl and pan fry them  till lightly brown on both sides. Drain well and serve with sauce immediately.

Sauce : Combine all ingredients, except cornstarch, and bring to a simmer. Add in cornstarch water to thicken the sauce. 
  • 2 tbsp sweet chilli sauce
  • 1 tbsp miso paste
  • 4 tbsp Hai Shan sauce
  • 1 tbsp sugar
  • 100ml water
  • 2 tbsp cornstarch water

I am submitting this post to Asian Food Fest – Taiwan hosted by travelling-foodies


Thursday, August 28, 2014

鹿港古早芋丸 Steamed Taro Balls

I've never tasted this kind of steamed taro balls before so I decided to give this recipe a try since I love yam! 芋头糕芋头饭芋头焖排骨 drools......^0^ Do not mistaken this with the popular 芋圆 which is a dessert made from yam too. This steamed taro balls are made from shredded yam and are encased with marinated pork slices. After which they are moulded into round shape and send to steam. Looks rather an ordinary dish but it tasted so good! Full of yam flavour with hint of five spice powder and tender savoury meat fillings...satisfying snack!


shredded yam


Recipe source : 台湾小吃图解版
Ingredient (6 rolls)
Filling
  • 200gm pork fillet, diced
  • 1 egg
  • 2 tbsp minced garlic
  • 2 tbsp light soy sauce
  • 1 tbsp sugar
  • 1/4 tsp pepper

Yam Ball
  • 600gm peeled yam, finely shredded
  • 30gm fried shallots
  • 4 tbsp potato starch
  • 3/4 tsp pepper
  • 1/4 tsp five spice powder
  • 1 tsp salt
  • 100ml water

Method
  1. Combine filling and mix evenly. Leave to marinate for 30mins.
  2. Place shredded yam into a mixing bowl. Stir in fried shallots.
  3. Add in the rest of the seasoning and mix well. Mixture will be slightly sticky.
  4. Line 6 bowls with microwavable cling wrap. Fill in some yam mixture followed tbsp of meat filling. Cover the top with more yam mixture. Press down firmly. Seal the cling wrap and bind firmly into a ball shape.
  5. Steam the yam ball in preheated steamer for 20mins.
  6. Cool down slightly and serve with sweet chilli sauce.

I am submitting this post to Asian Food Fest – Taiwan hosted by travelling-foodies


Wednesday, August 27, 2014

基隆豆干包汤 Stuffed Tofu Soup

It is always very comforting to enjoy a hearty and warm soup during chilling weather :) This stuffed tofu soup can be served on its own as it can be really filling. But I'm greedy, so I again prepared some Taiwan style cold noodle to go with it ^0^ 


filling in firm tofu pockets with marinated minced pork...

be generous with the filling! pack in as much as you can :D

and finally seal the cut sides with squid and fish paste


Ingredient (4 servings)
  • 4 blocks small firm tofu
  • 200gm squid paste
  • 200gm fish paste
  • 200gm minced pork
  • 4 dried shiitake mushroom, softened and finely diced
  • 1 tsp grated ginger
  • 1 tsp pepper
  • 1 tsp sugar
  • 1 tsp sesame oil
  • 1 tsp salt
  • 1 tsp light soy sauce
  • 2 stalk spring onion, chopped
  • 2 tsp finely chopped chinese parsley 
  • 2 tsp potato starch
Broth
  • 4 cups stock
  • 2 tbsp fried shallots
  • 1 tsp pepper
  • 1/2 tsp salt
  • 1 tsp sesame oil

Method

  1. Marinate minced pork with grated ginger, pepper, sugar, sesame oil, salt & soy sauce. Stir in potato starch, spring onion and parsley and stir till mixture is sticky. Stir in chopped mushroom. Set aside for at least 30mins.
  2. Combine squid and fish paste together.
  3. Cut the firm tofu into quarters. Deep fry in hot oil till golden brown. Drain well on kitchen paper. Cool down completely. Make a slit on the cut sides and scoop out some of the tofu* to make a pocket.
  4. Fill in the pocket with marinated minced pork. Follow by a thick layer of squid and fish paste sealing the cut side completely.
  5. Repeat till all fried tofu pockets are completely filled.
  6. Bring broth ingredients to boil and set aside.
  7. Bring a medium pot of water to boil. Cook the stuffed fried tofu for 10 mins over medium heat until thoroughly cook through. 
  8. To serve, place 2 pieces of cooked stuffed tofu into a bowl and ladle in  hot broth. Garnish with more chopped parsley and serve immediately. 
* tips : with leftover ingredients of tofu, minced pork, squid and fish paste, combine everything together and mix well. Shape them into round flat patties and pan fried till golden brown on both sides. 


I am submitting this post to Asian Food Fest – Taiwan hosted by travelling-foodies


Tuesday, August 26, 2014

Mitarashi Dango (Sweet Dumplings)

This is another Japanese sweet snack made with glutinous flour! It looks similar to our Chinese 汤圆 but the texture is rather different. With the additional rice flour added to the dough, it gave a more firm and yet chewy  texture. Before it is served, the dumplings are grilled till slightly charred (I don't have the patience so my dumplings don't look charred at all hahaha...)  after then they coated with a sweet glaze. It tasted nice....with a smoky flavour attributed by the sweet soy glaze.


All whites looks too boring, so I've added some matcha powder :D

Cooked dango 

Grilled and coated with sweet soy glaze

or just smear a thick layer of red bean paste over!

Recipe ref : just one cookbook
Ingredient (8 sticks)
  • 100gm rice flour
  • 100gm glutinous rice flour
  • 2 tsp sugar 
  • 150ml warm water + 2 tsp water
  • 2 tsp matcha powder

Sweet Soy Sauce
  • 6 tbsp sugar
  • 1 tbsp soy sauce
  • 4 tbsp water
  • 1 tbsp corn flour (dissolve in 1 tbsp water)

Method
  1. Combine flour and sugar in a mixing bowl. Add in warm water gradually and knead to form a smooth and soft dough.
  2. Divide dough into 2 equal portions. Knead matcha powder and extra 2 tsp warm water into 1 of the plain dough. Divide the plain dough and matcha dough into 12 equal portions each, total 24 pieces. Roll them into round balls.
  3. Bring a pot of water to boil. Drop in dango and cook over medium heat. The dumplings are fully cooked when they float to the surface. Transfer the dango into a pot of icy cold water. 
  4. Meanwhile prepare the sauce. Combine sugar, soy sauce and water into a small saucepan. Bring to boil till sugar is well dissolved. Add in cornstarch water to thicken the sauce. Turn off heat.
  5. Drain away water and thread 3 dango onto a skewer. Lightly grease a non-stick pan, grill over medium heat, rotating slowly, till lightly char.
  6. Place the grilled dango on a serving plate, brush with some sweet soy sauce and serve immediately. 
  7. Alternative : spread some homemade anko over grilled dango.

Monday, August 25, 2014

草莓大福 Strawberry Daifuku

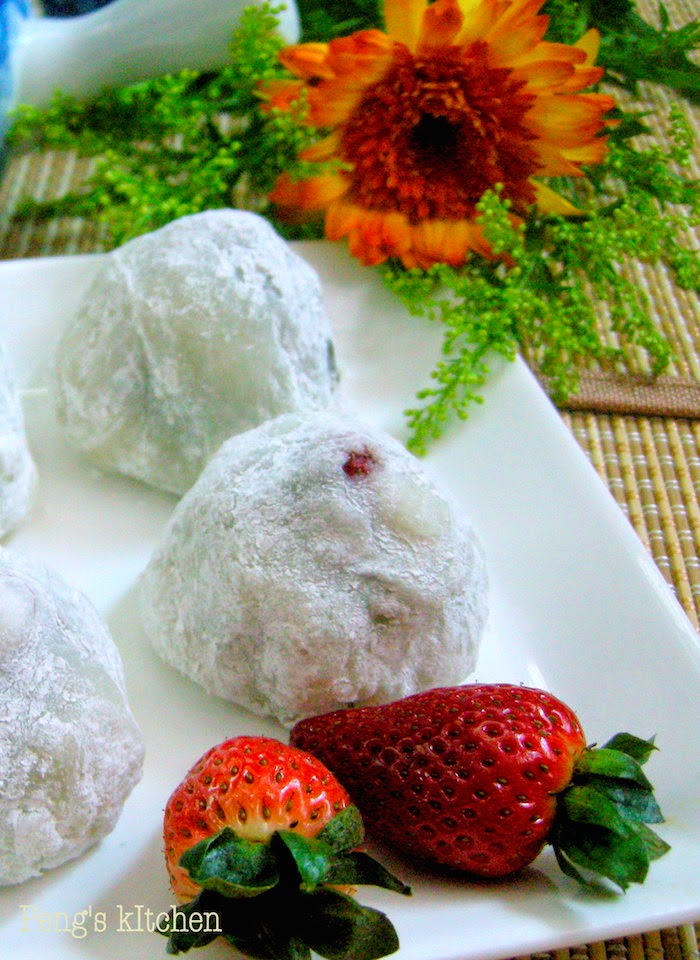
More sweet snacks to share as I wanted to clear the pack of glutinous flour which is expiring soon ^.^ Before I attempted this strawberry wrapped mochi, I knew that it won't be a easy job. The cooking of the mochi is really simple just by using microwave, is the wrapping process that kills me....arrgghhh After the mochi is cooked, you need to divide it into equal portions and wrap it up with the strawberries while is till hot, soft and stretchy! By the time I meddling with the last 2 pieces of the dough, I just feel like popping them into my mouth and skip the wrapping process hahaha....but in the end I still managed to come out with 6 rather not so pleasant looking strawberry daifuku いちご大福.


Recipe ref : just one cookbook
Ingredients (6 strawberry mochi)
  • 6 medium strawberries
  • 180gm homemade anko (sweet red bean paste)
  • 100gm glutinous rice flour
  • 2 tbsp sugar
  • 150ml water
  • cornstarch for dusting (pre-baked in oven @ 160 deg cel for 20mins)

Method
  1. Rinse, dry and hull the strawberries. Divide anko into 6 equal portions. Wrap the strawberries with anko. Leave the tip of the strawberry uncovered.
  2. In a medium microwave safe glass bowl, mix glutinous rice flour with sugar.  Slowly add water in 3 parts and stir until to dissolve the flour. Cover loosely with cling wrap. Microwave for 1 min. Remove and stir well with a wet silicone spatula. 
  3. For the 2nd time, microwave for another 1 min again. Remove and stir well with a wet silicone spatula.
  4. For the 3rd time, microwave for only 30 seconds. Stir again and now the mixture should look translucent and soft.
  5. Sift cornstarch onto a tray and put the mochi on top. With a silicone spatula, fold the mochi in half one time so it won't be as sticky. Divide into 6 equal pieces. Put some cornstarch on your hands and flatten and stretch each kochi into a 3" round. Put the anko covered strawberry on top of it, with the tip facing down.
  6. Start covering the strawberry from all sides and use your thumb to hold the mochi on top. When all sides of mochi meet at the top, twist and seal the edge. 
  7. Hold the mochi with both hands and form into a nice round shape. Repeat the process for the remaining mochi.
  8. Serve at room temperature and best serve within end of the day.

Sunday, August 24, 2014

豆沙南瓜饼 Part II

Here is the Part II of making red bean pumpkin cake, this time round using steam method. Compare with the Part I version, this Part II recipe uses only glutinous flour therefore the texture is more chewy and softer. Oh yes the fun part is to shape the wrapped dough into a mock pumpkin! Cute! 


I've should have added lesser flour to the pumpkin puree, as you can see that the pre-steamed dough is rather uneven. Worst still I did not cover the rest of the dough while shaping it, resulting the last few pieces of dough started to crack up after wrapping up the filling.


After steaming the cracks were less visible and most importantly the pumpkin shape retained really well! *happy*


Ingredient (12 portions)
  • 200gm pumpkin, net wgt after removing seeds and skin
  • 120-140gm glutinous rice flour
  • 2 tbsp sugar
  • 240gm homemade red bean paste
  • wolfberries for decorating

Method
  1. Cut pumpkin in small cubes. Cook pumpkin cubes in boiling water until fork tender. Drain away water and mash it while its still hot. Add in sugar and mix well to combine.
  2. Add in 100gm glutinous flour and mix in using a fork. Gradually add in more flour and knead (careful is hot!) till a soft and non sticky dough is formed.
  3. Divide dough into 12 equal portions, approx 30gm each. Cover the rest of the dough while doing the wrapping.
  4. Take a piece of the dough and flatten into a round disc. Put in a ball of red bean paste and wrap up. Seal the edge tightly. Place it, with seam sides down, on a greased plate. Using a toothpick, press out patterns on the surface to resemble pumpkin. Place a wolfberry onto the centre. Complete the wrapping with the remaining dough.
  5. Steam over medium heat for 10mins. Cool down completely before serving.

Saturday, August 23, 2014

豆沙南瓜饼 Part I

One fine day I'm in the mood of making some red bean paste (my previous attempt was unsatisfactory) Using the same recipe from Alan's blog, this time round I've made sure I followed the steps properly and correctly. Finally got the texture right! ^0^


Back to this lovely little snack made with fresh pumpkin puree! Glutinous flour is added into the pumpkin puree, giving it a slightly chewy texture after frying, matched well with the not too sweet homemade red bean paste filling :D


This is rather a simple and fast recipe to attempt if you got the proportion of the pumpkin and flour right. Adding too much flour at a go will result a dry dough, to rectify it you may need more pumpkin puree. The best way is to knead in flour gradually into the hot fresh puree till you get a soft, non-sticky and moist dough. 


Instead of coating all sides with white sesame seeds, I've decorated a side with some pumpkin seeds :D
Add caption

Pan frying in medium hot oil till golden brown


Taste best while is still warm. I've kept one till next day and it still taste good without warming it up.

Ingredient (6 qty)
  • 100gm pumpkin, net wgt after removing seeds and skin
  • 20gm icing sugar
  • 40gm plain flour
  • 40gm glutinous flour
  • homemade red bean paste
  • pumpkin seeds for garnishing
  • white sesame seeds for coating

Method
  1. Cut pumpkin into cubes. Cook in boiling water till fork tender. Drain away water and mash.
  2. Mix in sugar and flour. Knead till a smooth and soft dough is formed. Divide into 6 equal portions.
  3. Wrap in a about 1/2 tbsp red bean paste and seal up the edges tightly. Roll into a ball and flatten  it. Brush one side with some water and coat with sesame seeds. Press in pumpkin seeds on the sides of the cake. Repeat the process with the remaining dough.
  4. Heat about 2 tbsp oil in a non-stick pan. Add in pumpkin cake and pan fry over medium heat till lightly brown on both sides. Drain well on kitchen paper. Cool down slightly before serving.

This post is linked to the event, Little Thumbs Up organised by Bake for Happy Kids and My Little Favourite DIY, and hosted by Diana from the Domestic Goddess Wannabe

Friday, August 22, 2014

咸煎饼 Ham Ji Peng

Ever since the day when Jane posted her salted bun recipe, I've knew I must try it out! Glad that I've attempted this ham ji peng, everyone loved it! Especially my kids whom first time taste this Chinese style fried doughnuts, surprisingly they preferred the salted version one instead of the red bean filling :D 


Ingredient (15 qty)
  • 125gm bread flour
  • 175gm plain flour
  • 1.5 tsp instant yeast
  • 65gm sugar
  • 175gm water
  • 1/2 tsp salt
  • 1/2 tsp baking soda
  • 1 tbsp oil
Fillings :
  • 1 tsp five spice powder
  • 1/2 tsp salt
  • 1/2 piece fermented bean curd
  • adequate red bean paste (optional)

Method
  1. Combine flour, yeast, sugar, salt, baking soda in a mixing bowl. Add in oil and water and knead into a smooth dough. Cover and proof in a warm area for 30mins.
  2. Mix five spice powder, salt and fermented bean curd into a paste. 
  3. Punch down the dough and knead lightly. On a lightly floured surface, roll out the dough into a rectangle shape, spread with fillings evenly over the dough and roll up like a swiss roll.
  4. Cut into 15 equal portions and flatten it. Rest for another 15 mins.
  5. Optional : For red bean paste filling, after flattened out the cut out dough, wrap them with a heap tsp of red bean paste and seal the edges. Flatten it again.
  6. Heat some oil in a saucepan, deep fry the ham ji peng, in batches, until golden brown on both sides. Drain well on kitchen paper.


This post is linked to the event, Little Thumbs Up organised by Bake for Happy Kids and My Little Favourite DIY, and hosted by Diana from the Domestic Goddess Wannabe
Related Posts with Thumbnails