Sunday, June 29, 2014

Quinoa Stuffed Pumpkin

Finally I've found a pretty flower looking pumpkin to try out this Quinoa Stuffed Pumpkin recipe! Arn't it beautiful?? ^0^ Visually is pretty but taste must be good too if not will spoil the whole dish hahaha....Believe me the quinoa rice stuffing (meatless) is real good, even my 4 year old girl requested for 2nd serving! Let's find out what's inside this little pumpkin.....


Clockwise : cooked mixed grains, cooked red quinoa, carrots, corn, peas, mushroom, red pepper

The pumpkin is not very large, only approx 5" in diameter

Topped with shredded mozzarella and baked till cheese melted 

❤️ Kids Meal ❤️

Recipe source : kimkimcooking
Ingredient
  • one 700gm pumpkin
  • 1/2 cup cooked red quinoa
  • 1 cup cooked mixed grains
  • 1/2 cup chopped carrots
  • 1/2 cup chopped red peppers
  • 1/2 cup chopped mushrooms
  • 1/4 cup corn kernels
  • 1/4 cup green peas
  • 1 tbsp olive oil
  • 2 cloves garlic, minced
  • 1 tsp dried thyme
  • salt & pepper to taste
  • 1/4 cup shredded mozzarella cheese

Method
  1. Cut the top of the pumpkin and remove the seeds. Drizzle over some olive oil and bake in preheated oven at 180 deg cel for 50mins.
  2. Heat olive oil in pan. Saute garlic till fragrant.
  3. Add in carrots and mushroom and stir fry for 5 mins.
  4. Add in red peppers, corn and peas and mix evenly.
  5. Add in cooked quinoa and mixed grains and seasoning. Fry till grains are heated through.
  6. Can be served immediately or use to stuff pumpkin as below.
  7. Fill the roasted pumpkin with cooked rice mixture. Top with cheese. Grill at 200 deg cel for 5 mins until cheese melted.  

Friday, June 27, 2014

Vietnamese Fish Cake (Cha Ca)

This Vietnamese fish cake reminds me of the Thai version one :D Looks rather similar but slight difference in the herbs used. Both are equally tasty but I find that the Vietnamese version taste lighter than the Thai one. Instead of using ready made fish paste, the fish cake is made from fresh fish fillet blended with spices and herbs thereafter shaped into round disc and pan frying till golden brown. Fast and simple dish which can be whipped up anytime :D


Ingredient (12 patties)
  • 450gm tilapia fillets
  • 1 egg
  • 1 tsp sugar
  • 1 tbsp fish sauce
  • 1/2 tsp turmeric powder
  • 2 garlic, mashed
  • 1/2 tsp white pepper
  • 1 tsp dried chilli flakes
  • 2 stalks spring onion, roughly chopped
  • handful of thai basil, roughly chopped

Method
  1. Cut fish into chunks and marinate with sugar, fish sauce, garlic, egg and pepper. Chill for at least 1 hour or overnight in fridge.
  2. Transfer mixture into a food process and blend to form a coarse mixture.
  3. Add in basil, spring onion and chilli flakes and blend to just combine.
  4. Remove mixture from the processor. Grease hands with oil. Shape mixture into 12 round flat patties.
  5. Heat some oil in a pan. Pan fry fish cakes till golden brown on both sides. Drain on paper towels and serve with Nouc Mam Cham Ngot (recipe below).

Marinated tilapia chunks, thai sweet basil & spring onions

Blend in food processor and shaped into patties

Pan frying in hot oil till golden brown


Dipping in simple fish sauce with some chilli padi...shiok!


I am submitting this post to Asian Food Fest – IndoChina hosted by Kelly Siew Cooks

Thursday, June 26, 2014

Rainbow Flan Dessert (Rau Cau Flan)

I was first attracted by the layers of this flan dessert.....pandan, coconut and coffee agar agar layer. Thinking of these 3 combinations already made me drools! I was actually contemplating whether to try out this recipe when I saw the rich flan layer which uses ONE canned sweetened condensed milk and ONE canned evaporated milk. But considering the layers of agar agar did not use much sugar and the final outcome of the whole flan should taste just right, therefore I just closed one eye on the amount of condensed milk used hahaha...Indeed when my boy tasted a slice of this Rainbow Flan Dessert, he asked me why the jelly layer not sweet one?? Therefore savour the sweet and rich egg custard  layer with the not so sweet agar agar will balance out the richness of this chilling dessert! 


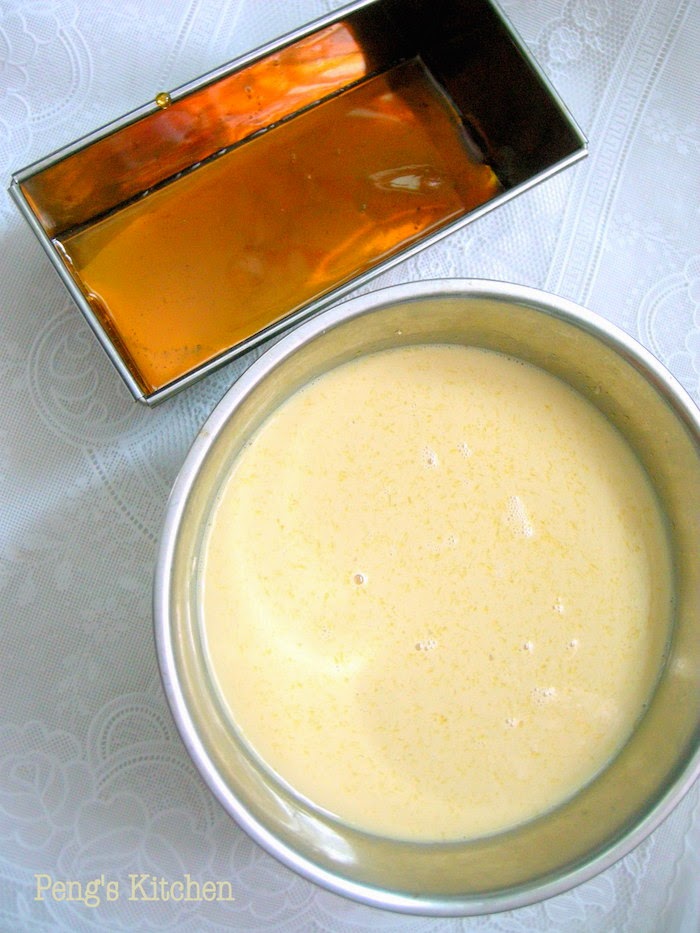
Caramelised sugar setting in pan and ready to pour in egg custard

The flan after steamed baking...ready to layer in the agar agar!

Love the caramelised surface! This pandan layer is made with bottled pandan paste.

This version the pandan layer is made with fresh pandan extract with an additional layer of coffee agar agar.


Recipe source : theravenouscouple.com
Ingredient

Basic Flan :
  • 250gm sugar
  • 1/4 cup water
  • 3 large eggs, lightly beaten
  • 1 can sweetened  condensed milk
  • 1 can evaporated milk
  • 1 tsp vanilla extract

Agar Agar Layers :


Pandan Layer
Coconut Layer
Coffee Layer

1 cup water (or 1 cup fresh pandan extract
2 tbsp sugar
¾ tsp pandan paste (exclude if using fresh pandan extract)
1 tsp agar agar powder


1 cup coconut milk
2 tbsp sugar
pinch of salt
1 tsp agar agar powder


1 cup water
1 heap tsp coffee granules (not instant powder)
2 tbsp sugar
1 tsp agar agar powder

Method
  1. Preheat oven to 180 deg cel and fill a baking pan with hot water.
  2. In a saucepan, caramelise the sugar and water until golden brown and pour into a pan or several ramekins and coat evenly. Allow to cool and crystallise.
  3. In a bowl, combine eggs, condensed and evaporated milk and vanilla and whisk till smooth. Strain the mixture and sit for 15 mins. Gently pour the egg mixture over caramelised sugar and cover the ramekins with foil.
  4. Place the ramekins onto the tray of hot water and bake for 60mins or until the custard is well set.
  5. While the flan is cooling down, prepare the agar agar layers. In a saucepan heat all the ingredients for the pandan layer until sugar and agar agar is dissolves and comes to gentle boil. Remove from heat and carefully spoon the mixture onto the flan. 
  6. Prepare the coconut layer when the pandan layer is about to set. To test : lightly touch the layer with your fingers, it should be firm but still slightly sticky and not set completely. Repeat with the coffee layer.
  7. After all 3 agar agar layers have set, chill in fridge. To un-mould, use a spatula to loosen the edges and invert onto serving plate. 


I am submitting this post to Asian Food Fest – IndoChina hosted by Kelly Siew Cooks

Wednesday, June 25, 2014

Mini Pandan Butter Cupcake

Recently I'm hooked on using fresh pandan extract for cooking/baking! Just can't stop loving  the flavour of this lovely plant :D I've actually wanting to bake a Pandan Orgura Cake but realise I've running out of eggs in the fridge! But I need to bake something badly hahaha baking addiction relapsing. So with only 2 eggs I made this cute little pandan butter cupcakes, recipe found in AnnCoo Journal! Though the texture is little too crumbly but the taste is definitely double thumbs up!! My boy actually gobbled down 3 mini cupcakes at one go ^0^ Guess this batch of mini pandan butter cake won't last till next day :P


Ingredient (fills up 9 mini cupcakes and 12 mini teddies)
  • 180gm butter
  • 80gm castor sugar
  • 2 large eggs, lightly beaten
  • 45gm thick pandan extract
  • 35gm coconut milk
  • 220gm self raising flour
  • 1 tsp baking powder (will omit this for next bake to see difference)

Method
  1. Combine pandan extract with coconut milk and mix well.
  2. Cream butter and sugar until light. Add in egg gradually and beat until fluffy.
  3. Sieve in flour, baking powder and fold into egg batter, alternate coconut milk mixture. Do not beat.
  4. Spoon mixture into small cupcake cases or grease small muffin pan.
  5. Bake in preheated oven at 160 deg cel for 12 mins or until a skewer inserted comes out clean.

Making of fresh pandan extract

After sitting in fridge overnight, the mixture separated into 2 layers! Remove the top liquid and you will just need the bottom thick extract for baking :) I did not wasted the top clear liquid too, I just pour them into my pot of green bean soup :)


Tuesday, June 24, 2014

Vietnamese Sizzling Crepes (Banh Xeo)


I've never travel to Vietnam so I don't have to chance to compare my homemade version Banh Xeo to the one selling in Vietnam. But I think I've pass the look of this dish and it does taste real good! Crisp and thin crepe (the yellow hue crepe is actually by adding turmeric powder to the rice batter) with lots of greens at the sides and not forgetting the dipping sauce Nuoc Mam Cham which brings out the refreshing taste of the crepes :)


Some of the ingredients required : Rice flour, coconut millk, prawns, chicken fillet, bean sprouts

The batter recipe just nice for making exactly 4 crepes using Happy Call Pan. Huge serving per crepe? Not really as the crepe is real thin with lots of greens added so it is rather light and refreshing crepe to enjoy :)


Ingredient (4-6 servings)

Crepe Batter:
  • 150gm rice flour
  • 1 tsp turmeric powder
  • 3 stalks spring onion, chopped
  • 2 tbsp olive oil
  • 1 cup water
  • 1/2 cup coconut milk
Crepe Filling :
  • 200gm chicken fillet, thinly sliced
  • 200gm peeled prawns, sliced into 2-3 sections
  • 1 medium onion, peeled and thinly sliced
  • 300gm beansprouts, trimmed
  • salt & pepper to taste

Vietnamese Dipping Sauce (Nuoc Mam Cham):
  • 2 cloves garlic, finely chopped
  • 1 red chilli, finely chopped
  • 1/4 cup fish sauce
  • 2/3 cup water
  • 2 tbsp fresh lime juice
  • 1/4 cup sugar
Side Salads :
  • lettuce
  • mint leaves
  • sweet basil leaves
  • cilantro

Method
  1. Marinate chicken fillet with a pinch of salt, pepper and cornflour. Set aside.
  2. Combine all ingredients for the crepe batter and whisk until smooth. Rest for 15-30mins.
  3. Make the dipping sauce by mixing all the ingredients in a bowl. Whisk till sugar is well dissolved. Adjust taste if desired.
  4. Heat 1 tbsp oil in Happy Call Pan (HCP). Add onion and sauté till fragrant and slightly softened. Remove from pan.
  5. Add in chicken slices and pan fried for 2 mins. Remove from pan.
  6. Finally add in prawns and sauté till prawns turn pink. Remove from pan.
  7. Clean the pan with a paper towel. Heat 1 tbsp olive oil over medium high heat. Stir the batter well. Scoop a portion of the batter (slightly less than a cup) into the pan and swirl the pan to distribute the batter evenly over the pan to create a thin layer. As the sides of the pancakes start sizzling, top with onions, chicken, prawn and bean sprouts (be generous with the sprouts!) on the left half sides of the crepes. Sprinkle some pepper over. Lock the pan and cook for 1-2 mins. Uncover the lid and continue to cook over medium high heat until the crepe is crispy and golden. Shift the pan occasionally. Fold the crepe in half and gently slide the crepes onto a serving plate. It is rather tricky to remove the crepes if using a deep HCP. So I use 2 spatulas, each supporting one side of the crepes and swiftly lift the crepes out and place onto a serving plate.
  8. Continue with rest of the crepes, stirring well the batter before scooping. Adding more oil to the pan for each crepe.
  9. Serve crepes hot (cooling down will lose its crispiness) with the dipping sauce along with more salads!


I am submitting this post to Asian Food Fest – IndoChina hosted by Kelly Siew Cooks

Monday, June 23, 2014

Overnight Oatmeal III

Let's start this Monday morning with these healthy oatmeal! Pumpkin Pie, Mocha & Coconut Mango....which one you prefer?

Pumpkin  Pie Overnight Oatmeal


Pumpkin Pie Overnight Oatmeal
Ingredient

Spice Mix - 1/2 tsp ground cinnamon, 1/2 tsp ground nutmeg, 1/2 tsp ground ginger, 1/4 tsp ground cloves, 1/4 tsp allspice, mix well.
  • 1/2 cup rolled oats
  • 1/2 cup plain yogurt
  • 1/2 cup pumpkin puree
  • 1/2 + 1/3 cup low sugar almond milk
  • 2 tbsp raisins
  • 1/2 tbsp chia seeds
  • 3/4 tsp spice mix

Method
  1. Put all ingredients into a clean dry jar, stir well to mix.
  2. Chill in fridge for at least 3 hours before serving.
  3. Garnish with toasted pumpkin seeds and more spice mix if desired.


Mocha Overnight Oatmeal


Mocha Overnight Oatmeal
Ingredient
  • 1/2 cup rolled oats
  • 1/2 cup skim milk
  • 1/2 ripe banana, mashed
  • 1/2 tbsp chia seeds
  • 1 tsp cocoa powder or more to taste
  • 1 tsp coffee granules or more to taste
  • 1/2 tsp vanilla paste
  • 2 tsp honey, or more to taste

Method
  1. Dissolve cocoa powder & coffee granules in 1 tbsp hot water.
  2. Place all ingredients in a clean jar and stir well.
  3. Chill in fridge for at least 3 hours or overnight before serving.
Coconut Mango Overnight Oatmeal


Coconut Mango Overnight Oatmeal
Ingredient
  • 1/2 cup rolled oats
  • 1/4 cup natural yogurt
  • 1 cup low fat milk
  • 1 tbsp toasted desiccated coconut
  • 1/2 tbsp chia seeds
  • 1/2 cup diced mangoes
  • 1 tbsp coconut milk
  • honey to taste

Method
  1. Place rolled oats, yogurt and milk in a clean dry jar.
  2. Stir in desiccated coconut, chia seeds and mango.
  3. Chill for at least 3 hours or overnight.
  4. Before serving, stir in coconut milk and honey to taste.

Saturday, June 21, 2014

Pandan Magic Custard Cake

Pretty? No artificial colourings & flavourings added! How it is done? Pandan Magic Custard Cake of course needs pandan flavours hahaha....Inspired by Baking Tai Tai's version, instead of using pandan essence/paste, I've actually blended some fresh pandan leaves with the milk to obtain the natural colours and flavours :) So happy with the natural soothing green hue! Of course the taste of the cake is good too, is like eating a slice of pandan kaya layer cake


A pan of watery batter :)

This is how it looks when out of oven ;) but the surface will be more wrinkled after further cooling down.

Cross-sectioned of the cake


Ingredient (7" square cake)
  • 120gm unsalted butter
  • 300ml milk
  • 8 thin blades fresh pandan leaves, washed and snipped into small pcs
  • 200ml coconut milk (one pack Ayam brand coconut milk)
  • 4 eggs, separated
  • 130gm icing sugar
  • 120gm plain flour
  • icing sugar for dusting

Method
  1. Preheat oven to 180 deg cel. Lightly grease and fully line a 7" square pan with baking paper slightly overhang the edge of the pan.
  2. Melt butter and set aside and cool down slightly. 
  3. Blend the cut pandan leaves with the milk till smooth. Strain the mixture thoroughly and discard the pulps.
  4. Whip the egg whites till stiff peak formed. Set aside.
  5. In a separate mixing bowl, beat the egg yolks, sugar& salt till pale and creamy. Beat in melted butter for about 2 mins until evenly incorporated.
  6. Sift in flour and beat until combined. Slowly beat in milk and coconut milk. Mixture will be watery.
  7. Fold in the beaten egg whites, 1/3 at a time. Fold in till all whites are evenly incorporated.
  8. Pour batter into the prepared pan and bake for 45-50 mins until the top is golden brown, or a skewer inserted comes out clean.
  9. Remove cake from the pan and cool down completely on wire rack. Dust with icing sugar before serving. Best serve chill.


Friday, June 20, 2014

Danish Butter Cookies

Simplicity is the best! This danish butter cookies were so awfully addictive that me and my kids just polish it off within 2 days :) This is a type of cookie that I will make over and over again as it is effortless to bake it and super yummy!


Butter softened in room temperature for over 24 hours, only needs a couple of whisking and the dough comes together in less than a min!?


before baking

After baking...but  first batch not browned enough so I increased the baking time slightly for subsequent trays :)


Ingredient
  • one 60gm egg
  • 200gm Danish salted butter (place in room temperature for 24 hours before using)
  • 130gm icing sugar
  • 320gm plain flour
  • 2 tbsp vanilla paste 

Method
  1. Sift icing sugar and plain flour.
  2. Place all ingredients in a mixing bowl. Using a electric whisk, beat on low speed for 30 secs. Scrap down the side and beat for another few secs till mixture is smooth. Do not overmix.
  3. Transfer dough into a piping bag using 1M wilton tip. Pipe wreaths onto lined baking sheet.
  4. Bake in preheated oven at 200 deg cel for about 10-12mins until golden brown.
  5. Cool cookies completely before storing in airtight container.


Wednesday, June 18, 2014

Rainbow Pasta


Oooooo I just can't enough of rainbow food ;) Yah I know some of you may detest the use of food coloring, but I usually don't rarely serve food that are loaded with colourings to my kids. Just trying out this recipe for fun....Hahaha this maybe the first and last time I make this colored pasta ;) It is really simple and fun to make this rainbow pasta! Just need to get ready a pack of pasta (I've used linguine), Wilton food colouring paste, some toothpicks and 6 medium ziplog bags and start cooking the pasta in a pot of boiling water.


Ingredient
  • One 500gm package of pasta of your choice (I've used linguine)
  • Wilton food colourings paste 
  • 6 ziplog bags 

Method
  1. Bring a pot of water to boil. Add 1 tsp salt. Cook pasta till al dente. Drain away water and rinse with cold water. Drain well.
  2. Place 2 tbsp hot water into each ziplog bag. Use a toothpick and swab in some food colourings. Mix well with the water. Need not use a lot of colouring, one tiny bit is vibrant enough. 
  3. Add in 1 cup cooked pasta into each bag. Seal the bag and toss the pasta to blend with the colourings. Rest the mixture for 10 mins.
  4. Remove pasta and rinse with cold water individually till water runs clear. Toss the colored pasta with some olive oil to prevent them sticking together. Best use for making cold Pasta Salad. Serve it immediately after mixing it with your favourite salad dressing. 


Please don't laugh at my amatuer drawings ^0^ A simple art work to put into real food 

Tadah!! My kids so happy to see this! hahaha Only made a serving but they happily shared it and finished up everything :) All edible ingredients including rainbow pasta, tomato (sun), cheese (sun), bread (clouds), omelette (birds), broccoli (trees), carrots (flowers), corn kernels, teriyaki chicken.


Related Posts with Thumbnails