Sunday, March 30, 2014

Roselle Non-Bake Cheesecake

It's been some time I make a non-bake cheesecake! The moment I've saw this Roselle Non-Bake Cheesecake, I knew I must made it right away as I've got the pickled roselle and roselle jam all ready!  The cheesecake was done the night before so that it had plenty time to chill thoroughly overnight. Such a lovely & sweet cheesecake to enjoy with the family! :D 


Ingredient
Base
  • 100gm digestive biscuits
  • 60gm unsalted butter, melted
Filling
  • 1 tbsp gelatin powder
  • 2 tbsp water
  • 250gm cream cheese, room temperature
  • 3 tbsp sugar
  • 60ml milk
  • 100gm roselle jam
  • 200ml dairy whipping cream

Method
  1. Line the base and side of a 7" removable cake pan. Set aside.
  2. Place biscuits in a zip log bag and crushed finely with a rolling pin. Combine melted butter with crushed biscuits. Press the crumbs onto the base of the prepared and chilled in fridge for later use.
  3. Soak gelatine with 2 tbsp water. Set aside to allow the mixture to swell before setting the bowl over a pot of simmering hot water. Stir the mixture once the gelatine melts, remove from heated pot and cool slightly before used.
  4. In a mixing bowl, whip the dairy cream until soft peak form. Set aside in fridge.
  5. In another clean mixing bowl, beat cream cheese until smooth. Beat in sugar until well dissolved. Beat in milk and jam follow by the melted gelatine.
  6. Fold whipped cream into the cream cheese mixture with a hand whisk.
  7. Pour the cream cheese mixture on the chilled biscuit base. Smooth the surface and chilled until set.

Roselle Jelly Topping
Ingredient

Method
  1. Soak gelatine with 2 tbsp water, stir lightly. Set aside to allow the gelatine to swell before setting the bowl over a pot of simmering hot water. Stir with a spoon once the gelatine melts.
  2. Add roselle syrup, sugar and water in a small pot. Stir till sugar dissolved at medium heat. Add in gelatine and stir well to combine.  
  3. Cool down the liquid slightly and gently pour over the top of the cheesecake. 
  4. Chill till set before slicing.


Saturday, March 29, 2014

Pickled Roselle & Roselle Jam

The heat is killing me again......feeling refreshed after gulping down a glass of sparkling roselle drink!  It just resembles Ribena!  As I rarely let my kids drink Ribena 'cos of its high sugar content, that's why they are so delighted when get to drink this homemade 'roselle juice' ^0^


These are fresh roselle which I've bought from the wet market. I find it relatively cheap 100gm for S$0.30? ^0^ Therefore I've bought quite a quantity for making pickled roselle and jam! 


Making of roselle pickles

Recipe source : Vivian Pang Kitchen
Ingredient
  • 250gm fresh roselle (net wgt after removing the central seedpod)
  • juice from 1 lemon
  • 300gm sugar

Method
  1. Make a 3cm cut at the bottom of the seedpod. Push the seed out and keep the red fleshy calyx (try not to tear up the whole calyx)
  2. Rinse the red fleshy calyx thoroughly.
  3. Bring a pot of water to boil. Add in clean red fleshy calyx and blanch for about 5 seconds. Remove and drain. Leave aside to cool.
  4. In a mixing bowl, add in cool calyx together with lemon juice and 150gm sugar. Mix gently to combine.
  5. Prepare a clean jar. Spoon in calyx mixture. Add in remaining 150gm sugar over the top.
  6. Close the lid and leave the jar at room temperature for 3 days before refrigerate. (turn over the jar each day to ensure all the calyx is evenly covered with the sugar syrup.

Pickled Roselle after 3rd day


Puree roselle for making the jam. A simple and fast process of cooking the jam by blending the deseeded roselle prior to cooking. 


Ingredients
  • 250gm fresh roselle calyx (net wgt after removing seedpod)
  • 1/2 cup water
  • 300gm brown sugar

Method
  1. Wash the red fleshy calyx till clean. Tear into small size. Blend (in batches) with water till fine.
  2. Pour the blended roselle into a pot. Add in sugar and cook at medium low heat until the mixture becomes thick, for about 30mins. Stir occasionally during the end of the process to prevent the mixture fro scorching.
  3. Turn off heat. Immediately transfer the jam into a warm sterilised jar and seal up tightly.

Wednesday, March 26, 2014

Indonesian Style Grilled Chicken (Ayam Bekakak)

This is another grilled chicken which is well received by the kids and adults. It taste smoky sweet with lots of spices flavour. Instead of grilling the whole chicken till cooked, it is lightly simmered in a blend of spices and herbs sauce. Thereafter the chicken is drained from the thickened gravy and grill in griddle pan (I've used Happy Call Pan) till charred and golden.  Not too complicated to cook this dish, but just to take note the heat while grilling to prevent over charring....yah I almost burnt the whole chicken as I overlooked the timing ^0^""


Ingredient
  • 1 chicken, split the back, crushed lightly to flatten it
  • 2 lemongrass stick, crushed lightly
  • 2 bay leaves
  • 2cm blue ginger, crushed lightly
  • 1 tbsp tamarind paste, mixed with 2 tbsp water, discard the seeds
  • 2 kaffir lime leaves
  • 5 tbsp dark sweet soy sauce
  • 500ml water
Spice :
  • 6 shallots
  • 4 cloves garlic
  • 2 cm old ginger
  • 2 cm yellow ginger
  • 1 tsp coriander seeds
  • 1 tbsp sugar

Method
  1. Process spice ingredients in food processor till smooth.
  2. Heat 3 tbsp oil in a deep pan, sauté spice paste till fragrant.
  3. Add in lemongrass, bay leave, lime leaves and blue ginger and fry till fragrant.
  4. Add in chicken, flip occasionally, cook briefly for 8 mins.
  5. Add in water, kecap manis and bring to boil. Cook on medium heat till sauce thickens, flipping occasionally.
  6. Remove chicken from pan and reserved the gravy.
  7. To grill : Place chicken in Happy Call Pan, drizzle over some gravy. Lock pan and cook over medium heat till both sides are golden brown. Drizzle more gravy over the chicken after each time when flipping the pan.

I am submitting this post to Asian Food Fest: Indonesia (Wendy from Wendyinkk.blogspot.sg), hosted by Alice from I Love. I Cook. I Bake(Link to HERE)   

Sunday, March 23, 2014

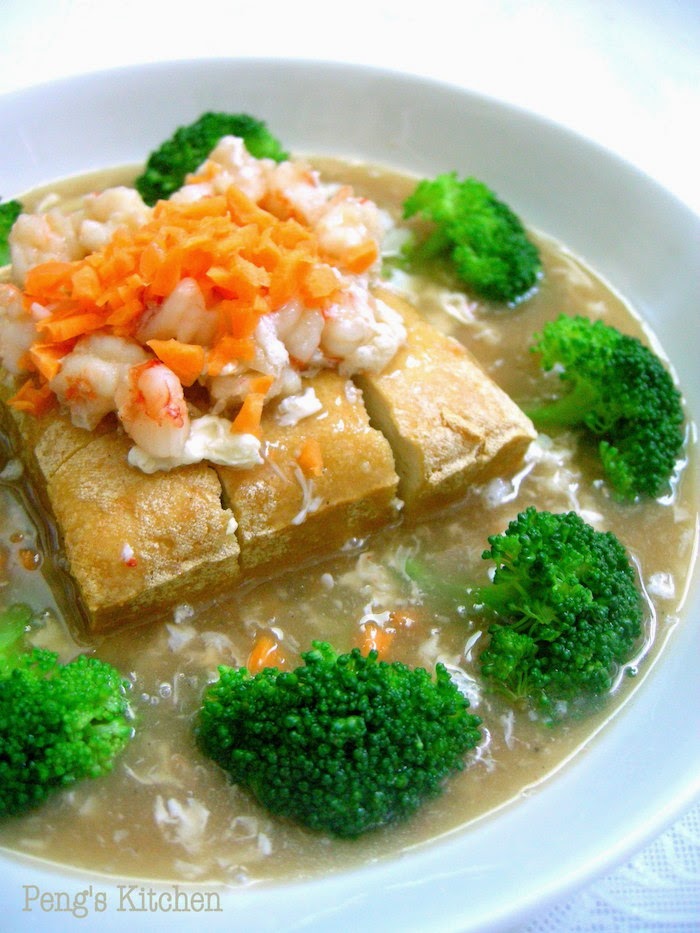
Tofu in Creamy Egg Sauce

This is a healthy delicious dish which my kids will not rejected as all their favourite ingredients are used, tofu, prawn and broccoli! Top with creamy egg sauce,  and serve along with bowl of warm rice, they enjoyed their lunch like  happy little birds :D


Recipe source : Yum Yum Magazine Jan 2014
Ingredient
  • 1 block firm tofu
  • 80gm broccoli florets
  • 1 tsp chopped garlic
  • 100gm prawn meat, diced
  • 300ml water
  • 1 tbsp chinese wine
  • 1/2 tbsp oyster sauce
  • 1 tsp chicken stock powder
  • 1 tsp light soy sauce
  • 1 tsp sesame oil
  • 1/2 tsp pepper
  • 1 tbsp cornflour water
  • 1 egg white
  • 1 tbsp chopped carrot

Method
  1. Blanch broccoli florets in boiling water for 2 mins. Drain away water. Set aside.
  2. Heat some oil in wok, pan fried tofu till golden brown on all sides. Remove and place on serving plate.
  3. Leaving 1 tbsp oil in wok, add in garlic and fry till fragrant.
  4. Add in prawn and fry till they turn pink.
  5. Add in water and seasoning and bring to boil.
  6. Add in cornflour water to thicken. Add in egg white and turn off heat.
  7. Cut fried tofu into 9 squares. Spoon the creamy egg sauce over the tofu. Arrange blanched broccoli at the sides. Top with chopped carrots. Serve immediately.

I am also submitting this post to the event, Little Thumbs up organised by Doreen from my little favourite DIY and Zoe of Bake for Happy Kids, hosted by Moon from Food playground at this post.

Saturday, March 22, 2014

Indonesian Fried Noodle (Mie Goreng Java)

Talking about instant noodle, one of my favourite brand should be Indomie Mee Goreng! Once in a while I will indulge a pack as a quick snack :P  While browsing recipe for this month Asian Food Fest : Indonesia, I found this homemade Indonesian Fried Noodle which tasted fantastic good! Love the peppery and nutty flavour with a tinge of sweetness. The first attempt I've forgotten to take into consideration the level of spiciness my kids can accept, I've added too much pepper and they had a hard time polishing off their plate of noodle. My hubby also commented too much pepper added >.<" Therefore the second attempt I've reduced the peppercorns used and it tasted much much better for all of us :D


Recipe source : NoRecipes with slight modifications
Ingredient
  • 300gm dried egg noodles
  • 5 cloves garlic, chopped
  • 4 candlenuts, presoaked
  • 1 tbsp whole white pepper
  • 250gm chicken breast, thinly sliced
  • 180gm cabbage, thinly sliced
  • 200gm bean sprouts
  • 3 stalks spring onion, chopped
  • 2 stalk chinese celery, chopped 
  • 4 tbsp sweet dark soy sauce
  • 1 tbsp light soy sauce
  • 300ml chicken stock (dissolved 1 non-MSG stock cube in water)

Method
  1. Cook dried egg noodles as per packaging instructions. Drain well and set aside.
  2. Combine garlic, candlenut and pepper in a electric grinder and process till smooth.
  3. Heat some oil in wok. Stir fry spice paste till fragrant over medium heat briefly.
  4. Toss in chicken and stir to mix with the spice. 
  5. Add sweet dark soy sauce & light soy sauce and mix well.
  6. Add in chicken stock and cabbage. Bring to boil and cook for 2-3 minutes until cabbage is tender and liquid reduced slightly.
  7. Add in noodles and stir evenly. Add in bean sprouts, spring onion and celery, mix well. Turn off heat.
  8. Serve immediately with sambal chilli and lime at the sides.


I am submitting this post to Asian Food Fest: Indonesia (Wendy from Wendyinkk.blogspot.sg), hosted by Alice from I Love. I Cook. I Bake(Link to HERE)   

Thursday, March 20, 2014

Anka & Charcoal Butter Cake

These were actually baked during this year Chinese Lunar New Year for my family gathering :) I've baked two butter cakes one using egg separation method (the famous Mrs Ngsks's recipe) and there other whole egg method (Topo  Map Love Cake). So which cake was more well-recieved? hahaha actually no winner or loser for this question :D Those whom prefer fluffier and soft texture liked the Anka & Charcoal Butter Cake, whereas those prefer firmer cake crumbs liked the Topo Map Love Cake. Anyway all the cakes were finished by everyone so I guessed both cakes taste equally good :D


Modified from Mrs Ngsks Vanilla Butter Cake
Ingredient
  • 250gm salted butter
  • 200gm eggs, no shell (4 large eggs)
  • 50gm + 150gm sugar
  • 200gm self raising flour, sifted
  • 60ml milk
  • 1 tsp vanilla paste
  • 1 tsp charcoal powder
  • 1 tsp anka powder + few drops of red coloring 

Method
  1. Preheat oven at 160 deg cel. Prepare a 7 inch square pan. Line the base and grease the sides (greasing helps the cake’s sides to rise well)
  2. Separate the eggs, and place the whites into a medium sized bowl. Beat egg whites until soft peaks, gradually add 50gm sugar and beat until stiff. Set aside.
  3. Cream butter and 150gm sugar until pale and fluffy. Put in vanilla paste and and beat for a while. Put in egg yolks one by one and beat well after each addition.
  4. Put in half the flour and mix on low speed until incorporated. Put in milk in 2 additions and mix until well incorporated. Mix in balance of flour.
  5. Divide egg yolk batter into 2 equal portions. Add charcoal powder into one portion and anka powder with red coloring into another portion. Fold well.
  6. Divide beaten egg white into 2 equal portions and fold into the charcoal batter and anka batter respectively.
  7. Spread a portion of anka batter onto the cake pan, follow by the charcoal batter. Repeat with another anka batter and finish with the charcoal batter on the top layer. 
  8. Bake for 45 minutes or until skewer comes out clean. Remove from oven and invert to cool completely before unmoulding.


I am linking this post to the Bake Along #59 event hosted by Zoe of Bake for Happy KidsJoyce of Kitchen Flavours and Lena of Frozen Wings.

Wednesday, March 19, 2014

Chocolate Olive Oil Cake (Nigella)

This is another chocolate cake I really really adore as it is butter-free and flourless! Sounds really healthy yah? ^0^ Even my two kids enjoyed this chocolate cake too thus the cake was completely wiped off by the 2nd day!

I've thought made a right choice of using a round base 8" pan :D After unmoulding the cake onto the serving plate, it revealed a rounded edge surface which it looked rather cute :D


Recipe source : Nigella.com
Ingredient
  • 150ml olive oil
  • 50gm unsweetened cocoa powder, sifted
  • 125ml boiling water
  • 1 tsp vanilla paste
  • 150gm ground almonds
  • 1/2 tsp baking soda
  • pinch of salt
  • 150gm sugar
  • 3 large eggs

Method
  1. Combine cocoa powder with boiling water and whisk till smooth. Add in vanilla paste, cool down.
  2. Combine ground almond, baking soda and salt.
  3. Place sugar, oil and eggs in a mixing bowl. Using a electric whisk, beat for 3 minutes until the mixture has aerated and thickened.
  4. Lower speed and beat in cocoa mixture. Tip in almond mixture and beat briefly.
  5. Scrape the mixture into a lined 8" cake pan. Bake in preheated oven at 160 deg cel for 45 mins.
  6. Cool in pan for 10mins. Gently loosen the edge with a spatula and turn the cake onto a serving plate.  Leave to cool completely or serve while still warm.


I'm linking this post to Cook Like A Star, All-Stars Anniversary Party, hosted by Zoe of Bake For Happy KidsMich of Piece of Cake and Joyce of Kitchen Flavours.

Tuesday, March 18, 2014

Indonesian Style Steamed Chicken Rice (Nasi Tim Ayam)

Craving for chicken rice? Try this simplified version! The rice and chicken are lightly sautéed with butter and sesame together with some simple seasoning. Instead of using pre-packed stock, I simmered a pot of simple chicken stock for cooking the rice. Yes everything is simplified but it did not compromise the taste :D Result is a light and flavourful chicken rice but less oilier than the traditional Hainanese Chicken Rice :D 


Recipe source : ILove.ICooke.IBake
Ingredient
For the chicken :
  • 3 cloves garlic, chopped
  • 1 medium onion, chopped
  • 500gm chicken breast, diced
  • 1 can button mushroom, sliced
  • 1 tbsp butter
  • 1 tsp sesame oil
  • 1 tbsp light soy sauce
  • 1/2 tbsp dark soy sauce
  • 1 tbsp oyster sauce
  • 1 tsp sugar
  • 1 tsp pepper
For the rice :
  • 2 cups rice, washed and drained
  • 4 cloves garlic, chopped
  • 1 tbsp butter
  • 1/2 tbsp sesame oil
  • 1 tbsp light soy sauce
For the soup : Bring to boil and simmer for 2 hours, sieved
  • 500gm chicken breast bone
  • 1 onion, chopped
  • 1 carrot, chopped
  • 1 tsp pepper

Method
  1. Chicken : Heat butter and sesame oil. Fry onion and garlic till fragrant.
  2. Add chicken and fry till meats turn white. Add in seasoning and mix well. Set aside.
  3. Rice : Heat butter and sesame oil. Fry garlic till fragrant.
  4. Add in rice and soy sauce and mix evenly. Add in chicken stock and cook in rice cooker as required till cook.
  5. Prepare heat proof melamine bowls. (I've used disposable foil bowl)
  6. Put some chicken mixture at the bottom of each bowl.
  7. Add cooked rice on the top of the chicken till almost full.
  8. Put bowls in the steamer and steam for 30 mins.
  9. To serve....Unmould the chicken rice on a serving plate and serve with soup (I've added some chopped cabbage into the balanced stock and simmer for 30mins) at the side.


I am submitting this post to Asian Food Fest: Indonesia (Wendy from Wendyinkk.blogspot.sg), hosted by Alice from I Love. I Cook. I Bake(Link to HERE)   

Saturday, March 15, 2014

Sweet & Spicy Prawns

Do you like Chilli Crab? If you do, you will definitely love this sweet and spicy prawns :D The gravy  taste similar to chilli crab except prawns are used here :D Fresh, succulent big prawn goes well with this sweet spicy thick gravy, can't help licking up all the delicious sauce!


Recipe source : Yum Yum Magazine Jan 2014
Ingredient
  • 3 cloves garlic
  • 2 tbsp chopped ginger
  • 1 medium onion, diced
  • 1 red chilli, deseeded and diced
  • 300gm shelled big prawns
Seasoning
  • 4 tbsp tomato sauce
  • 1 tbsp chilli boh
  • 2 tbsp sugar
  • 1 tsp salt
  • 200ml water
  • 1 tbsp cornflour water, for thickening
  • 1 small egg, beaten
  • spring onion for garnish

Method
  1. Heat 1 tbsp oil in pan, sauté garlic and ginger till fragrant.
  2. Add in onion and chilli and fry till onion is softened.
  3. Add in seasoning and prawn. Bring to boil and cook till prawns cooked through.
  4. Thicken gravy with cornflour water. Add in beaten egg and spring onion. Toss evenly. Dish up to serve.


I am also submitting this post to the event, Little Thumbs up organised by Doreen from my little favourite DIY and Zoe of Bake for Happy Kids, hosted by Moon from Food playground at this post.

Friday, March 14, 2014

Indonesian Style Curry Puffs

This is my first time making curry puffs! The filling of this indonesian style curry puff is not the usual  spicy chicken/sardine which is commonly sold here. It has tanghoon (rice vermicelli) inside, along with some chicken meat, carrots and french beans...unusual isn't it? ^0^ and yes is not spicy too which is kids friendly. But I like some heat so I dip them with some sambal belacan! Yumz!!


Recipe source : ILove.ICook.IBake
Ingredient (12 curry puffs)
Dough :
  • 125gm plain flour
  • 1/4 tsp salt
  • 1/4 tsp chicken stock powder
  • 20gm butter
  • 30gm beaten egg
  • 2 tbsp icy cold water
Filling:
  • 2 shallots, chopped
  • 2 cloves garlic, chopped
  • 2 tsp chopped parsley
  • 150gm chicken breast, finely diced
  • 100gm carrots, finely diced
  • 50gm french beans, thinly sliced
  • 25gm bean vermicelli, soaked till soft and cut into short strands
  • 2 tsp salt
  • 1/4 tsp pepper
  • 1/8 tsp ground nutmeg
  • 1/4 tsp sugar
  • 1/4 tsp chicken stock powder
  • 100ml water
  • 2 hardboiled eggs, cut into 6 sections

Method
  1. Dough : mix plain flour, salt and chicken stock powder together.
  2. Add in butter and rub till mixture resembles crumbs.
  3. Add in egg and water. Lightly knead till a soft dough is formed.
  4. Cling wrap and rest the dough for 30mins before using.
  5. Filling : Add 1 tbsp oil in pan, sauté shallot, garlic and parsley till fragrant.
  6. Add in chicken and fry till opaque.
  7. Add in carrots and french beans, stir fry for 2 mins.
  8. Add in seasoning and water, simmer till liquid reduce.
  9. Add in tanghoon and mix evenly. Turn off heat. Cool completely before using.
  10. To wrap : Divide dough into 12 portions, approx 16gm each.
  11. Roll out each dough into a thin round disc, spoon in some filling and a slice of egg. Fold up into a semi circle shape and seal the edge firmly. Plaits around the edges.
  12. Heat oil on high heat. Slide in the puffs (in batches), off the heat for awhile. Wait till the skin forms bumps then turn on the fire again. Deep fry on medium heat till golden brown. 
  13. Drain well on kitchen paper. Serve warm with sambal belacan at the sides.


I am submitting this post to Asian Food Fest: Indonesia (Wendy from Wendyinkk.blogspot.sg), hosted by Alice from I Love. I Cook. I Bake(Link to HERE)   

Thursday, March 13, 2014

Foochow Braised Fried Noodles (Chao Zhu Mian) 炒煮面

I love this month theme event by Little Thumbs Up : Prawn simply because prawn is my favourite seafood of all! ^0^ This Foochow braised noodles looks rather similar to our local Hokkien Mee but actually the taste is not the same. The main seasoning required is the Foochow red wine and the usual dark and light soy sauce. Prawn and fishball are being braised with the noodle therefore the gravy is enhanced with sweet seafood flavours. I've attempted the dish again but without adding the prawn (my hubby does not like prawn!) .... verdict? I still prefer the one with added prawn! :D 


Recipe ref : Kellysiew 
Ingredient (4 servings)
  • 400gm thin hokkien noodles, rinsed and set aside
  • 240gm medium prawns, trimmed and deveined
  • 9 fresh fish balls, sliced in half
  • 100gm pork fillet (marinated lightly with dash of sesame oil, light soy sauce, pepper & cornflour)
  • 3 cloves garlic, minced
  • 90gm choy sum, trimmed
  • spring onion for garnishing
  • 4 tbsp dark soy sauce
  • 2 tbsp light soy sauce
  • 2 tbsp foochow red wine
  • 1/2 tsp white pepper
  • 2 tbsp cornstarch water

Method
  1. Heat 2 tbsp oil in wok over high heat. Add garlic and sauté till fragrant.
  2. Add in pork, prawns and fish balls and toss quickly.
  3. Add in noodle and mix well.
  4. Add in seasoning and choy sum, toss evenly. Add in 400ml water and cook for 3-4 mins.
  5. Add in cornstarch water and cook till broth has thickened slightly. Turn of heat and garnish with spring onion before serving.


I am also submitting this post to the event, Little Thumbs up organised by Doreen from my little favourite DIY and Zoe of Bake for Happy Kids, hosted by Moon from Food playground at this post.

Wednesday, March 12, 2014

Wild Yam Salad with Plum & Osmanthus Dressing

Not wanting to have a full and heavy lunch, today I've prepared a  sweet and refreshing salad as lunch. ^0^ It is filling enough and yet won't feel sluggish even after a huge bowl of serving!!


Recipe source : Xin Flavours 19th Issue
Ingredient

  • 400gm fresh Chinese yam, 山药
  • 350gm lotus root, 莲藕
  • 50gm red capsicum, cut into strips
  • 50gm green capsicum, cut into strips
  • 50gm soaked black fungus, cut into strips
  • 50gm carrots, cut into strips
  • toasted sesame seeds for garnish
Dressing :
  • 3 tbsp plum sauce
  • 1 tbsp olive oil
  • 1/4 tsp salt
  • 1 tsp sugar
  • 1 tbsp lime juice
  • 1/2 tbsp dried osmanthus flower


Method

  1. Peel and cut Chinese yam into strips. Peel and slice lotus roots. (soak in water to prevent browning)
  2. Bring a pot of water to boil. Blanch black fungus, Chinese yam and lotus roots respectively. Drain away water and soak in cold water for 10mins.
  3. Mix salad dressing evenly. Place all ingredients into a mixing bowl and add in the dressing. Toss evenly.
  4. Garnish with sesame seeds and serve.


I'm linking this post to :
Related Posts with Thumbnails