Wednesday, June 22, 2016

Pandan Nasi Lemak

Today I invited my girlfriend over for a simple afternoon lunch. Glad she enjoyed the Nasi Lemak set  and had a second helping of the rice! As for my hubby, he super like the Nasi Lemak Sambal as it is not too spicy and most importantly, no added belacan as per he requested ^0^. I personally like the way the pandan coconut rice turned out as what I am expecting....rich green and very fragrant, and it is naturally without any food colourings added!


Before and after 

How to get the au natural green pandan rice without adding any food colourings? Simply blend about 20 blades fresh pandan leaves with 500ml water. Squeeze the pulp thoroughly over a sieve to extract the juice. Transfer the pandan juice into a container. Let it sit in fridge overnight. Next day you will see the chlorophyll has settled at the bottom of the container. Carefully pour the top clear liquid into a bowl. We need about 200ml of the deep green pandan extract. Top up with the clear pandan juice to make it up to 200ml if the extract is insufficient.


Pandan Coconut Rice
Ingredient
  • 400gm long grain rice
  • 200ml coconut milk
  • 200ml fresh pandan extract*
  • 2 slices ginger, lightly crushed
  • 2 shallots,  sliced
  • 1 clove garlic,  sliced
  • 1 lemongrass, white section only, lightly crushed
  • 2 pandan leaves, knotted
  • Nasi Lemak sambal to serve

Method
  1. Wash, rinse and drain the rice. Combine all the ingredients evenly in the rice cooker. Cook as per your rice cooker instructions.
  2. After rice is cooked, rest it for 15 mins. Remove pandan leaves, ginger and lemongrass. Fluff up the rice. Serve with sambal and sides like sunny side up, fried chicken wings, fried groundnuts/anchovies.

Fried Sunnyside Up

Fried chicken wings is a must!

Recipe ref : FB Christine Tan
Crispy Fried Chicken Wings
Ingredient
  • 12 fresh chicken wings
  • 3/4 tsp salt
  • 1 tbsp sugar
  • 3 tbsp hua tiao jiu
  • 3/4 tbsp five spice powder
  • 1 tsp pepper
  • 3 tbsp light soy sauce
  • 4 tbsp plain flour
Flour coating (mix well)
  • 8 tbsp plain flour
  • 3 tbsp corn flour
  • 4 tbsp sweet potato starch

Method
  1. Combine the seasoning with the chicken wings and allow to marinate in fridge overnight.
  2. The next day, bring out the chicken wings to room temperature. 
  3. Coat the chicken wings evenly with the flour mixture. 
  4. Heat oil in a wok till hot, drop in chicken wings, in batches, fry till golden brown.
  5. Drain well on kitchen paper before serving.
Enjoy!!


Sunday, June 19, 2016

Winter Chicken Stew

This is a hearty and scrumptious chicken stew perfect during chilling weather. Though Singapore is summer all year round, we still can enjoy this warm stew any time as we like! I like to make one pot stew during busy days or clueless on what to prepare. Fast, simple and delicious! Today sharing this recipe as I discover a  method of making the stew creamier without adding any flour! Instead grated potato is added during the stewing process, resulting a thick and creamy gravy, awesome right?!


Leek, carrots, parsnip, potato, onion, garlic, skinless chicken thigh

One pot cooking

Serve with crusty bread if you like! 

Ingredient
  • 1 medium onion, finely chopped
  • 2 cloves garlic, sliced
  • 6 chicken thigh, skinless and chopped into bite sizes
  • 700ml chicken stock
  • 1 large potato, grated
  • 1/2 tbsp dried thyme
  • 1 tsp dried rosemary
  • 2 medium carrots, cut into chunks
  • 1 parsnips, cut into chunks
  • 2 leeks, thickly sliced
  • salt & pepper to taste

Method
  1. Heat 1 tbsp olive oil in a deep casserole. Add onion and garlic and fry till fragrant and onion is softened.
  2. Add in chicken pieces and fry for 2 mins.
  3. Add in stock, grated potatoes and herbs. Bring to boil.
  4. Stir in carrots, parsnips and leeks, cover  and simmer on low heat for 45 mins, stirring occasionally, till all the vegetables are tender and gravy is thickened. 

Saturday, June 18, 2016

Curry Chicken & Roti Jala

Ooh such a nice cooling weather these couple of days. This is such a perfect weather to enjoy a  hearty bowl of spicy curry chicken! My two kids, 9 and 6 years old, love curry chicken but they usually 'attack' the curry gravy and potatoes more than the chicken meat. ^0^'''' I've adjusted the spiciness level which the kids can tolerate and yet not too mellow for the adults. Enjoy! 


Curry Chicken
Ingredient
  • 5 whole chicken leg, chopped into half pieces
  • 4 potatoes, peeled & cut into big chunks
  • 100ml coconut milk
  • 150ml evaporated milk
  • 650ml water
  • 5 tbsp meat curry powder
  • 1 tbsp chilli powder
  • 15 leaf of curry leaves
  • 6 shallots
  • 6 cloves garlic
  • 1 stalk lemongrass, bruised
  • 3 tbsp rice bran oil
  • salt & sugar to taste

Method
  1. Grind shallot and garlic into paste.
  2. Mix curry powder and chilli powder with 4 tbsp water to form a smooth paste.
  3. Heat oil in a deep pot. Fry garlic and shallot paste, curry leaves, lemongrass and curry paste till fragrant.
  4. Add in chicken pieces and sear them for 5 mins.
  5. Add in water and bring to boil. Add in potatoes and mix well. Cover the pot with lid and let it simmer for 15 mins under low heat.
  6. Add in salt & sugar to taste. Stir in coconut milk and evaporated milk and bring to boil. Adjust taste accordingly. Turn off heat. Leave to cool down for 10mins before serving.
Recipe ref : Annielicious Food


This is my first time cooking and eating Roti Jala (Net Crepes)!  The batter is consisted a simple mixture of eggs, coconut milk, flour, turmeric powder. Then it is poured into a roti jala mould (I used a simple piping tube bought from Daiso), drizzled in circular patterns onto a heated pan. It cooked very quickly! Thereby it is loosely folded to form a netlike crepes! These beautiful lacy crepes just perfect for mopping up the curry gravy!


Roti Jala
Ingredient
  • 140gm plain flour
  • 1 large egg
  • 300ml water (+/-)
  • 100ml coconut milk
  • 1/2 tsp turmeric powder
  • 1/2 tbsp cooking oil
  • 1/2 tsp salt

Method
  1. Place all ingredients in a mixing and whisk well to incorporate.
  2. Heat up a non-stick pan (no oil is needed) over low heat. Fill a container with batter, attached with a piping tip. Pipe out the batter over the pan in a circular motion to make the crepe.
  3. Cook the crepe on one side only, until the crepe is set. Fold crepe into quarter and remove from pan. Repeat the process till batter are used up.
  4. Serve roti jala with curry chicken.
Recipe ref : Annielicous Food


Thursday, June 16, 2016

Curry Spice Roasted Chicken

Inspired by the newly Hello Kitty Orchid Garden Cafe  opened in Singapore, I tried a simple cute lunch set for the kids at home, rather then burning a big hole in my pocket bringing them to the cafe. Hello Kitty set for princess and Pooh Bear set for the prince. ^0^ Princess do not wanted the roasted mixed vegetables, so I served her with more fresh salad and sautéed butter mushroom. How to make the pooh bear rice? Just cook rice as usual, then mix a small bowl of rice with 2 cooked egg yolks to obtain the natural yellow rice. Cute?? 


Before baking

After baking
Ingredient
  • 1 large chicken, spatchcocked
  • 1 tbsp coconut oil
  • 2 cloves garlic, finely minced
  • 2 tsp curry powder
  • 1 tsp paprika
  • 1 tsp salt
  • 1 tsp ground ginger
  • 1 tsp chilli powder

Roasted Mixed Vegetables (toss everything well to combine)
  • 5 baby potatoes, halved & boil for 10 mins
  • 2 carrots, cut into chunks
  • 2 corn cobs, cut into chunks
  • 1 tbsp coconut oil
  • 1 tsp salt
  • 1/2 tsp black pepper
  • 1 tsp mixed herbs

Method
  1. Combine all chicken seasoning together into a paste.
  2. Rub the spice paste all over the chicken. Cover and leave to marinate in fridge overnight.
  3. Remove the chicken from fridge and leave to room temperature before roasting.
  4. Place mixed vegetables in a large baking tray, spread out evenly. Place marinated chicken over the vegetables.
  5. Bake in preheated oven at 200 deg cel for 40 mins until skin is crisp and golden. Carefully remove roasted chicken onto a serving plate. 
  6. Give the roasted vegetable a few stir. If the vegetables is not tender enough, further bake for another 5-10 mins.


Wednesday, June 15, 2016

Homemade Basic Rempah (Spice Paste)

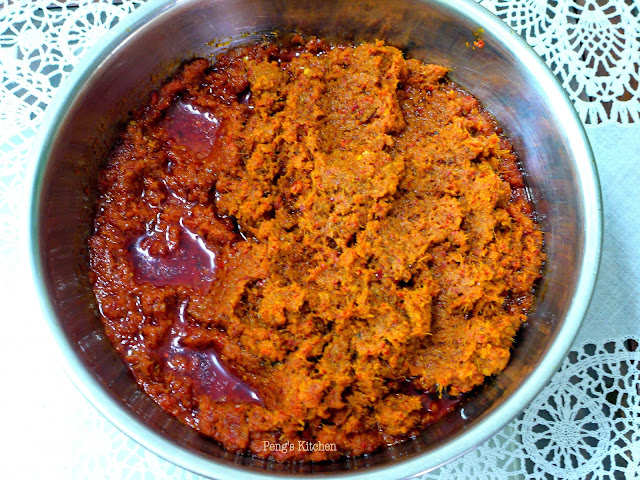
It is school holiday therefore I've ample time on hand to prepare something which I've plan for quite some time...cooking rempah!! You must be thinking making rempah doesn't require much time or effort, anytime can make it right??!! As I am making a large batch at a go, the slicing and cooking process took me a bulk of the time, quite time consuming actually. Hahaha I think my next rempah preparation will be in December school holidays, if my current stock can last till then! Thanks Alan for sharing his generic rempah recipe, it is a very versatile spice paste recipe which can be used as a base for curry, laksa lemak paste, achar, satay peanut sauce etc. At the end of the post I've shared a Nasi Lemak Sambal recipe by using the basic rempah!

Basic Spice Paste...no sugar, salt or belacan added at this stage

getting ready all the ingredients for slicing before blending into paste

took me quite some time to get all these sliced up! *sweat* this is only the beginning! *gasp*

from raw orangy paste and sautéing till dark and glistering with oil separated!

After 1 hour of frying, yielding approx. 1.6 kg of awesome rempah

Ingredient (yields approx. 400gm)
  • 5 red chilli, roughly sliced *
  • 10 dried red chillies, soaked till softened *
  • 5 candlenuts, roughly chopped
  • 15 shallots, peeled and sliced
  • 5 cloves garlic, peeled and sliced
  • 4 stalks of lemongrass, lower 1/3 whitish portion, sliced
  • thumb length knob of ginger, sliced
  • thumb length knob of galangal, sliced
  • thumb length knob of turmeric root, sliced
  • 3/4 cup rice bran oil
* I've removed some of the seeds as I do not want the paste to be too spicy, you can opt to retain them :)
Note : I've increased the proportion (x4) of the ingredients and the cooking process took me about 1 hour. The final cooked rempah weighed approx. 1.6 kg. Thereafter I divided them into 200gm each, packed and freeze.


Method
  1. Using a food processor, blend all the ingredients, except oil, into a paste. *do not add water!! drizzle in some oil instead to ease the blending process. 
  2. Heat cooking oil in a wok over medium heat.
  3. Scoop the blended spice mixture into the hot oil. Saute the mixture over medium low heat until fragrant and oil begins to separate from the paste. *took me a approx. 1 hour to obtain a dark, glistering paste.
  4. Cool down the rempah completely before storing and freeze in desired portions for future use. 

Transforming the basic rempah to make some Nasi Lemak sambal!! 

Nasi Lemak Sambal
Ingredient
  • 250gm basic rempah
  • 50gm gula melaka, finely chopped
  • 100ml thick tamarind liquid (dissolve 1 heap tbsp in some water)
  • 1 tsp toasted belachan powder (optional)
  • salt to taste

Method
  1. Place rempah in a heated pan. Add in tamarind liquid, gula melaka and belachan is using. 
  2. Cook over low heat and stirring constantly till sugar is well dissolved.
  3. Add in salt to taste.
  4. Remove from heat. Cool down before serving.


Monday, June 13, 2016

Steamed Rainbow Cake

Munching on a slice of my steamed rainbow cake while busying trying to get this blog post out.....went on to take a second slice as it was really delicious! 我没骗你们,味道真的不错!hehehe....This is a simple sponge cake (whole egg method) flavoured with coconut milk. No butter is added as the coconut milk is rich enough to give flavour and moisture to this lovely sponge cake. The layerings though can be further improved. You can see that the red layer is thinner than the rest, as I've distributed too much batter for the earlier colour layers. Hahaha lesson learnt...don't act smart....should have just follow the weight of each colour batter I've measured out! ^0^ The heat of the steamer is maintained at low heat all the way, this way the colour layerings will be even and no bulging at all! At least I'm very satisfy with the outcome of the rainbow layers...happy rainbow!! 🌈🌈🌈 


Before (top pic) & after (bottom pic) slicing. The sliced section revealed how spongy the cake texture is! It does not have the texture like a chiffon cake which is light and fluffy. Instead this steamed rainbow cake texture is firm and yet soft.


Ingredient
  • 6 eggs
  • 200gm fine sugar
  • 1 tsp cake emulsifier 
  • 1 tsp vanilla paste
  • 1/4 tsp salt
  • 280gm cake flour
  • 200ml coconut milk
  • Wilton food colouring paste : violet, blue, green, yellow, orange, red

Method
  1. Grease a 8" square pan and preheat steamer.
  2. Combine eggs, sugar, vanilla, emulsifier and salt in a mixing bowl. Using a electric whisk, beat on high speed, about 8 mins, until the batter is thick and pale.
  3. Using a spatula, sieve in flour and fold into egg batter, in 3 additions, alternate with coconut milk.
  4. Divide mixture into 6 portions, approx. 165gm. Tinted each batter with food colourings accordingly.
  5. Spread the violet batter into the pan and steam for 5 mins over low heat. Repeat with blue, green, yellow, orange and red batter.
  6. For the final layer, steam for 15 mins till whole cake is cooked through.
  7. Remove pan from steamer. Rest cake in pan for 10mins. Unmould and cool completely on wire rack before slicing.

Can't stop snapping different angles of this steamed rainbow cake ^0^ so pleasing to the eyes! 


Sunday, June 12, 2016

Baked Tapioca Cake (Kueh Bingka Ubi Kayu)

Finally satisfied my cravings of this coconut-ty and rich tapioca kueh! This is not my first time attempting this traditional kueh. There are various method in making this, either by grating the fresh peeled tapioca or the lazy way blending everything up! This time round I decided to try out Alan's recipe instead of my previous old recipe as I find his recipe really interesting! No water is added into the tapioca mixture. Instead the liquid is being extracted and discarded, leaving behind a mass of natural thick tapioca starch which is then mixed together with the batter! The result of this baked tapioca cake is so rich and flavourful, even my boy whom seldom taste this kueh had two slices at one go! 


If you look carefully at the slices, there are white strands embedded. They are actually fresh grated coconut! 

Select skinny tapioca rather than those thick huge one, as the latter will be too fibrous. Discard the centre hard core if any. But the skinny tapioca is really tender and I just grated all the flesh!

Grating process is the laborious part, other than that making of this kueh is a breeze! If you have a powerful food blender you can try the blending method. ^0^

I love eating kueh but my family can't possibly polish up the whole 7" cake! Hahaha so I distributed 2/3 of it to my neighbours and friends. Unfinished portion can be stored in fridge for 1 day, just zap in  microwave for 30 secs to warm it up or steam briefly to heat up slices.


Ingredient (7" square pan)
  • 1 kg freshly grated tapioca/cassava (I used about 5 skinny fresh unpeeled tapioca)
  • 250gm fine sugar
  • 2 eggs + 1 yolk, lightly beaten
  • 500ml thick coconut milk
  • drops of yellow food colouring (optional)
  • 80gm freshly grated coconut
  • 25gm melted unsalted butter
  • 1/4 tsp salt

Method
  1. Using a muslin/cheese cloth and squeeze out as much juices from the grated tapioca as possible into a small clear bowl.   
  2. Allow the bowl of starchy juice to settle for 30mins. Carefully remove & discard the top yellowish liquid, leaving behind a layer of tapioca starch at the bottom.
  3. Combine grated tapioca, tapioca starch, sugar, eggs, coconut milk, butter, salt & grated coconut into a mixing bowl. Mix thoroughly using a fork.
  4. Pour the mixture into a lightly grease and lined 7" square pan. Bake in preheated oven at 180 deg for 45 mins.
  5. Turn the oven into top heat mode. Grill for 5-10 mins till top is golden brown. Watch the kueh closely and remove it from oven once the surface has reached the desired browning.
  6. Remove pan from oven and leave to cool completely, approx. 3-6 hrs before slicing. 

Friday, June 10, 2016

Chicken Claypot Rice (Rice Cooker Version)

Today I'm sharing a cheated way of preparing a classic claypot rice using a rice cooker! Unlike cooking over claypot, you won't be able to achieve a smoky flavour dish but I guaranteed that it still taste very satisfying and fuss free in preparation too!


3 main ingredients : marinated chicken thigh meat, dried shiitake mushroom & Chinese sausages

A pot of wholesomeness!

I've blanched some bok choy to serve along this protein rich rice dish.

Ingredients 
  • 3 cups long grain rice (approx. 400gm)
  • 350ml water *
  • 500gm boneless, skinless chicken thigh, cut into bite sizes
  • 2 Chinese sausages
  • 12 small dried shiitake mushrooms, soaked
Marinade for meat
  • 2 tbsp fresh ginger juice
  • 2 tbsp oyster sauce
  • 1/2 tsp dark soy sauce
  • 1 tsp sugar
  • 1/2 tsp white pepper
  • 2 tbsp hua tiao jiu
  • 2 tsp sesame oil
  • 1 tsp cornflour
  • 1/2 tsp salt
Seasoning (mix well)
  • 2 tbsp oyster
  • 1/2 tbsp dark soy sauce
  • 2 tbsp light soy sauce
  • 2 tsp sesame oil
*optional : soak the Chinese sausages in hot boiling water for 1 min. Cool briefly and remove the casing. The ratio of rice to water is just right if you follow this proportion, not mushy at all and the grains maintained its shape after fluffing up. I may try reducing the water a little bit more for my next attempt. Thereby I will then update the adjustment again. ^0^


Method
  1. Combine the marinade with chicken meat and allow to marinate for at least 30mins.
  2. Slice the Chinese sausages and mushroom thinly.
  3. Heat a little oil in a non-stick pan. Add in sausages and fry till golden at the edge. Remove from pan and set aside.
  4. Using the same pan, add in mushroom and fry in the sausage oil residue. Add in marinated chicken meat and fry for 2 mins. Turn off heat.
  5. Rinse rice and drain well. Place rice into rice cooker inner pot and add in water. Cook as per ur rice cooker function. Half-way through the cooking process, add in chicken mixture and chinese sausages. Drizzle in seasoning sauce. Cover and continue the cooking process till the chicken is thoroughly cooked through.
  6. When the cooking process is done (warm mode). Carefully remove the cooke chicken mixture into a bowl. Fluff up the rice gently. Return to chicken mixture and mix with the rice. Serve! 

Thursday, June 9, 2016

Rice Cooker Marble Butter Cake

This is another amazing butter cake baked by using a rice cooker! The original recipe uses an oven but I converted it into a rice cooker cake. It tasted so good that you won't believe that it is done in a rice cooker! 


This recipe uses only 2 eggs, is a little short compared to a 3 eggs recipe which I did previously. I like  the even browning of the bottom, very beautiful right? 

Ingredient
  • 125gm Golden Churn butter (tin version)*
  • 100gm fine sugar
  • 2 eggs
  • 1/2 tsp vanilla paste
  • 120gm cake flour
  • 1 tbsp polenta flour
  • 1 tsp double action baking powder
  • 2 tbsp milk
  • 1 tbsp cocoa powder (mix with 1 tbsp water to form paste)

Method
  1. Grease inner rice pot with butter. 
  2. Preheat rice cooker by pressing down the 'rapid' cook button. 
  3. Using a electric whisk, cream butter and sugar until light.
  4. Beat in eggs, one at a time, until creamy and fluffy. Beat in vanilla.
  5. Sift in flour mixture, alternate with milk, and fold until just combine. Do not overmix.
  6. Divide batter into 2 portions. Mix cocoa paste into one portion.
  7. Spoon tbsp of plain batter into the inner pot. Spoon the cocoa batter on top of the plain batter. Repeat layering till batter are used up. Shift the pot lightly to even out the batter.
  8. Place the inner pot into rice cooker. Cover and select 'cake' function. 
  9. After 45mins when cake is ready, remove inner pot. Carefully invert the cake onto a wire rack to cool down completely.

* Oh so love the fragrant of this marble butter cake. So moist and tender! This is the first time I'm using Golden Churn butter (tin version) which I'm very impressed with the flavour and texture. Thumbs up!! 


Wednesday, June 8, 2016

Rice Cooker Cranberry Yogurt Cake

Its been ages I've used a rice cooker! My old rice cooker has become a white elephant inside storeroom ^0^. Who knows I got another brand new rice cooker with purchased of my new fridge!  Actually I'm pretty excited about this new cooker as it comes with a baking function! I've read recipe on baking chiffon cake, cream cheese cake and bread using rice cooker! All their results turn out really convincing. There are plenty of interesting rice cooker cake recipes over Everybody Eats Well in Flanders and My Mind Patch  which you can refer to.  For the first attempt, I've chosen a simple butter cake to test out on my new rice cooker using My Mind Patch recipe, but I replaced the sour cream with plain yogurt instead. It turned out better than I've anticipated! Moist and tender crumbs with golden crust! I can tell you that the cake don't taste much difference compare to using an oven. 


before and after

How to bake a cake using a rice cooker? 1. take out the inner pot 2. grease the inner pot with butter 3. press the 'rapid/steam' button to preheat 4. prepare cake batter and pour into greased inner pot 5. put  the pot into rice cooker, cover and press 'menu' button to select cake baking function 6. press 'cook' button to start the baking process! 7. the cake will be done in 45 mins, remove pot immediately and invert cake onto wire rack to cool down completely....simple?


nice bottom! ^0^


Ingredient
  • 150gm unsalted butter
  • 150gm sugar
  • 3 eggs, lightly beaten
  • 80gm plain yogurt
  • 1 tsp vanilla paste
  • 1/2 tsp salt
  • 250gm cake flour
  • 3 tsp baking powder
  • 150gm milk
  • 30gm dried cranberries, chopped and coat with some flour

Method
  1. Preheat rice cooker and grease the inner pot with butter. Set aside.
  2. Using a electric whisk, cream butter and sugar until light and creamy.
  3. Beat in eggs gradually until fluffy.
  4. Add in yogurt, vanilla and salt and mix lightly.
  5. Sift flour and baking powder in 3 additions, alternate with milk and beat until well incorporated.
  6. Fold in cranberries.
  7. Pour the batter into pot and smooth the surface with a spatula.
  8. Place the pot into rice cooker and select 'bake' function. Cake will be done in 45 mins. Remove the pot immediately and invert the cake (the cake will slide off easily) onto a wire rack to cool completely.


Related Posts with Thumbnails