Saturday, June 4, 2016

Berries Bakes Week #1 : Raspberry Bakewell Cake

Time to bake some berry cakes since they are rather affordable recently! A punnet of fresh raspberries cost only S$4. How to resist the temptations, therefore I bought 2 packs of it! ^0^


A very simple almond butter cake layered with fresh raspberries and raspberries jam. Love the light and moist crumbs and tangy filings, perfect with a cuppa of English tea! Who wanna join me for tea time? ^0^


Ingredient
  • 150gm unsalted butter
  • 120gm fine sugar
  • 2 eggs
  • 1/2 tsp vanilla paste
  • 1/2 tsp almond extract
  • 140gm self-raising flour
  • 140gm ground almond
  • 250gm fresh raspberry
  • 2 heap tbsp raspberry jam
  • 2 tbsp flaked almond
  • icing sugar for dusting

Method
  1. Combine flour and ground almond, and stir evenly to mix. Set aside.
  2. In a mixing bowl, cream butter and sugar until fluffy.
  3. Beat in eggs, one at at time, until well combined. Beat in vanilla and almond extract.
  4. Beat in flour mixture in batches until just combined.
  5. Spread half of the cake batter into a lined 8" round pan. Scatter the raspberries over, randomly drop tsp of raspberry all over the raspberries.
  6. Lightly spread the remaining cake batter and scatter the flaked almonds over.
  7. Bake in preheated oven at 160 deg cel for 60mins or until golden brown.
  8. Cool in pan for 10 mins before unmoulding the cake on a cooling rack to cool down completely.
  9. Dust with icing sugar before serving.
Here I am given the opportunity to involve in a local variety programme named 弹指间的料理 "Touch Screen Cuisine"! I will be appearing on the 10th episode on the 8th June Wednesday. A handful of my blogger friends like Zoe from Bake for Happy Kids, Alan from Travelling Foodie, Victoria from Victoria Bakes, Sharon from Delishar.com, Diana from Domestic Goddness Wannebe, Kenneth from guaishushu.com etc.....have already featured on the past episodes. Catch the various episodes on Toggle "touch screen cuisine'  now if you have missed it!  #touchscreencuisine


Thursday, June 2, 2016

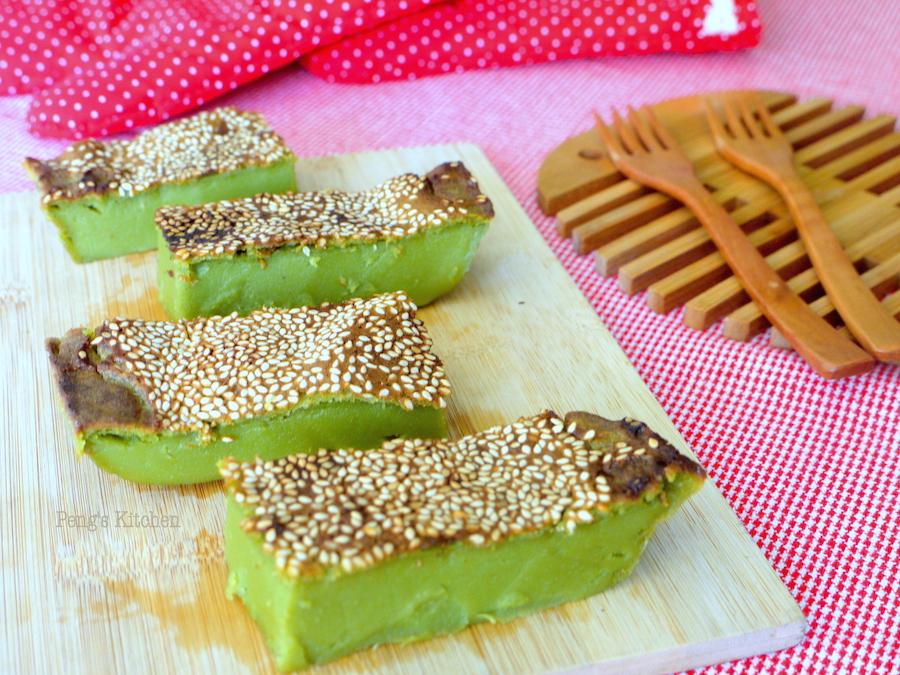
Kuih Bakar Pandan (Baked Pandan Kueh)

I've extracted plenty of pandan juice to bake a pandan rice chiffon cake and this particular baked pandan cake which I've bookmarked for very long! I do not recall tasting this Malay kueh (cake) before therefore curious with the taste and texture. Actually my kids do not really fancy traditional kueh, if have a choice they would rather choose a slice of cream/ butter cake :D I was prepared to stuff myself with this 7" size kueh bakar pandan hahaha...But surprisingly the kids, even my hubby loved this rich coconut pandan flavoured kueh! 


The top don't look really appealing as I almost over grilled it. The top toasted sesame layer gives a nice crunch and compliments the rich pandan custard texture. Thumbs up! 


Ingredient
  • 140gm plain flour
  • 3 large eggs
  • 150gm castor sugar
  • 1/4 tsp salt
  • 30gm pandan leaves
  • 125ml water
  • 250ml fresh coconut milk
  • few drops pandan paste (optional)
  • 1 tbsp white sesame seeds
  • 1 tbsp coconut oil
  • banana leaves for lining the pan

Method
  1. Blend pandan leaves with water and strain. Discard pulp.
  2. Beat eggs with salt and sugar with a ballon whisk until frothy.
  3. Add in coconut milk and stir well.
  4. Pour in flour and mix till smooth.
  5. Add in 125ml strained pandan juice. Add in drops of pandan paste if desired.
  6. Preheat oven to 200 deg cel. Put the baking pan into the oven during preheating.
  7. Remove the pan from the oven, carefully place in the banana leaves and drizzle over coconut oil evenly over the surface.
  8. Pour the batter into the hot pan. Sprinkle sesame seeds over.
  9. Return the pan to oven and bake for 6 mins. Lower heat to 160 deg cel and continue to bake for 45 mins. 
  10. Increase the oven heat to 250 deg cel and bake for another 10 mins, or until the colour reaches your preference.
  11. Remove the cake from the oven and let it cool down completely before slicing.
Related Posts with Thumbnails