Saturday, December 30, 2017

Strawberry Caprese Pasta Salad with Balsamic Glaze

This will be my last posting for 2017!! Hopefully the coming 2018 I'm still pink in health to share more awesome food with you all! I hereby wishing all readers Good Health & Happiness for the coming 2018 New Year! 


Ingredient

Balsamic Glaze
  • 3/4 cup balsamic vinegar
  • 3 tbsp brown sugar
  • pinch of salt
Pasta Salad
  • 250gm San Remo Chickpea Pulse Pasta
  • 1 tbsp extra virgin olive oil
  • 200gm fresh mozzarella, diced
  • 250gm strawberry halves
  • 1 avocado, diced
  • handful of basil leaves, torn
  • salt & pepper to taste

Method
  1. To prepare balsamic glaze : Combine the ingredients in a small saucepan. Bring to boil. Lower heat and simmer to reduce by half, for about 15 mins. Set aside to cool down.
  2. To prepare pasta : Bring a large pot of water to boil. Add salt and cook the pasta till al dente. Drain away water and rinse with cold water. Toss lightly with olive oil.
  3. To assemble the salad : Combine the pasta, mozzarella, strawberries, avocado and basil leaves in a mixing bowl. Drizzle with desired amount of balsamic glaze and season with salt and pepper. Serve chilled or at room temperature.


Saturday, December 23, 2017

Mary Berry's Easy Fruit Cake


No requirement of soaking dried fruits in alcohol nor aging it, really easy fruit cake which is kids friendly! The cake is burst with buttery and fruity flavour. With the additional of ground almonds, it really gives a moist and tender texture! 


Ingredient
  • 225gm salted butter, room temperature 
  • 180gm fine sugar
  • 4 large eggs
  • 1/2 tsp almond extract
  • 1 tsp vanilla extract
  • 225gm self raising flour
  • 100gm ground almonds
  • 450gm mixed dried fruit
  • 25gm flaked almonds (optional)
Method
  1. Sift flour and ground almond. Take 2 tbsp of flour mixture and toss into mixed fruit. Set aside. Using a electric whisk, cream butter and sugar until light and pale. 
  2. Beat in eggs, one at a time, until well incorporated. Mix for about 2 mins. Beat in almond and vanilla extract.
  3. Use a spatula and fold in flour mixture until well mixed. Fold in dried fruit.
  4. Spoon the mixture into a lined 8" round pan and level the top. Sprinkle flaked almonds on the surface.
  5. Bake in preheated oven at 160 deg cel for 1.5 hours or until a skewer inserted comes out clean. When cake is done, remove from oven and leave to cool in the pan. Best serve on the following day.


Friday, December 22, 2017

Creamy Chicken Artichoke Lasagne Rolls


Ingredient
  • 300gm minced chicken
  • 1 onion, finely chopped
  • 2 x 425gm can diced tomato
  • 3 cloves garlic
  • 2 tsp dried rosemary
  • 2 tsp dried basil
  • 1 tsp dried oregano
  • 2 tsp sugar 
  • 180gm Casa Rinaldi artichoke garlic sauce
  • 250gm cottage cheese
  • 1 large egg
  • 3 tbsp freshly chopped parsley
  • 3 cups grated mozzarella cheese
  • 1/2 cup  grated parmesan cheese
  • salt and freshly black pepper to taste
  • 12 pieces Casa Rinaldi egg lasagna

Method
  1. Heat 1 tbsp Casa Rinaldi olive oil in pan. Add onion and fry till soft and fragrant. Add in minced chicken and break up the meat using the cooking spatula. Fry till lightly brown.
  2. Drizzle in another tbsp of olive oil. Add in tomato sauce, garlic, rosemary, basil and oregano. Mix well and bring to a simmer. Cook on low heat for 15 mins till mixture thickens slightly . Add in sugar, salt and pepper to taste. Remove from fire and set aside to cool down while preparing the lasagne and cheese mixture.
  3. Cook lasagna noodle in a shallow pan of boiling water with 1 tsp salt. Cook according to package till al dente. Remove the noodle and line them in a single layer on a baking sheet.
  4. Prepare cheese mixture by combining artichoke garlic sauce, cottage cheese, egg, parsley, 1.5 cups mozzarella cheese, 1/4 cup parmesan cheese, salt and pepper. Stir well. 
  5. Stir meat sauce and spread a thin layer evenly onto a baking casserole. Spread cheese mixture evenly onto each cooked lasagne noodle, follow by 1 heap tbsp meat sauce on top of the cheese. Roll noodle up like a swiss roll and arrange seam side down in the baking casserole. 
  6. Cover the lasagne rolls with remaining meat sauce then sprinkle remaining mozzarella cheese and parmesan cheese over. Tent the baking dish with foil and bake at 180 deg cel for 35 mins.  At the last 5 mins, remove foil and bake till cheese is lightly brown. Remove from oven and rest the dish for 10 mins before serving. 


Monday, December 18, 2017

Air Fried Crispy Roast Duck

This is my challenging attempt to roast a duck using the halogen air fryer! The first thing I'm worrying is whether the whole duck can fit into the air fryer compartment. I try to get the smallest duck as possible and after removing its neck and bottom, it managed to fit in just nicely!! 


220 deg cel for 15 mins

180 deg cel for 45mins

Ingredient
  • 1 whole fresh duck, approx. 2.4kg
  • 3 cups water
  • 2 heap tbsp maltose
  • 1 tbsp rice vinegar
  • 3 shallots, peeled
  • 5 cloves garlic, peeled
Marination
  • 3 tbsp fermented bean paste
  • 2 tsp five spice powder
  • 3 shallots, grind into paste
  • 5 cloves garlic, grind into paste
  • 1 tsp salt
  • 1 tsp pepper

Method
  1. Trim excess fats and rinse the duck thoroughly. Sprinkle 1 tbsp salt over the duck and spread evenly all over including the cavity. Leave aside for 20mins. Rinse and pat dry with kitchen paper. Insert a S hook through the neck of the duck.
  2. Combine water, maltose and vinegar in a wok. Bring to boil. Hold up the duck and bath with the boiling mixture several times. Hang the duck at a airy area and allow to dry for 2 hours.
  3. Bring the maltose mixture to boil again. Bath the duck for second time. Allow to dry for 1 hour. Combine the marination and mix well. Spread the mixture into the cavity of the duck. Transfer the whole duck into the fridge for at least 24 hours. 
  4. Following day remove the duck from fridge and bring it to room temperature before roasting. 
  5. Preheat air fryer at 200 deg cel for 5 mins. Roast the duck at 220 deg cel for 15 mins. Reduce temperature to 180 deg cel and continue to roast for another 45 mins till skin is crisp and golden brown. Cool down completely before slicing. 


Wednesday, December 13, 2017

Kids Baking

These are the delicious bakes done by my kids! The only chance they can mess around is during their school holidays. ^0^ I asked them what they wanted to bake and both requested for chocolaty treats! One of them wanted cookies and the other wanted muffins, so I spent half of the morning assisting and cleaning up for them hahaha....


Milo Muffins baked by my 7 year old daughter. She did most of the steps like sifting, folding, mixing and ladle the batter into cup cases. Great that she enjoyed her own bakes and she has requested for her next bake session. 😅😅😅


Milo Muffins 
Ingredient (6pcs)
  • 120gm fresh milk
  • 80gm milo powder (divide into 70gm, 10gm portions)
  • 75gm melted
  • 1 large egg
  • 10gm cocoa powder
  • 180gm cake flour
  • 2 tsp baking powder
  • 60gm sugar
  • chocolate chips for sprinkle
Method
  1. Warm milk and dissolve 70gm milo powder into milk. Stir well and set aside.
  2. Sift flour, cocoa powder, 10gm milo powder and baking powder into a mixing bowl. Add in sugar and stir well.
  3. Add in melted butter, milk and egg into dry ingredients. Fold until batter is well mixed.
  4. Fill lined muffin cup with batter till almost full. Sprinkle some chocolate chips over.
  5. Bake in preheated oven 200deg cel for 10mins, reduce temperature to 180 deg cel and continue bake for 15mins. 
Recipe ref : bakingintotheether.com

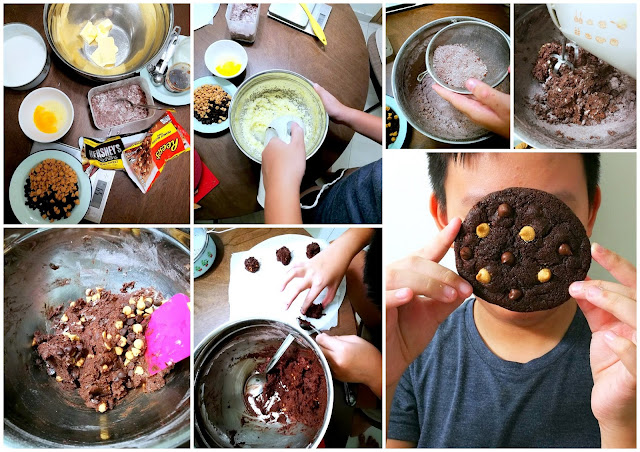
Reese's Double Chocolate Cookies done by my 11 year old son! He did a really good job throughout the process, especially placing the cookie dough onto baking sheet. I only demonstrated once and he followed my instructions. He's so happy to see that the cookies spread out nicely and mostly standardised in shapes. He even requested to make a few giant size cookie for the last batch! These double chocolate cookies tasted really good....slightly crisp at the edge, soft and fudge in the middle! Super addictive! 


Reese's Double Chocolate Cookies
Ingredient (approx. 24 pcs)
  • 125gm butter
  • 200gm fine sugar
  • 1 tsp vanilla paste
  • 1 large egg
  • 140gm plain flour
  • 1/2 tsp baking soda
  • 45gm cocoa powder
  • 1/2 tsp salt
  • 1/2 cup semi sweet chocolate chips
  • 1/2 cup Reese's chips
Method
  1. Using a electric whisk, cream butter and sugar until creamy. Beat in egg and vanilla until well incorporated.
  2. Sift in flour, baking soda, cocoa powder and salt. Beat until just combined. Stir in chips and fold well.
  3. Drop tbsp of batter onto lined baking sheet. Top with extra chocolate chips if desired. Bake in preheated oven at 180deg cel for 12 mins. Leave to cool on baking sheet for 5 mins, transfer to wire rack to cool down completely before storing. 
Recipe ref : thereciperebel.com

Friday, December 8, 2017

Cha Soba Hiyashi Chuka (Japanese Cold Noodle Salad)

My final noodle posting for the week! Easy peasy Japanese salad noodle to prepare and taste so refreshing. A great lunch idea if you do not want a heavy meal! 


Ingredients

Salad Dressing
  • 7 tbsp light soy sauce
  • 5 tbsp fine sugar
  • 4 tbsp rice vinegar
  • 3 tbsp sesame oil
  • 3 tbsp water
  • 1 tbsp toasted white sesame seeds
  • 1/2 tsp grated ginger
  • 1 tsp Japanese chilli oil
Egg Crepe
  • 3 large eggs, beaten
  • 1 tbsp mirin
  • 1/4 tsp salt
Toppings
  • 200gm Hakubaku Organic Cha Soba
  • 1 Japanese cucumber, julienned
  • 1 tomato, cut into wedges
  • 4 slices ham, julienned
  • 6 imitation crab meat, shredded
  • pea sprouts
Method
  1. Combine all noodle salad dressing in a bowl. Whisk well and chill in fridge till use.
  2. To make egg crepes, whisk together eggs, mirin and salt. Heat oil in pan. Pour in half of the egg mixture into pan and cook till set. Repeat with the remaining egg mixture. Cool egg crepe and slice into thin strips.
  3. To cook soba, bring a pot of water to boil. Add noodles and cook for 6 mins. Drain and rinse with cold water. Soak the soba into a bowl of ice water to cool. Drain completely and divide into 4 serving plates.
  4. Place all the toppings and drizzle salad dressing and serve immediately. 
Recipe ref : justonecookbook.com


Wednesday, December 6, 2017

Shoyu Ramen

Its been a while I've prepared such elaborate dish as the Nitamago eggs, Japanese Chashu and basic broth are all done from scratch, except the ramen which I've used #Hakubaku Organic Ramen. Its best to prepare the lava eggs and chashu at least one day in advance as they required ample time for the flavour to develop. The following day I gathered the ingredients for the broth and by noon time a bowl of hearty homemade shoyu ramen is ready to be served! 


Homemade chicken broth

recipe ref : iceorrice.com
Ingredient
Tare
  • 1 cup low sodium light soy sauce
  • 1 piece kombu
  • 1/2 cup mirin
  • 1/2 cup cooking sake
  • 8 spring onion
  • 1/2 cup bonita flakes
  • 1/4 cup fine sugar
  • 1/2" ginger, sliced
  • 8 cloves garlic, crushed
Chicken Broth
  • 1.3 kg chicken frame
  • 1/4 cup dried anchovies
  • 1/4 dried scallops
  • 1/2 cup bonito flakes
  • 1 piece kombu 
  • 50gm spring onion, chopped
  • 1 large onion, chopped
  • 1 bulb garlic
  • 1 thumb size ginger, sliced
Toppings 
  • cooked Hakubaku Organic Ramen
  • thinly sliced chashu*
  • Nitamago egg*
  • kamboko, Japanese fish cake
  • spring onion, sliced
  • nori seaweed
Method
  1. To prepare tare, place all ingredient into a saucepan. Bring to boil. Lower heat and simmer for 10mins. Strain mixture into a clean container. Set aside for later use. 
  2. Prepare the stock. Parboil chicken frame in boiling water for 1 min. Strain and rinse well. Add chicken frame, anchovies, scallops, bonito flakes, onion, spring onion, garlic and ginger with 3 litres water into a large stock pot. Bring to boil. Reduce heat to low and simmer for 2.5 hours. Strain stock and press through a sieve. 
  3. To serve, heat 2 cups chicken broth and add 2 tbsp tare, pour into a serving bowl. Cook ramen according to package. Place ramen into serving bowl. Add toppings and serve immediately.
Nitamago eggs, click here for recipe


Soft & tender Japanese Chashu

Recipe ref : wendyinkk
Rolled Chashu
Ingredient
  • 800gm pork belly (I've replaced with pork shoulder)
  • 80gm spring onion, sectioned
  • 40gm ginger, sliced
  • 40gm shallots, halved
  • 40gm garlic
  • 80gm mirin
  • 160gm sake
  • 80gm low sodium soy sauce
  • 80gm fine sugar
  • 4gm salt

Method
  1. Slice the pork apart like an opened book, roll up and tie with kitchen twine. This will help the meat to keep in shape while cooking and makes round, compact when sliced. Heat 1 tbsp oil in pan. Sear the pork roll until brown all over, for about 10 mins. 
  2. Put the pork roll into a pot with the rest of the ingredients. Top with enough water to submerge the pork roll. Bring to a gentle boil. 
  3. Turn heat to low and simmer for 2.5 hours. Turn the roll every half an hour after the first hour. Turn off heat and let it cool down.
  4. Place the pork roll into a ziplog back and strain the gravy and pour into the bag, tighten the bag with a clip. Let it marinate for a few hours at room temperature. Chill in fridge after that. To serve, remove cotton strings and thinly slice the cooled pork.


Tuesday, December 5, 2017

Curry Udon with Chicken Katsu

My kids simply adore Japanese curry which has a slightly sweeter tone, though they can accept much spicier food than this. This is the first time I tried Japanese style curry served with udon instead of rice. Its really quick to whip up too! You can opt to add meat like pork or chicken into the curry gravy, but I omitted as I've prepared some chicken katsu which is my kids favourite too! ^0^ Love the udon which coats the thick curry gravy, every mouthful is slurpy-licious!


Recipe ref : recipetineats.com
Ingredient
  • 3x90gm Hakubaku Organic Udon
  • 50gm spring onion
  • 125gm chikuwa
  • 120gm dried beancurd
  • 120gm white shimeiji mushroom
  • 1500ml dashi stock
Curry mixture
  • 2 tbsp meat curry powder
  • 1 tsp turmeric powder
  • 5 tbsp corn flour
  • 10 tbsp dashi stock
  • 8 tbsp low sodium soy sauce
  • 4 tbsp mirin

 Method
  1. Bring a pot of water to boil. Add dried beancurd and blanch for 1 min to remove excess oil. Squeeze dry the beancurd and slice. Cut spring onion into sections and slice chikuwa into half.
  2. Combine curry mixture and mix well. Set aside.
  3. In a deep saucepan, heat 1 tbsp oil. Add shimeiji mushroom and fry till fragrant. Add in dried beancurd, chikuwa and spring onion, fry briefly. Pour in dashi stock and bring to boil at medium high heat.
  4. Lower heat slightly. Drizzle in curry mixture gradually, stirring continuously at the same time. When sauce starts to thicken and bubbling, turn off heat. 
  5. Prepare a pot of water to boil. Add in dried udon and cook over boiling water for 10mins. Drain and rinse with cold water. Divide udon among 4 serving bowls. Ladle over curry sauce and serve immediately.
Recipe for chicken katsu, click here 


Monday, December 4, 2017

Janchi Guksu (Korean Warm Noodle Soup)

This is the first time I tried cooking Japanese somen, a fine thin wheat noodle that resembles our Chinese mee sua. But the texture of the Japanese somen tasted so much better than the latter! The somen is less starchy and remained 'al dente' if left at room temperature. 


We really enjoy this bowl of light tasty somen soup! The broth is made with simple ingredients like radish, anchovies, kelp, onion, garlic and spring onion which required only 25 mins of simmering. To keep this noodle dish on the lighter side, the accomplishment like zucchini, carrots, shimeiji mushroom and chicken meat are all lightly seasoned and pan fried. Some may find it too bland for their taste bud. If you like kimchi, serve it at the side which will helps to perk up the taste of this light refreshing broth.


Recipe ref : koreanbapsang.com
Ingredient
  • 2 x 90gm Hakubaku Organic Somen
  • 150gm white radish, cut into cubes
  • 1 onion
  • 2 cloves garlic
  • 2 stalk spring onion, white section
  • 10 pcs large dried anchovies
  • 1 3" dried kelp
  • 8 cups water 
  • 2 tbsp light soy sauce
Toppings
  • 200gm zucchini, julienned
  • 150gm carrot, julienned 
  • 2 eggs, fried into thin sheet, julienned
  • 150gm chicken breast, cut into thin strips
  • 200gm shimeiji mushroom
  • 2 spring onion, green section, chopped
Sauce (mix well)
  • 2 tbsp light soy sauce
  • 1 tsp Korean chilli pepper flakes
  • 1/2 tsp sesame oil
  • 1/2 tsp toasted sesame seeds
  • 1/2 tsp garlic, minced
  • 1 spring onion, chopped
Method
  1. Soak dried kelp in a pot of water for 30mins. Add anchovies, radish, onion, garlic and spring onion into the pot with the kelp. Bring to boil. Reduce heat to medium and boil for 15 mins. Add soy sauce, salt and pepper to taste and simmer for another 10 mins over medium heat. Discard all the solid ingredients from the broth. 
  2. Season chicken with 1 tsp light soy sauce, 1/2 tsp sesame oil, 1/2 tsp sugar and pinch of pepper. Set aside while preparing the vegetables.
  3. Heat 1 tbsp oil in pan, saute zucchini over medium heat for 1 min. Add garlic powder, salt and sesame oil to taste. Set aside. In the same pan, sautéed carrots for 2 mins, add garlic powder and sesame oil to taste. Remove and set aside. 
  4. Add more oil and saute shimeiji mushroom till fragrant. Add garlic powder and salt to taste. Set aside. Lastly fry the chicken strips for 3 min till cook.
  5. Bring a pot of water to boil. Add somen noodles and cook for 2 mins. Drain and rinse with cold water. Transfer to somen and place into individual serving bowls.
  6. Reheat broth till hot. Ladle in hot broth over the noodles. Arrange each topping on top of the noodle. Garnish with chopped spring onion and serve with sauce at the side.


Sunday, December 3, 2017

Bibi Guksu (Korean Spicy & Sweet Soba)

My kids have been bugging me quite some time for Korean Crispy Chicken! Their wish fulfilled finally! ^0^  Besides the sweet crispy Korean Fried Chicken and kimchi tofu patties, I've made a spicy & sweet Korean soba, a really appetising noodle salad dish. 


Its really quick to prepare this noodle dish. Just cook the soba and top from fresh lettuce leaves, carrots, cucumber and kimchi. Drizzle with the spicy sweet sauce.....yummy! I think I can eat this noodle dish  a few times a week without getting tired of it as it is so refreshing and addicting at the same time!


Recipe ref : mykoreankitchen.com
Ingredient
  • 3x90gm Hakubaku Organic Soba
  • lettuce leaves, sliced
  • 1 Japanese cucumber, julienned
  • 1 small carrot, julienned
  • handful of pea sprouts
  • 1/2 cup kimchi, sliced
Sauce (mix well)
  • 3 tbsp gochujang, Korean chilli paste
  • 4 tbsp rice vinegar
  • 1 tbsp low sodium light soy sauce
  • 1 tbsp honey
  • 1 tbsp brown sugar
  • 1 tbsp sesame oil
  • 1 tbsp toasted sesame seeds
Method
  1. Bring a pot of water to boil. Add in soba and cook for 4 mins. Drain and rinse in cold water. Divide soba into 4 serving bowls. 
  2. Add in sauce and top with sliced vegetables. Mix well and serve immediately.
Recipe for Korean Fried Chicken, click here
Recipe for Korean Kimchi Tofu Patties, click here


Stay tune for the coming next noodle dish I've made using Hakubaku Organic Noodle!


Related Posts with Thumbnails