Showing posts with label jelly/pudding. Show all posts

Tuesday, February 13, 2018

Rainbow Agar Agar


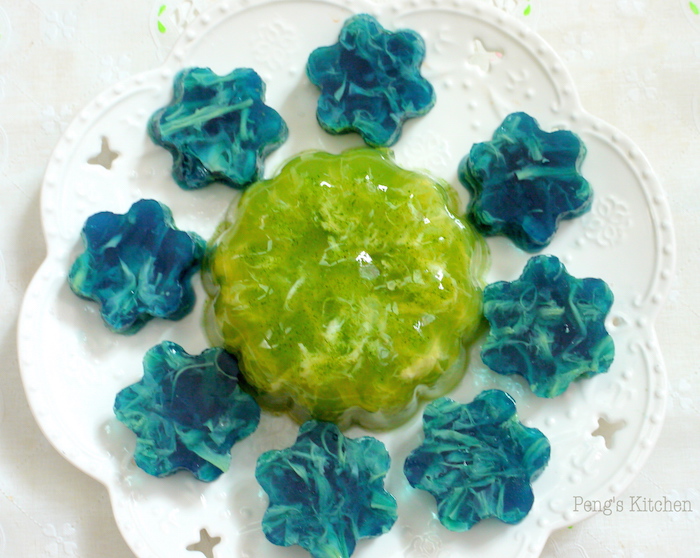
Revisiting my rainbow agar agar recipe made few years ago! Love the cute heart mould which I newly acquired. Instead of using coconut milk for layering, I've replaced with condensed milk this time round. Actually I did not do a good job today. Some of the layers smudge! arrrgghhh....some of the layers too thick resulting I've to skip 2 more layerings. *cry* Only consolation is that it dislodged beautiful onto the serving plate rather then breaking up into pieces. hahaha....


Ingredient (8" square pan or 1.5L container)
Colours Layer
  • 1 packet 10gm agar agar powder
  • 1200 ml water
  • 200gm sugar
  • 2 pandan leaves, knotted
  • wilton colour paste I've used 6 colours : violet, blue, green, yellow, orange & red
Milk Layer
  • 1 packet 10gm agar agar powder
  • 1000ml water
  • 250gm condensed milk
  • 2 pandan leaves, knotted

Method
  1. Colours Layer : Place pandan leaves and water into a pot. Bring to boil and add in sugar and agar agar powder. Boil for 1 minute and turn off heat. Sieve mixture into a bowl. Discard pandan leaves. Place the bowl (covered) over a pot of hot water (double boil) to keep the mixture warm while preparing the milk mixture.
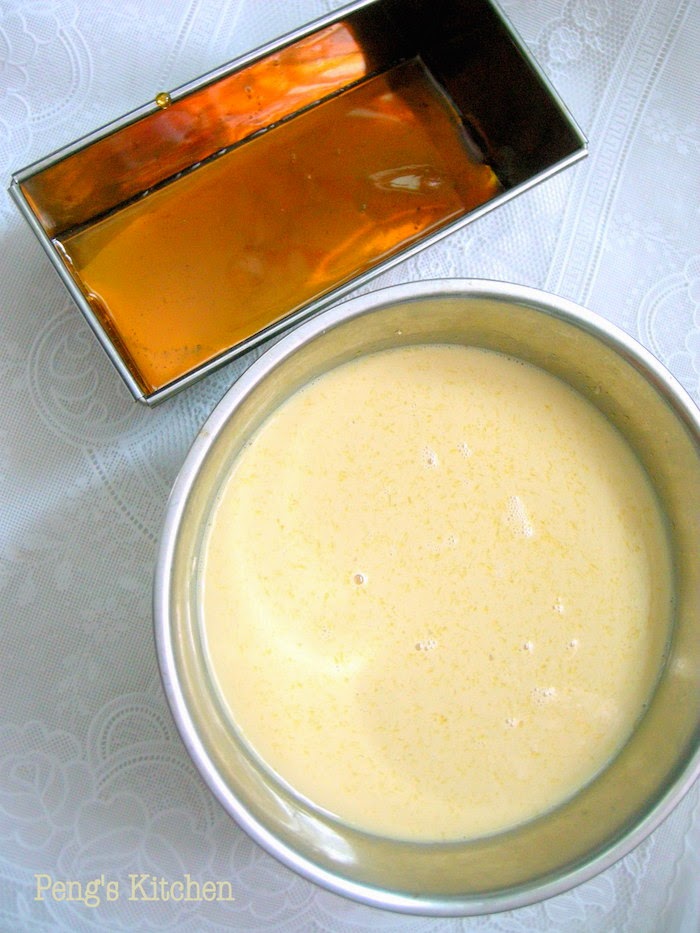
  2. Milk Layer : Place pandan leaves and water into a pot. Bring to boil and add in condensed milk and agar agar powder. Boil for 1 minute. Turn off heat. Sieve mixture into another bowl and discard pandan leaves. Place the bowl (covered) over a pot of simmering hot water (double boil) to keep the mixture warm.

To assemble 12 layers agar agar : milk, violet, milk, blue, milk, green, milk, yellow, milk, orange, milk, red (or reverse order if using the heart mould*)
  1. Measure 200ml of milk mixture  and pour into a 8" x 8" pan. Leave it to set slightly but not harden. The surface will be sticky to feel. Use your finger gently touch on the surface to test out.
  2. Second layer : Measure 200ml of plain mixture and add the violet colour (use a toothpick to swap some colour paste and stir into the agar agar mixture, add more till the desired tone you prefer), stir evenly to dissolve the colouring. Gently spoon the coloured mixture over the milk layer (first layer). Leave to set slightly but not harden.
  3. Repeat Step 1 and 2 till the layers are completed (ending with a red coloured layer).
  4. Leave the whole jelly to cool down in room temperature before refrigerating till cold. Slice and serve!
* For the heart mould, each layer requires approx. 150ml of liquid. 

Friday, September 1, 2017

Panna Cotta with Berries Sauce

This is my first time making/tasting this classic Italian dessert panna cotta. Initially I thought it will taste very rich but is actually light and creamy with a silky and smooth texture! Its really a wonderful after meal dessert.


Ingredient
  • 330ml fresh milk
  • 3 tsp powdered gelatin
  • 70gm fine sugar
  • 300ml thickened cream
  • 1 tsp vanilla extract
  • pinch of salt
Berries Sauce
  • 2 cups berries (I used mixture of cranberry and strawberry)
  • 3 tbsp fine sugar
  • 1 tbsp lemon juice

Method
  1. Pour milk into a saucepan. Sprinkle gelatinised evenly over the top. Let it soften for 5 mins until the surface of the milk is wrinkled and gelatin grains look wet. Stir the milk mixture. 
  2. Turn on heat and cook over low heat, stirring frequently till gelatin is dissolved for about 5 mins. Do not allow the milk to boil or simmer. Remove the pan from fire if milk gets too hot. 
  3. Add in sugar and stir well to dissolve. Turn off flame when sugar and gelatine are dissolved.
  4. Whisk in cream, vanilla and salt. Pour the mixture into individual cups, covered and chill for at least 4 hours to set before serving. 
  5. To make berries sauce : Put berries into a saucepan, add in sugar and lemon juice. Cook over medium low heat for 5 mins until syrupy. Cool down to room temperature and spoon it over the top of chilled panna cotta.


Wednesday, June 21, 2017

Mini High Tea Set : Honey Theme

This is the first time I've attempted a mini high tea so that I can make use of my newly bought 2 tier display tray from Ikea...hahaha...pretty isn't it? Back to the snacks and dessert I've prepared, the common ingredient for each item is the Huiji honey I've incorporated!  Huiji honey is made from natural raw honey and infused with jasmine flower scents. My whole kitchen is bursting with lovely sweet honey fragrant while baking in process! 


Light and refreshing Honey Lemon Konnyaku to enjoy in this hot weather! 

Honey Lemon Konnyaku
Ingredient
  • 10gm konnyaku powder
  • 200gm fine sugar
  • 850ml water
  • 50gm honey
  • 50gm fresh lemon juice
Method
  1. Combine konnyaku powder and sugar together till well incorporated. Bring water to boil. Gradually add in konnyaku mixture into boiling water, stirring at the same time. Cook the mixture for 5 mins. 
  2. Turn off heat. Add in honey and lemon juice. Stir well till honey is dissolved. 
  3. Pour the mixture into jelly mould to set. Serve chill. 
Nobody can resist this Honey Mustard Mini Sausage Roll! Its so simple to prepare with ready rolled puff pastry sheet, some good quality sausages, dijon mustard and of course Huiji Honey! 

Honey Mustard Mini Sausage Roll
Ingredient (12 mini rolls)
  • 1 sheet frozen puff pastry
  • 1 tbsp honey
  • 1 tbsp dijon mustard
  • 4 good quality pork sausages
  • 1 egg, lightly beaten
Method
  1. Cut the puff pastry into 4 equal squares. Whisk honey and dijon mustard together. Brush the mixture over the puff pastry, leaving a 1 cm gap at one edge. 
  2. Place a sausage on each pastry square. Roll up the pastry encasing the sausage, seal the edge with egg wash. You will get 4 sausage roll. Slice each roll into 3 small portions. 
  3. Place the cut portions, seam sides down on a lined baking sheet. Make two scores on each small roll. Brush egg wash. Sprinkle some black pepper over. 
  4. Bake in preheated oven at 220 deg cel for 25 mins until crisp and golden brown.
Buttery and melty tart base with sweet nutty filling! Yummylicous! 

Ingredient (11 small tarts)

Sweet Pastry Crust
  • 75gm unsalted butter
  • 35gm icing sugar
  • pinch of salt
  • 1 tsp vanilla extract
  • 25gm beaten egg
  • 25gm ground almonds
  • 125gm plain flour
Fillings
  • 10gm unsalted butter
  • 1 tbsp fine sugar
  • 4 tbsp honey
  • 1 sprig thyme leaves
  • 1 egg, lightly beaten
  • 1 tsp vanilla extract
  • 100gm pine nuts

Method
  1. Prepare the tart base : Cream butter, icing sugar and salt till creamy. Beat in egg and vanilla. Add in ground almond and plain flour and beat till mixture just incorporated. Use a spatula to fold the mixture together to form a soft dough. Gather the dough into a ball and place in a ziplog bag. Flatten the dough into a round disc. Chill in fridge for 30 mins. 
  2. Roll out the dough to about 0.5cm thick. Cut out the dough using a round cutter. Press the dough into tart tins, prick the base with fork. Blind bake at 180 deg cel for 12 mins. Set aside to cool down.
  3. Meanwhile prepare the fillings. Combine butter, sugar, honey and thyme leave in a small saucepan. Simmer over low heat till butter and sugar is well dissolved. Set aside to cool down before adding in egg and vanilla. Stir in pine nuts.
  4. Scoop the pine nut mixture evenly over the tart base. Return to oven and bake at 180 deg cel for 15 mins until the filling is set and golden brown. 


Wednesday, July 1, 2015

MSW Durian Pudding

This is the durian season you can't be missing! I've been detecting the durian fragrance from my neighbours since the starting of this season ... 榴莲飘香! Everyone in the house love durian except my son. Hahaha he find it rather yucky to just eat it from seeds! But he does not mind durian ice-cream, durian puffs etc! Actually I also find it rather 'jelat' after eating a couple of the MSW (猫山王) durian as it is really rich, thick and creamy. So instead of polishing up the 2 big MSW, I've removed the pulp from the seeds and process into by-products hahaha....The first durian dessert I'm sharing today will be MSW durian pudding! I've only prepared 8 small cups, just nice for my family, 2 each no need to fight Lol


Cooking the durian pudding mixture using bain-marie method

Mixing in the dissolved gelatine into durian milk mixture

Sieve the mixture to get smooth texture before pouring into small cups. I'm using 90ml serving cups here.

Chill in fridge till set and top with a dollop of fresh durian pulp before serving!


Oooooh so creamy and smooth! 

Ingredients (90ml x 8)
  • 200gm good quality durian pulp
  • 50gm sugar
  • 360gm milk
  • 2 egg yolks
  • 1 tbsp gelatine
  • 80gm water
  • extra fresh durian pulp for garnishing

Method
  1. Place durian pulp and sugar in a food processor. Blend till smooth and creamy. 
  2. Combine milk, egg yolk, durian puree in a bowl. Bring a pot of water to a simmer. Sit the bowl over the pot and cook the mixture  for 10mins, stirring constantly.  Remove from heat and cool  it slightly.
  3. Mix gelatine with water in a small cup, let it sit for 10 mins. Place the cup over a small pot of  hot water and stir the mixture to fully dissolve the gelatine.
  4. Add gelatine mixture to the durian mixture and stir to mix evenly. Strain the mixture thoroughly  over a sieve before pouring into mould.
  5. Chill in fridge until set. Top with tsp of durian pulp over the pudding before serving.

Saturday, June 27, 2015

斑兰蛋花菜燕 Pandan Egg Drop Agar Agar

Expecting more hot and dry weather for the coming weeks! School reopening tomorrow and I will be back in duty of fetching my two kiddos back and fro from school under this terrible heat! Besides cooking more dessert like green bean soup, barley water etc....I've also make some cooling agar agar for the kids to beat the heat. Just simple ingredients used, no colorings or coconut milk added. Blue colour is extract from dried bluepea flowers whereas the green is natural pandan juice. The marble effect is by adding an egg in each batch of cooking.  Drink more water and stay hydrated everyone! 


Ingredient
  • 10 blades fresh pandan leaves, snip short
  • 1000ml water
  • 1 packet agar agar powder
  • 150gm fine sugar
  • 1 egg, lightly beaten

Method
  1. Blend pandan leaves with 500ml water and sieve to get first batch of pandan liquid. Process again with another 500ml water to get second batch of the liquid.
  2. Combine all pandan liquid into a pot with agar agar powder and sugar. (alternative : add eggs at this point of time to achieve different effect)
  3. Bring to boil, lower heat and stirring frequently and simmer till sugar is well dissolved.
  4. Slowly drizzle in beaten egg and stirring in clockwise at the same time.
  5. Turn off heat and pour the agar agar mixture into small jelly mould or pan.
  6. Cool completely and chill in fridge till serve.
* Note : For blue liquid, simmer 1/4 cup dried bluepea flower with 1000ml water for 5 mins to extract the blue liquid. Remove flowers before adding in agar agar powder and sugar. Cook as per above instructions.

Saturday, February 28, 2015

Gula Melaka Agar Agar

Who knows that agar agar making can be so challenging!? I've actually attempted 3 trials before I succeeded in making this gula melaka agar agar @.@ The jelly actually separated into 2 even layers on its own after cooling down. The first two attempts I've used too thick coconut milk (different brands) resulting a thin agar agar layer forming or it did not separate at all! So frustrating but the taste still equally yummylicious :D 


I was too lazy to sieve the gula melaka mixture therefore the sediments were rather obvious :P Moreover I actually bought a wrong agar agar powder! hahaha I wrongly grabbed a pack of orange colour one. Only realised it  after I pour it into the pot....so silly >.< Luckily the colour blended so well into the gula melaka mixture, that's why my agar agar had a deeper tone. So don't be alarmed if your agar agar turned out lighter than mine :D


Recipe ref : Baking's Corner
Ingredient
  • 12gm agar agar powder
  • 750ml water
  • 200gm gula melaka (palm sugar)
  • 2 blade pandan leaves, knotted
  • 200ml coconut milk* + 2 tbsp water + 1/4 tsp salt

Method
  1. Cut palm sugar into small pieces.
  2. Put sugar, water and pandan leaves into a pot and bring to boil. Cook over low heat till sugar is well melted. Sieve to remove any sediments.
  3. Add agar agar powder into the gula melaka mixture and bring to boil for 5 mins.
  4. Add in coconut milk and stir to mix evenly. Cook over medium heat till mixture comes back to a slight boil. Do not over boil. Remove from fire immediately.
  5. Pour the mixture into a 7" square pan or individual jelly mould. Leave to cool and set in room temperature. The jelly will separate into 2 layers as it cool. Chill well before serving!
* I used Ayam brand coconut milk

Monday, July 28, 2014

Stained Glass Jelly

This is another colourful rainbow that is yummylicous and candy to the eye! It looks complicated to make this but it does not! It is so much simple than the Rainbow Agar Agar I've did previously :D 


Preparing the coloured jelly (agar agar) first, the only natural colour extract here is the blue from dried bluepea flower! 

Stained Glass Jelly
Ingredients
  • 1 packet agar agar powder  (4 tsp)
  • 800ml water 
  • 120gm sugar (can increase up to 200gm sugar if you prefer sweeter)
  • blue - 2 tbsp dried bluepea flower
  • red - konnyaku cherry colour
  • green - pandan paste
  • orange - konnyaku peach colour

Method
  1. Steep bluepea flower in 200ml water for 15 mins. Strain liquid and discard flowers. Combine liquid with 30gm sugar and 1 tsp agar agar powder and bring to boil for 2 mins. Pour mixture into a small container. Cool completely before chilling.
  2. Bring the balanced 600ml water to boil. Add in remaining 90gm sugar and 3 tsp agar agar powder and cook for 2 mins. Remove from heat.
  3. Divide mixture into 3 equal portions and add in red, green and orange colours respectively.
  4. Pour into individual containers and leave to set before chilling.
  5. Cut the stained glass jelly into small cubes and gently toss to distribute the coloured jelly evenly and set aside in fridge.

After the coloured jelly had set, cut them into small cubes and ready to proceed in preparing the condensed milk jelly. Keep them chilled while preparing the milk jelly.

Condensed Milk Jelly
Ingredient
  • 1 packet agar agar powder
  • 900ml water
  • 12 tbsp condensed milk
  • 2 pandan leaves, knotted

Method
  1. Combine pandan leaves and water in a pot and bring to boil. Add in agar agar powder and cook  for 2 mins. 
  2. Add in condensed milk and stir evenly. Turn off heat. Discard pandan leaves.
  3. Ladle a scoop of milk mixture into a 7" square pan. After it is semi-set, gently sprinkle in a layer of stained glass jelly over, pour in some milk agar agar mixture. Layer in more stained glass jelly and milk mixture. Make sure the last layer of coloured jelly is well submerged without protruding out. 
  4. Set in room temperature before chilling. Chill completely before serving.


Thursday, June 26, 2014

Rainbow Flan Dessert (Rau Cau Flan)

I was first attracted by the layers of this flan dessert.....pandan, coconut and coffee agar agar layer. Thinking of these 3 combinations already made me drools! I was actually contemplating whether to try out this recipe when I saw the rich flan layer which uses ONE canned sweetened condensed milk and ONE canned evaporated milk. But considering the layers of agar agar did not use much sugar and the final outcome of the whole flan should taste just right, therefore I just closed one eye on the amount of condensed milk used hahaha...Indeed when my boy tasted a slice of this Rainbow Flan Dessert, he asked me why the jelly layer not sweet one?? Therefore savour the sweet and rich egg custard  layer with the not so sweet agar agar will balance out the richness of this chilling dessert! 


Caramelised sugar setting in pan and ready to pour in egg custard

The flan after steamed baking...ready to layer in the agar agar!

Love the caramelised surface! This pandan layer is made with bottled pandan paste.

This version the pandan layer is made with fresh pandan extract with an additional layer of coffee agar agar.


Recipe source : theravenouscouple.com
Ingredient

Basic Flan :
  • 250gm sugar
  • 1/4 cup water
  • 3 large eggs, lightly beaten
  • 1 can sweetened  condensed milk
  • 1 can evaporated milk
  • 1 tsp vanilla extract

Agar Agar Layers :


Pandan Layer
Coconut Layer
Coffee Layer

1 cup water (or 1 cup fresh pandan extract
2 tbsp sugar
¾ tsp pandan paste (exclude if using fresh pandan extract)
1 tsp agar agar powder


1 cup coconut milk
2 tbsp sugar
pinch of salt
1 tsp agar agar powder


1 cup water
1 heap tsp coffee granules (not instant powder)
2 tbsp sugar
1 tsp agar agar powder

Method
  1. Preheat oven to 180 deg cel and fill a baking pan with hot water.
  2. In a saucepan, caramelise the sugar and water until golden brown and pour into a pan or several ramekins and coat evenly. Allow to cool and crystallise.
  3. In a bowl, combine eggs, condensed and evaporated milk and vanilla and whisk till smooth. Strain the mixture and sit for 15 mins. Gently pour the egg mixture over caramelised sugar and cover the ramekins with foil.
  4. Place the ramekins onto the tray of hot water and bake for 60mins or until the custard is well set.
  5. While the flan is cooling down, prepare the agar agar layers. In a saucepan heat all the ingredients for the pandan layer until sugar and agar agar is dissolves and comes to gentle boil. Remove from heat and carefully spoon the mixture onto the flan. 
  6. Prepare the coconut layer when the pandan layer is about to set. To test : lightly touch the layer with your fingers, it should be firm but still slightly sticky and not set completely. Repeat with the coffee layer.
  7. After all 3 agar agar layers have set, chill in fridge. To un-mould, use a spatula to loosen the edges and invert onto serving plate. 


I am submitting this post to Asian Food Fest – IndoChina hosted by Kelly Siew Cooks

Sunday, June 15, 2014

Milo & Oreo Jelly

Another lovely jelly (agar agar) to share. You will like this combination if you are fan of Milo and Oreo :) It's been ages I actually touch Milo drink!  I purposely bought a pack of Milo powder just to make this Milo & Oreo Jelly hahaha....from that day my kids saw the pack of Milo powder sitting in the pantry, they have been bugging me to prepare a cup for them every day! 


Recipe source : bisousatoi.com
Ingredient
  • 1 pack 10gm Agar Agar Powder
  • 750ml water
  • 160gm sugar (I only used 120gm)
  • 400gm Evaporated milk
  • 3/4 cup Milo powder (not the instant 3-1 version)
  • 1 pack 137gm Oreo cookies, break into small pcs

Method
  1. Place the jelly powder and water in a pot and bring to boil.
  2. Add in sugar and cook until sugar is well dissolved
  3. Add in milk and stir well and turn off heat.
  4. Remove 2 cups of the mixture and add in Milo powder. Stir well to dissolve all lumps.
  5. Pour 1 cup of the Milo mixture into a square container and let the remaining half warm up over a pot of simmering pot of water (double-boil). Let the layer set slightly on surface before pouring over the plain mixture over. Sprinkle oreo cookie into the plain layer and let it set slightly.
  6. Pour the remaining Milo mixture over. Let it set completely at room temperature before chilling in fridge. Serve cold.


Saturday, June 14, 2014

Rainbow Agar Agar (Jelly)

R A I N B O W     A G A R     A G A R


A heavy down pour has indeed cool down the heat instantly! This also perked up my cooking mood again thus gets my hands busy with this multi-coloured layer agar agar aka Rainbow Jelly. Oh my but this is not a easy job hahaha....6 layers coloured jelly with 6 layers coconut jelly in between ^0^ 12 times measuring out each of the portion (200ml each layer) and 12 times the waiting time (about 3 mins each layer to set slightly) for the layers to set in between. But I must admit the effort is all worthwhile when revealing this wholesome pretty jelly from the pan! Besides the fantastic appearance, I'm also really glad that each of the layers stick together very well without any layers falling apart! Can't help admiring them first before popping it into my mouth hahaha....


Ingredient (8" x 8")
Colours Layer
  • 1 packet 10gm agar agar powder
  • 1200 ml water
  • 200gm sugar
  • 2 pandan leaves, knotted
  • wilton colour paste - I've used 6 colours : violet, blue, green, yellow, orange & red


Coconut Milk Layer
  • 1 packet 10gm agar agar powder
  • 400ml coconut milk (I used 2 packets Ayam brand ones)
  • 800ml water
  • 200gm sugar
  • 2 pandan leaves
  • 1/2 tsp salt
* Note : Not too sure if the plain mixture evaporated too fast while double-boiling, I run out of the plain mixture at the last 2 colour layers! So I've actually cook another 1/2 portion of the mixture i.e. : 1 tbsp agar agar powder, 600ml water and 100gm sugar


Method
  1. Colours Layer : Place pandan leaves and water into a pot. Bring to boil and add in sugar and agar agar powder. Boil for 1 minute and turn off heat. Sieve mixture into a bowl. Discard pandan leaves. Place the bowl over a pot of simmering hot water (double boil) to keep the mixture warm while preparing the coconut mixture.
  2. Coconut Milk Layer : Place pandan leaves and water into a pot. Bring to boil and add in sugar and agar agar powder. Boil for 1 minute. Add in coconut milk and salt. Turn off heat. Sieve mixture into another bowl and discard pandan leaves. Place the bowl over a pot of simmering hot water (double boil) to keep the mixture warm.

To Assemble 12 layers Jelly : milk, violet, milk, blue, milk, green, milk, yellow, milk, orange, milk, red 
  1. Measure 200ml of coconut mixture  and pour into a 8" x 8" pan. Leave it to set slightly but not harden. The surface will be sticky to feel. Use your finger gently touch on the surface to test out.
  2. Second layer : Measure 200ml of plain mixture and add the violet colour (use a toothpick to swap some colour paste and stir into the agar agar mixture, add more till the desired tone you prefer), stir evenly to dissolve the colouring. Gently spoon the coloured mixture over the coconut layer (first layer). Leave to set slightly but not harden.
  3. Repeat Step 1 and 2 till the layers are completed (ending with a red coloured layer).
  4. Leave the whole jelly to cool down in room temperature before refrigerating till cold. Slice and serve!

Friday, May 2, 2014

Chia Seeds Milk Pudding

Have you tried this super food before? I get to know this particular healthy food from my sis-in-law and thereafter I google more information on Chia Seeds and was wowed by the all the benefits it claimed! Since then I love to sprinkle them over salads, cereals, homemade smoothie and even into my cup of coffee ^0^ As the seeds will gelatinised after soaking in liquid, therefore it is great way to thicken up dish like soup and porridge. More ways on how to eat Chia Seeds.....Try it today for an additional nutritious boast to your diet! 


  1. Chia is gluten free
  2. It is super high in dietary fibre, making it great for digestion and healing digestion issues.
  3. It contains 20% Omega 3 ALA, making it a super food for the brain and heart. Chia has eight times more Omega 3 than salmon.
  4. It boasts 20% protein
  5. The protein is a complete protein with all 8 essential amino acids
  6. It is high in antioxidants (It has a four times higher ORAC value than blueberries)
  7. Chia contains five times more calcium than milk
  8. Chia contains seven times more vitamin C than oranges
  9. It contains three times more iron than spinach
  10. It contains twice the potassium content of bananas
  11. It is food for healthy skin, hair and nails
  12. It has a positive impact balancing blood glucose levels (making it awesome for diabetics)
  13. Chia makes a great egg replacement. Just combine with water to form a gel, and add it to recipes that call for egg.


Ingredient (2 servings)
  • 1 cup fresh milk
  • 1/2 tsp vanilla flavoured liquid stevia (or replace with 1-2 tbsp honey)
  • 1/4 cup organic chia seeds 
  • fresh berries for toppings

Method
  1. In a small bowl, whisk together the milk, honey and vanilla. 
  2. Add in chia seeds and stir to combine.
  3. Transfer mixture into small ramekins and chill in fridge for at least 4 hours, stirring once halfway through.
  4. Serve chilled with berries.


This post is linked to the event, Little Thumbs up organised by Bake For Happy Kids, and My Little Favourite DIY, hosted by Tze of Awayofmind Bakery House

Related Posts with Thumbnails