Thursday, August 22, 2013

Vanilla Custard Puffs

It's been a long time that I've make this choux pastry! Worrying that my skills has rusted,  I made a small batch in case it fail :P Luckily these little gems puffed up beautifully and in the end the small quantity not enough to fill my kids tummy hahaha...no worries as I actually bake another batch the very same day :D


Vanilla Bean Pastry Cream
Ingredient
a) 400gm milk, 40gm sugar, 1/2 fresh vanilla bean pod
b) 2 egg yolks, 40gm sugar
c) 100gm fresh milk, 15gm corn flour, 30gm cake flour
d) 20gm unsalted butter


Method
  1. Combine (a) and bring to boil.
  2. Combine (b) and mix well.
  3. Combine (c) until batter is free of lumps.
  4. Combine flour batter into the yolk mixture and mix well.
  5. Add in boiled hot milk (a) and whisk in, beating at the same time.
  6. Strain mixture and cook the mixture over low heat (high heat will cause the mixture to curdle), whisking continuously until mixture is thick.
  7. Remove from heat and cool down slightly. Stir in butter evenly. Sieve mixture if necessary to remove any lumps.
  8. Transfer custard into an air-tight container and lay a plastic wrap over the surface to prevent a layer of skin from forming. Cool down and chill till use.


Choux Pastry
Ingredient
  • 125ml water
  • 70gm unsalted butter
  • 65gm plain flour
  • 2 large eggs, lightly beaten
  • 1/4 tsp salt

Method
  1. Heat water, salt & butter in a saucepan to a rolling boil, reduce heat.
  2. Tip in the flour and stir vigorously over low heat until mixture forms into a ball, about 1 minute.
  3. Remove from heat. Cool down dough lightly. Dribble in beaten egg and beat at the same time until dough mixture is smooth.
  4. Fill batter into a piping bag. Pipe dollop of batter onto lined baking sheet. Bake in preheated oven at 200 deg for 10-15mins, reduce oven temperature to 180 deg cel and bake for another 10-15 mins until golden brown. (duration of baking time depends on the size of your pastry, adjust accordingly)


before and after....


Shanghai Cheesy Taro Mooncakes


With some balance homemade yam paste after baking the Teochew Spiral Yam Mooncake, I trial bake a new recipe which turns out equally tasty! This shortcrust pastry is more simplify then the previous flaky pastry I did :D The pastry is full of buttery flavour and light cheesy taste with the extra grated cheddar cheese garnished on the top and yet it did not taste overwhelming with the yam filling...delicious! This is definitely on my to-do list for the coming mid-autumn festival :)


Recipe source : Mooncakes by Y3K
Ingredient (10 mooncakes)
  • 110gm plain flour
  • 15gm milk powder
  • 10gm custard powder
  • 1.5 tsp baking powder
  • 35gm icing sugar
  • 30gm shortening
  • 25gm cold butter
  • 30gm beaten egg
  • 300gm yam paste
  • 15gm toasted melon seeds
  • grated cheddar cheese for garnishing
  • beaten egg for glazing

Method
  1. Combine yam paste and toasted melon seeds together and mix evenly. Divide into 10 equal portions, approx. 30gm each, shape round set aside.
  2. Sift flour, milk powder, custard powder, baking powder and icing sugar into a mixing bowl.
  3. Add in shortening and butter. Using your fingertips, rub mixture till it resembles breadcrumbs.
  4. Add in beaten egg and mix to form a pliable dough. Divide dough into 25gm each. Chill in fridge for 30mins.
  5. Roll out each dough slightly and wrap in yam paste. Shape into round and flatten the top slightly. Place on lined baking sheet.
  6. Glaze the pastry with beaten egg and top with some grated cheese. 
  7. Bake in preheated oven at 180 deg cel for 20 mins or until golden brown.


I'm also sharing this post  with Cook Your Books #3 hosted by Kitchen Flavours

Tuesday, August 20, 2013

Koo Chai Kueh 韭菜粿


Oh my painstaking 12 koo chai kueh aka chives dumpling >.<" It took me 3rd attempt to get the wrapper dough right! Imagine I've to wash my hands full of sticky dough and utensils twice, almost give up and dear son will not have any food for his afternoon snack hahaha. Luckily my perseverance paid off :D The dumpling skin is chewy and non-sticky to bite and it did not turn tough after cooling down. It still taste as soft after 4 hours. Oh my dear son chomped down 3 dumplings at one go before going for his afternoon nap >0<

Pan-fried filling ready to be wrapped 


Practise makes perfect! This is the best shaped dumpling I've ever made! :D

Ingredient (enough for 12 dumplings)
Fillings
  • 150gm chinese chives, diced
  • 3 cloves garlic, minced
  • 3 tbsp dried shrimps, soaked and roughly chopped (retained soaked liquid)
  • 5 dried shitake mushroom, soaked and diced (retained soaked liquid)
  • 1 tsp oyster sauce
  • 2 tsp light soy sauce
  • 1 tsp sugar
  • 1/3 tsp white pepper
Wrapper 
  • 75gm wheat starch 
  • 75gm tapioca starch
  • 1/4 tsp salt
  • 175ml boiling water
  • 1 tsp corn oil

Method
  1. Heat 1 tbsp oil in pan, garlic, dried shrimps and mushroom and sauté till fragrant.
  2. Add in chives and seasoning and mix evenly. Drizzle in 2 tbsp reserved liquid and stir fry briefly. Remove from fire. Cool completely before wrapping.
  3. Combine flour and salt into a large mixing bowl. Pour in boiling water at one go and stir with a spatula till just combine, mixture will be slightly crumbly. Cover and rest for 10mins.
  4. Add in 1 tsp oil and knead the dough till smooth. Rest for 5 mins.
  5. Divide dough into 12 equal portions. Lightly floured the working surface and the rolling pin.
  6. Roll out each dough thinly, roughly about 7-8cm in diameter. Wrap in filling and seal the edge by pinching it together.
  7. Arrange the dumplings on a well oiled plate. Steam over preheated steamer for 8 mins.
  8. Remove from heat and glaze the dumplings with sesame oil. 


I love to serve the dumplings with sweet dark sauce! ^.*


Monday, August 19, 2013

Hakka Yam Abacus 客家算盘子


Can't get enough of yam?! hehehe I purposely buy extra yam to make this yam abacus dish which I've been craving for very long time! Based on Honey Bee Sweets recipe, I further improvise on the cooking method and seasoning added :D I brought some to my sister for her lunch and I actually learnt a few techniques from her mother-in-law whom cook a very yummylicious hakka yam abacus! She told me to rinse the cooked yam abacus to create a soft and springy texture which I did prior to her guidance! Furthermore she suggested to steam the raw yam abacus rather than boiling it!! hmmm will try this method the next attempt to see the difference :D


Ingredient
Yam Abacus
  • 250gm peeled yam
  • 80gm tapioca flour
  • pinch of salt

Method
  1. Steam yam over preheated steamer until soft. Transfer hot yam into a large mixing bowl together with the salt
  2. Add in tapioca flour while the yam is still hot. Knead together until it forms a soft pliable dough.
  3. Roll into a long log and cut into chunks.
  4. Roll the chunks into round balls. Use your thumb to make a indentation in the middle.
  5. Cover and rest the yam balls for 10mins. Meanwhile bring a pot of water to rolling boil.
  6. Drop in yam balls and cook till it floats. Drain away hot water and rinse with cold tap water. Drizzle over some sesame oil to coat it evenly. Set aside.

Rest of the ingredients :
  • 2 cloves garlic, minced
  • 2 shallots, finely sliced
  • 150gm minced pork (marinate with 1/2 tsp sesame oil, 1/2 tsp light soy sauce and dash of pepper)
  • 5 pieces dried shitake mushroom, soaked & sliced (retain liquid)
  • 40gm dried squid, rinse and cut thinly
  • 5 medium dried black fungus, soaked and sliced
  • 3 tbsp dried shrimp, soaked (retain liquid)
  • 1/2 tsp sugar
  • 1 tsp light soy sauce
  • 1/3 tsp five-spice powder
  • 1/3 tsp white pepper
  1. Heat 2 tbsp oil in wok over medium fire. Add garlic and shallots and saute till fragrant.
  2. Add in dried shrimp and squid and fry for another min.
  3. Add in minced pork and cook till opaque.
  4. Add in dried mushroom and cook for a few minutes. Toss in black fungus.
  5. Add in yam abacus, reserved liquid and seasoning and mix evenly.
  6. Dish up and serve warm.


Sunday, August 18, 2013

Teochew Spiral Yam Mooncake

Deep fried and baked version of spiral yam mooncakes

I always love yam ^.^ Been procratinating for the past years whether to attempt this spiral yam mooncakes! The coming mid-autumn festival is one month away, therefore there is ample time to do some trial bakes :D For a start I've only did 6 flaky mooncakes of which only one is deep fried as I want to see how is the result. As the pastry is deep frying, the layers gradually start appearing! hehehe I  was worrying that whole pastry will explode during the frying process but luckily that did not happen and it looks pretty good to me! It looks very flaky with many many layers! Though the rolling techniques still have much room to be improved, is still a success for my maiden attempt ^0^ 


To make this spiral yam mooncake, of course you have to start with the basic yam paste filling! Never thought that it is quite fuss-free to prepare this tasty yam filling! Smooth and creamy paste which I've to stop myself from pinching it ;P


Yam Paste
Yields approx 750gm (I've reduced the sugar amount, therefore the final amount can only made 10 mooncakes instead of 12 which stated in the original recipe)
Ingredient (enough for 10 mooncakes)
  • 500gm peeled yam, sliced
  • 2 shallots, sliced
  • 70gm corn oil
  • 200gm sugar (can be further reduced to 150gm if you do like like it too sweet)
  • 50gm water
  • 50gm wheat starch
  • 40gm melon seeds, toasted
  • 10 salted egg yolks*

Method
  1. Steam sliced yam over high heat until soft.
  2. Using a food processor, blend hot yam, sugar & water until smooth.
  3. Heat pan with 70gm oil. Add shallots and fry till fragrant and golden brown. Remove the fried shallots.
  4. Add in blended yam paste and fry until thick, approx 5 mins, over medium heat.
  5. Sieve in wheat starch and fry till mixture is non-sticky, approx 5 mins. You will notice that the paste will start to pull away from the edges of the pan. 
  6. Cool completely before use.
  7. Add in melon seeds into cooled yam paste and knead evenly. Divide into 75gm each and wrap in a salted egg yolk. Shape into round. 
* Rinse salted egg yolk and soak in rice wine for 5mins. Drain away the wine and bake the yolks in preheated oven at 160 deg cel for 8mins. Cool completely before use.


Knead in toasted melon seeds and wrap in salted egg yolks, is now ready to be wrapped into pastry dough!

Pastry Dough (makes 6 mooncakes)
(A)
Water Dough
  • 30gm shortening
  • 1/2 tbsp sugar
  • 40gm warm water
  • 1/4 tsp rice vinegar
  • 90gm bread flour

Mix shortening & sugar evenly. Pour in warm water and vinegar gradually and stirring at the same time. Sift in flour and knead into a smooth dough. Cover and rest for 30mins. Divide dough into 2 equal portions.


(B)
Oil Dough
  • 90gm plain flour 
  • 50gm shortening
  • few drops of purple colouring (I use wilton colour paste)

Bake plain flour in preheated oven at 130 deg cel for 10mins. Stirring once in between the baking time. Cool down completely before kneading in shortening. While a dough is formed, incorporate in the colour paste. Divide the dough into 2 equal portions. 


Final procedure, wrapping the oil dough into the water dough! The steps looks rather daunting but actually is not that difficult at all :D Hopefully the above pictures give you an idea how to go about it.
  1. Lightly floured a working surface and rolling pin. Roll out the water dough into a flat round disc. Wrap in a piece of oil dough.
  2. Roll it out into a long thin sheet.
  3. Roll in up like a swiss roll. Turn the roll 90 deg and repeat step 2 and 3.
  4. Cut the long thin sheet into 2 long stripes.
  5. Stack them up and roll up again. Seal the edge with some water. 
  6. Trim of the protruding parts on both ends, reserved for later use.
  7. Slice the roll into 3 equal portions.
  8. Repeat steps with the 2nd piece water dough and oil dough. You will get 6 round layer discs.
  9. Using a rolling pin, roll out each disc. Wrap in yam paste filling.
  10. Do not seal the bottom completely, leave some space. Roll out the reserved dough, smear with some water and stick to seal the bottom.
  11. To deep fry : Heat some oil in a saucepan, the oil MUST BE HOT! Deep fry over medium heat until lightly browned. Drain well on kitchen paper. Cool completely before storing.
  12. To oven bake : Bake in preheated oven at 160 deg for 15-20mins. The pastry will be soft when is out from oven. It will harden upon cooling. Cool completely before storing.
Alternative wrapping method, click here....


Recipe source : ‘月盈中秋’by Choong Su Yin

I'm also sharing this post  with Cook Your Books #3 hosted by Kitchen Flavours


Friday, August 16, 2013

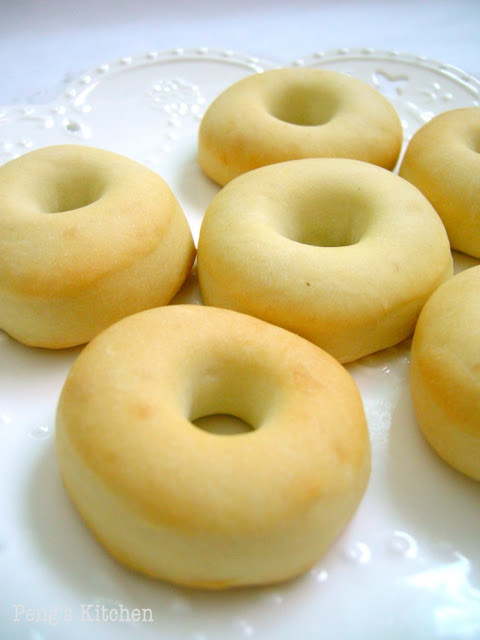
Baked Doughnut with Homemade Strawberry Jam

Oh they are so cute and sweet! Love these little baked doughnuts to bits :D Who says plain doughnut is boring? I love simplicity, it matches well with my homemade strawberry jam. Hehehe my boy can't wait to savour them while I was taking the pictures ^0^ and yes they are gone in a flash!


Recipe source : ‘我爱甜甜圈’ by Hirosawa Kyouko
Ingredient (6 doughnuts)
  • 50gm cake flour
  • 120gm bread flour
  • 2gm instant yeast
  • 25gm sugar
  • 3gm salt
  • 80ml warm milk
  • 30gm beaten egg
  • 10gm melted butter

Method
  1. Sift both flour into a mixing bowl. Make a well in the centre.
  2. Combine warm milk with yeast, sugar, salt & melted butter. Stir in beaten egg.
  3. Pour the liquid into the well. Use a scrapper to mix into a rough dough.
  4. Lightly flour hand and knead the dough for 5 mins until smooth and elastic.
  5. Cover and proof for 1 hour until double in bulk.
  6. Punch down dough and knead lightly.
  7. Roll out dough and cut out rounds using a doughnut cutter. Place the cut-outs onto a lined baking sheet. Cover with cling wrap and proof for another 45mins until double in bulk.
  8. Bake in preheated oven at 180 deg cel for 10-12mins.

I love the way they puffed up after baking, 100% cuteness! 


Recipe for homemade Strawberry Jam, click here...


I'm also sharing this post  with Cook Your Books #3 hosted by Kitchen Flavours

Thursday, August 15, 2013

Kampar Curry Chicken Bread


Voila! This is  the most gigantic bread I've ever made! ^0^ Doesn't it looks familiar to you? I did not know until now that Malaysia Kampar town has this dish which is similar to our local one known as Golden Pillow 金枕头 :D I've actually tasted this dish once like 10 years ago! Nothing special to the taste, except it looks more attractive in the presentation by wrapping the cooked curry chicken inside the sweet bread.


Hahaha... I've tried to shape it in a rectangle shape like a pillow, but alas it turned out rather round and flat >.<  Nevertheless the bread looks pretty nice to me, golden hue and the texture is soft too! I think this is great to serve at the dining table! Imagine everyone gather round the table and start tearing the bread apart and dipping into the creamy and flavourful curry! ^.^


Recipe ref : Frozen Wings
For Bread 
  • 450gm bread flour
  • 25gm milk powder
  • 15gm instant yeast
  • 60gm sugar
  • 1/2 tsp salt
  • 1 egg
  • 130ml cold milk
  • 130ml cold water
  • 40gm butter
  • extra milk for glazing

Method
  1. Combine milk and water together. 
  2. Mix flour, milk powder, yeast, sugar & salt in a large mixing bowl. 
  3. Add in egg and water (I did not add all, reserve 2-3 tbsp) and mix together in a rough dough. Knead for 5 mins.
  4. Add in butter and knead for another 10mins until dough is smooth and elastic. Cover and proof for 1 hour or double in bulk.
  5. After 1 hour proofing, punch down dough and knead lightly. Rest for another 10mins.
  6. Roll out dough in a large rectangle shape or round shape, put the wrapped chicken (refer to recipe below) at the center and gather the edges together. Pinch and seal tightly. Transfer onto a lined baking tray and proof for another 45mins.
  7. Glaze the surface with milk and bake in preheated oven at 180 deg cel for 35 mins or until golden brown. If the surface browned to fast, lightly shield the bread with a foil and bake till done.


Above picture is the cooked curry chicken before enclose into the bread dough. Looks like quite amount of gravy inside, but it actually reduce slightly after baking together with the bread. I chosen to cook the curry chicken using instant curry paste rather than taking the time of making a basic rempah.  So this is rather easy and fast to prepare and taste as good too! :D


Curry Chicken Recipe
  • 500gm chicken pieces
  • 90gm red curry paste (I used Ayam brand)
  • 2 cloves garlic
  • 8 shallots
  • 150ml water
  • 200ml coconut milk

Method
  1. Pound garlic and shallots till fine.
  2. Add 1 tbsp oil in pan and saute until fragrant.
  3. Add in chicken pieces and stir fry for 2-3 mins until lightly browned.
  4. Add in red curry paste and mix evenly.
  5. Add in water and coconut milk. Cover and simmer for 10mins. Cool down.
  6. Double lined a deep casserole with foil. Ladle in curry chicken and seal tightly.


I am submitting this to Malaysian Food Fest Perak Month hosted by WendyinKK of Table for 2 or more

Related Posts with Thumbnails