Wednesday, May 30, 2012

Cute Pasta with Homemade White Sauce

My recent discover in supermarket! cute shaped pasta! Aren't they cute! Other design like Racing Cars, Princess Series, Thomas Train & Hello Kitty are available. But I did not manage to spot the HK one if not sure will grab a package :P


Ooooo this creamy white sauce is so easy to make and very tasty also!! definitely less sodium loaded & food flavourings than commercially bought one! :D


Homemade Creamy Pasta White Sauce
Ingredient
  • 30gm onion, diced
  • 3 cloves, garlic, minced
  • 2 bay leaves
  • 250ml milk
  • 30gm butter
  • 2 tbsp flour
  • salt to taste
  • pinch of ground nutmeg
  • pinch of white pepper
Method
  1. Place onion, garlic, bay leaves & milk in a small pot. Bring to boil, lower heat to medium and cook for 5mins. Turn off heat and rest for 5mins for the flavours to infuse. Sieve.
  2. In a clean pot, melt butter over low heat. Add in flour and stir to mix, cook for 30secs. Remove from heat.
  3. Add in infused milk and stir well to remove any lumps.
  4. Add in salt, nutmeg & pepper and cook the mixture over low heat until thickens. Ready to use!

Kids Serving! ^-*


Slurped down everything! :D


Cute Pasta with Homemade Creamy Sauce
Ingredient (4 kids serving)

  • 80gm cute shaped paste
  • 30gm sliced carrots
  • 50gm broccoli florets
  • 30gm fresh mushroom, diced
  • 2 tbsp olive oil
  • 30gm onions, diced
  • 3 cloves garlic, minced
  • 2 tbsp white wine
  • 4 tbsp creamy white sauce
  • 1-2 tbsp pasta water
  • salt to taste
Method
  1. Cook pasta according to package, remove cooked pasta from water and set aside
  2. With the same pot of water, cook carrots for 3mins. Add in broccoli & mushroom and cook for another 2mins until the vegetables are softened. Remove the vege and retained the liquid for later use.
  3. Heat olive oil in a pan, add onions & garlic and saute till fragrant.
  4. Add in white wine and white sauce, stir well to combine.
  5. Toss in cooked pasta and vegetables and mix evenly. Add in adequate pasta water if mixture is too dry. Add salt to taste. Remove from heat and cool down slightly before serving.


This is Mummy's serving ^-^, heart shaped pasta with creamy sauce too :D


Baked Fish Fillet with Coriander & Lemon
...similar recipe as "Baked Seabass" which I cooked before. Just that I substitute parsley with coriander and added extra white onions :D


Baked White Fish Fillet with Coriander & Lemon

Ingredient
  • 500gm White Fish Fillet (I used Sutchi Fillet)
  • 1/2 lemon sliced
  • 12gm coriander, roughly chopped
  • 1/2 onion, sliced
  • 1/2 tsp salt
  • 1 tsp fresh black pepper
  • 1 tbsp olive oil
  • butter for greasing
Method
  1. Place a piece of foil over a baking pan. Lightly brush butter over. Place 1/2 of the onions & coriander on the foil. Arrange fish fillet over. Sprinkle salt & black pepper evenly over the fish
  2. Scatter lemon, remaining onion & coriander over. Drizzle olive oil evenly.
  3. Top another piece of foil over and seal tightly.
  4. Bake in preheated oven at 200 deg cel for 30mins.

Tuesday, May 29, 2012

Pack with Love 4

Here are some of my son's snack box which he bring to school everyday...with pictures from late last year till now. But starting of this year I was kind of lazy, not much nice presentation on his snack box :P


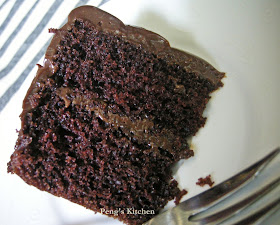
Bake-Along #25 - Bake-Along 1st Anniversary Layer Cake : Chocolate Fudge Cake


Happy 1st Anniversary to Bake Along!!
&
Happy Birthday to Mummy!! ^-* (5 days ago!)


One 6" & Two 4" cakes


Dulce De Leche Ganache!! addicting & sweet!


A 4" Chocolate Fudge Cake :) sweet & petite :)


Recipe adapted (with slight modifications) from Carnation
Ingredient (makes two 7" cake or two 4" + one 6" cake)
  • 175gm self-raising flour
  • 2½ tbsp cocoa powder
  • 1 tsp bicarbonate of soda
  • 120gm caster sugar
  • 2 eggs
  • 150ml corn oil
  • 150ml milk
  • 1 tsp vanilla extract
  • 125gm dark chocolate, melted
  • 397gm Dulce De Leche (caramel condensed milk)

Method
  1. Sift flour, cocoa powder & baking soda in a mixing bowl. Add in sugar and stir well to combine.
  2. Combine eggs, oil, milk, vanilla extract and 2 tbsp of DDL and stir well.
  3. Pour eggs mixture into dry ingredients and fold well to combine.
  4. Pour batter into lined cake pan and bake in preheated oven at 160 deg cel for 25-30mins or until a skewer inserted comes out clean.
  5. Rest cake in pan for 10mins. Unmould and cool completely on rack.
  6. Combine melted chocolate and DDL and stir till smooth. (Microwave on high for 30 secs if mixture is too thick to spread.)
  7. Place a slice of cake on a serving plate, spread some DDL ganache over and top with another slice of cake. Cover cake with remaining ganache. Chill in fridge before serving.
* Note : After layering the cake, I make a crumb coating over the cake, chill for 10mins, then spread ganache over the cake and use a piping tip #123 and run the patterns across the top of the cake :D


I loves the texture of the cake, very moist and light, compatible with the sweet & rich ganache :)


Monday, May 28, 2012

Holiday Baking #1

Today is the first day of June Holidays!! What to do to keep my 5 year old boy occupy?? BAKING!!! Ever since watching 'Junior Master Chef', his been asking me to teach him bake & cook >.<" Previously when am doing baking in the kitchen, once a while he will request to help to whisk or stir. So this morning I told him we will be making some muffins, he was pretty excited :D

Today I actually let him do 90% of the work!! :D :D Other then the macerating of strawberries, melting butter and putting the muffins into the oven, the rest of the steps like measuring flour, folding, sifting are all done by him! Though he enjoying the process most of the time, but reaching the end his complaining too warm! >.<" So I told him now you should understand Mummy's hard work when preparing meals for him and his sister hahahaha..In the end he still manage to complete all the tasks after some encouragement before leaving the kitchen! 做事要有头有尾!! This is today's teaching! wahahaha...


Recipe adapted from simplyrecipes.com

Strawberry Oatmeal Muffins

Ingredients

  • 1 1/4 cups oatmeal
  • 1 cup strawberry yogurt
  • 2 cups chopped strawberries
  • 2 teaspoons sugar
  • 1 teaspoon balsamic vinegar
  • 2 eggs
  • 125gm unsalted butter, melted
  • 90 gm brown sugar
  • 1 tsp vanilla paste
  • 125gm plain flour
  • 1 tbsp baking powder
  • 1/2 tsp baking soda
  • 1/4 tsp salt
  • 1/2 tsp cinnamon
Method
  1. Preheat oven to 220 deg cel.
  2. Place the strawberries in a small bowl. Sprinkle with white sugar and balsamic vinegar. Gently stir to coat the strawberries with the sugar and vinegar.
  3. Mix the oatmeals and strawberry yogurt together in a large bowl.
  4. Add the eggs, melted butter, brown sugar, and vanilla paste to the oatmeal and yogurt mixture. Stir until just incorporated.
  5. Sift in flour, baking powder, baking soda, salt & cinnamon powder into the oatmeal mixture. Stir until just incorporated and the flour is moistened. Do not over-mix! Or your muffins will end up rubbery. The batter should be rather lumpy, not smooth.
  6. Gently fold in the strawberries, including any of the sugary vinegary liquid the strawberries have been sitting in.
  7. Spoon the batter evenly into muffins cups. Reduce oven temp to 200 deg cel and bake for 10mins. Reduce to 180 deg cel and bake for another 10mins until golden brown. A skewer inserted into the center should come out clean. Let cool for a couple minutes in the muffin tin before removing to serve.

Saturday, May 26, 2012

鸡丝粉皮

A chilling and light dish which is perfect for this warm afternoon :D


Ingredient (4 servings)
  • 2 small japanese cucumber, julienne
  • 2 red chilli, deseeded & julienne
  • 2 chicken breast, steamed & shredded
  • 200gm Mung Bean Sheet Jelly 粉皮
  • 3 tbsp dark vinegar
  • 6 tbsp sesame dressing
  • 1 tsp sesame oil
  • 1/4 tsp white pepper

Method

  • Soak bean sheet in room temp boiled water till soften. Rinse lightly and drain well.
  • Place soaked bean sheet on a serving plate, top up with cucumber, chilli & shredded chicken. Chill for 30mins.
  • Meanwhile prepare the sauce : mix all seasoning evenly.
  • To serve, toss sauce evenly over the dish and serve immediately.

Tuna Mayo Bun

Finally attempt to make this heart shaped buns! I loves Carol's blog which features details on how to mould the dough into different shapes! :D Instead using her method using straight dough, I uses water roux dough :) All the six buns turned out nicely shaped, no weird looking heart shaped :D


Ooooo so soft :D


65C Tangzhong, Water Roux

Ingredient
  • 125gm fresh milk/ water
  • 25gm high protein flour
Method
  1. Pour milk into a small saucepan, add in flour and stir till flour is well dissolved.
  2. Cook over low heat and whisk continuously till a smooth paste is formed (I do not have a thermo to check whether the dough reaches 65C, but it roughly takes about 2mins)
  3. Cover the paste with a cling wrap touching the surface, leave to cool completely before using.

Tuna Mayo Bun (6 buns)
Ingredient
  • 180gm high protein flour
  • 55gm low protein flour
  • 15gm milk powder
  • 30gm sugar
  • 3gm salt
  • 4gm instant yeast
  • 70gm Tangzhong
  • 65gm milk
  • 30gm beaten egg
  • 25gm unsalted butter, softened
  • egg for glazing
Filling (mix well) : 1/2 can tuna, 3 tbsp sweet corn kernels, 1/4 chopped diced onion, 3 tbsp mayo, salt & pepper to taste


Method
(hand knead)
  1. Combine flour, milk powder, sugar, salt & yeast and mix evenly. Add Tangzhong and mix lightly. Make a well in the centre.
  2. Add in milk & egg and mix into a rough dough. Knead for 5mins. Add in softened and knead for another 10mins until the dough is smooth & elastic. Cover and proof for 60mins.
  3. Lightly punch down the proofed dough and knead to release gas. Divide into 6 portions, approx 75gm each, shaped into rounds and rest for 15mins.
  4. Shaped each dough and proof for another 60mins until double in bulk. (refer to Carol's blog on the shaping method)


5. Put some filling in the middle and glaze the side with beaten egg.
6. Bake in preheated oven at 180 deg cel for 15-20mins until golden brown. Remove from oven and cool completely
on wire rack.


fillings and glaze...ready to bake...


aren't they lovely...


Recipe adapted from 超简单面包精选

Friday, May 25, 2012

Strawberry Marble Butter Cake

oh butter cake again!? The vanilla butter cake I've baked for my son's school party received good feedback from his teachers! I actually ate only one slice of and miss it so badly hahaha. So yesterday night I whipped up another butter cake incorporated with some strawberry flavour! Half given to my father another half reserve for myself and kids hehehe.....not very pretty swirl but definitely still taste very buttery and moist :D :D


Recipe adapated from Vanilla Butter Cake
Ingredient

  • 230gm salted butter (I used 250gm)
  • 200gm eggs, no shell (4 large eggs)
  • 50gm + 150gm sugar
  • 200gm self raising flour, sifted
  • 60ml milk
  • 1 tsp vanilla paste
  • 3/4 tsp strawberry paste

Method
  1. Preheat oven at 180 deg cel. (I only use 160 deg cel). Prepare a 8 inch square pan. Line the base and grease the sides (greasing helps the cake’s sides to rise well)
  2. Separate the eggs, and place the whites into a medium sized bowl. Beat egg whites until soft peaks, gradually add 50gm sugar and beat until stiff. Set aside.
  3. Cream butter and 150gm sugar until pale and fluffy. Put in vanilla paste and and beat for a while. Put in egg yolks one by one and beat well after each addition.
  4. Put in half the flour and mix on low speed until incorporated. Put in milk in 2 additions and mix until well incorporated. Mix in balance of flour.
  5. Put half the egg whites in and mix on low speed. Remove 1 cup batter and mix with strawberry paste. Pour the balance of egg whites into the plain batter and FOLD.
  6. Pour batter into prepared pan and spoon in strawberry flavoured batter randomly. Level the surface and swirl lightly with a spoon.
  7. Bake for 45 minutes or until skewer comes out clean. Remove from oven and invert to cool completely before unmoulding.

Wednesday, May 23, 2012

Osmanthus Chiffon Cake

Chiffon Again! :D I always loves osmanthus fragrant :D But quite disappoint with the result, I should have thrown in the osmanthus flower into the batter rather than straining it away. Can't really detect the osmanthus flavour though I've added a tbsp of dried flowers at the last minute.


Osmanthus Flower & Osmanthus Sugar


Recipe adapted (with modifcations) from Vivian Pang's Kitchen
Ingredients
(A)
  • 50gm osmanthus sugar
  • 4 tbsp osmanthus, 桂花
  • 120ml water

(B)
  • 4 egg yolks
  • 1/4 tsp salt
  • 40gm corn oil

(C)
  • 100gm Top flour
  • 3/4 tsp baking powder
  • 2 tbsp osmanthus, 桂花

(D)
  • 5 egg whites
  • 30gm sugar

Method
  1. Put all ingredients (A) into a pot. Bring to boil, off heat and let it sit for 10mins. This is to bring out more aroma from the herbs. Set aside to cool.
  2. Pour egg yolks, salt and oil in a bowl. Stir well.
  3. Add in the cool syrup from (A). Stir well.
  4. Fold in sifted flour and baking powder. Mix till smooth. Stir in osmanthus.
  5. In another bowl, whisk the egg whites till frothy. Add sugar gradually and beat till stiff.
  6. Fold in 1/3 of the whites into the yolk mixture till well incorporated.
  7. Pour in the remaining egg whites and fold gently till well combined.
  8. Pour into chiffon mould. Bake in preheated oven at 180 deg cel for 45mins.
  9. Immediately invert it after removal from oven. Leave to cool. When cake is cold, remove from mould. Served.

Green Tea Chiffon Cake

Nice jade colour and green tea flavour with the use of the green tea powder bought from Phoon Huat. As I mentioned in my earlier post, this powder not exactly the real green tea extract but I still like the taste :P Very moist and light texture, like eating a piece of cotton :D


Ingredient
  • 95gm egg yolks
  • 25gm sugar
  • 1/2 tsp salt
  • 80gm corn oil
  • 50gm fresh milk
  • 30gm water
  • 100gm Top Flour
  • 3/4 tsp baking powder
  • 15gm Green Tea Powder
  • 240gm egg whites
  • 100gm sugar
  • 1/2 tsp cream of tartar
Method
  1. Beat yolks with sugar & salt until sugar is well dissolves.
  2. Add in oil, fresh milk and water and mix until well combine.
  3. Sift in flour, baking powder and green tea powder until a smooth batter is formed.
  4. In a clean dry bowl, beat egg whites and cream of tartar until soft foam. Beat in sugar gradually until stiff peak formed.
  5. Spoon 1/3 egg white mixture into yolk mixture and mix well. Pour batter into the balanced egg whites and fold till combine.
  6. Pour batter into a 9" tube pan and bake in preheated oven at 180 deg cel for 45mins. Remove from oven and cool completely with pan overturned.
Recipe adapted from Fion Lim from Munch Ministry

Walnut & Pine Nuts Cake

Very buttery coffee flavoured cake :D Best to serve next day for the flavour to develop.....


Recipe adapted from 'Fruity Cakes' by Alex Goh
Ingredient
  • 250gm unsalted butter
  • 130gm sugar
  • 3 eggs
  • 1 egg yolk
  • 50gm ground almonds
  • 230gm plain flour, sifted
  • 1/2 tsp baking powder
  • 60gm warm milk
  • 1 tbsp coffee granules
  • 120gm pine nuts + extra for topping, toasted

Method
  1. Dissolves coffee granules in warm milk. Set aside.
  2. Cream butter & sugar until light & fluffy.
  3. Add egg at a time and beat well after each addition.
  4. Fold in flour & baking powder, alternate with coffee mixture until well blended.
  5. Fold in pine nuts. Pour batter into a lined loaf pan and level the top. Sprinkle extra pine nuts over. Bake in preheated oven at 160 deg cel for 50mins or until a skewer inserted comes out clean.