Wednesday, December 28, 2016

Braised Lamb Leg in Red Wine

Thanks to Pure South New Zealand Asia for the giveaway contest, I've won a huge frozen lamb leg!! I rarely eat mutton and not to mention cooking it at home. So this will be my maiden lamb leg cooking attempt! 


When I first received the frozen lamb leg, I was really clueless on how to prepare it. After googling on some recipes, I've finally decided to use braising method. Similar to beef stew, I guess braising the lamb leg in red wine sauce should not fare too badly.


Ingredient
  • 1 bone-in lamb leg, approx. 2.5kg
  • 2 cups red wine
  • 2 cups chicken stock
  • 1/4 cup tomato paste
  • 2 x 400gm cans chopped tomatoes
  • 1 large onion, chopped
  • 10 cloves garlic, chopped
  • 10gm fresh thyme
  • 10gm fresh oregano
  • 10gm fresh rosemary
  • salt and black pepper to taste
Season the thawed lamb leg with salt & black pepper

Method
  1. Thaw and rinse the lamb leg thoroughly. Pat dry with kitchen paper. Generously season with salt and freshly ground black pepper. 
  2. Place a large oven proof casserole over the stove and heat up 3 tbsp oil. Add the lamb and sear each side until brown on both sides.
  3. Add in chopped onion and garlic and saute till fragrant.
  4. Pour in red wine, stock, chopped tomatoes and fresh herbs. Cover and bring it to a boil. Turn off heat.
  5. Preheat oven at 160deg cel. Place the casserole into the oven and cook for 1 hour. After 1 hour, remove casserole from oven. Gently turn over the lamb. Cover and return to oven and continue to cook for another 2 hours.
  6. Remove casserole from oven. Carefully transfer the braised lamb leg into a serving dish, cover lightly to keep it warm. 
  7. Place the casserole over stove, remove the herb sprigs, skim off excess grease and reduce the sauce till thick. Season with salt and pepper to taste if necessary.
  8. Spoon the gravy over lamb leg and serve.

Pan seared till browned on both sides before pouring in chopped tomatoes, tomato paste, red wine, chicken stock and fresh herbs.

This is how it looked after 3 hours of braising. 

Really tender meat after hours of braising! My 2 kids whom first time tasted lamb meat all approved of this dish! 

In another 3 days time it will be 2017!! I hereby wish all readers a Happy New Year!! Kids will be returning to school soon and time to prepare for the coming Chinese New Year.  My blog will be resting for a couple weeks and will be back with more awesome cooking/bakes....stay tune! 

Saturday, December 24, 2016

2016 Homemade Christmas Meal

Roasted Black Pepper Chicken, Baked Creamy Penne with Honey Baked Ham & Mushroom Soup

Roasted Black Pepper Chicken
Ingredient
  • One 1.5kg chicken, trimmed & butterflied
  • 1 small grated onion
  • 1 tbsp freshly ground black pepper
  • 2 tbsp garlic powder
  • 2 tbsp hoisin sauce
  • 2 tbsp olive oil
  • 2 tbsp brown sugar
  • 1 tsp salt
  • 4 sticks celery, cut into 3 sections

Method
  1. Combine grated onion with all the seasonings. Pat chicken dry with kitchen paper. Spread the marinade all over chicken. Cling wrap and chill overnight. 
  2. On the next day, bring the marinated chicken to room temperature before baking.
  3. Place celery sticks on a baking pan, place the butterflied chicken over the celery sticks. Drizzle some olive oil over the chicken.
  4. Bake in preheated oven at 220 deg cel for 60mins until crisp and golden brown. 
  5. Remove chicken from oven and lightly cover with foil to rest. 
  6. To serve, carefully transfer chicken onto a serving platter. Strain the gravy in the baking pan into a clean bowl. Serve along with pan grilled potatoes and varieties of baked vegetables.

Pan-grilled Potatoes
Ingredient
  • 1 kg baby potatoes
  • 1/4 cup butter
  • 2 tsp Italian mixed herbs
  • salt & pepper to taste

Method
  1. Peel and cut potato into halves. Slice into 3 sections if its too huge.
  2. Bring a pot of water to boil. Add in potatoes and cook for about 10 mins until tender. Drain away water.
  3. Melt butter in a large pan. Arrange potatoes in one layer onto the pan. Sprinkle mixed herbs, salt & pepper over the potatoes. Pan fry till bottom is golden brown. Gently flip the potatoes and fry till the other side is browned. 
  4. Remove from heat and transfer the potatoes onto a serving dish. 


Baked Creamy Penne with Honey Baked Ham
Ingredient

  • 500gm Penne
  • 200gm honey baked ham, sliced into small pieces
  • 500ml fresh milk
  • 3 tbsp self-raising flour
  • 1 cup mayonnaise
  • 1 can cream of chicken
  • 1/2 cup grated Parmesan cheese
  • 1 tsp Italian mixed herbs
  • 2 tbsp Dijon mustard
  • 1 tsp paprika
  • salt & black pepper to taste
toppings : 1 cup panko bread crumbs mix with 3/4 cup cheddar cheese

Method
  1. Cook the Penne according to package. Drain away water and mix in honey baked ham. Transfer the Penne into a large baking dish. Set aside.
  2. In a medium saucepan, whisk milk and flor until well combine. Turn on heat and cook over medium low heat. 
  3. Add in mayonnaise, cream chicken soup and stirring constantly, cook for about 4 mins until the sauce is thick. Remove from heat. Stir in mixed herbs, dijon mustard, cheese, paprika, salt and black pepper. 
  4. Pour the cream cheese sauce mixture over cooked Penne. Mix in gently to coat evenly the Penne. Sprinkle topping evenly over the top. 
  5. Bake in preheated oven at 180 deg cel for 25 mins.


Thanks to Auric Pacific for the invitation to attend the McCormick cooking demo at Tott @ Dunearn! 

The cooking demo was demonstrated by Chef Lisa Leong. We enjoyed her lively, joyful and informative session on how to prepare a complete Christmas menu!! We were shown on the preparation of Spiced Honey Baked Ham, Grill Mates Roast Pot Beef, Baked Pasta & Ham, Steamed Christmas Pudding and Cinnamon Spiced Fruit Punch, all using he McCormick range of herbs and spices. What a delicious feast! 

My kids simply loved the baked pasta at the cooking demo, therefore today I've replicated this dish at home and again they enjoyed it to bits! ^0^ The above recipes are references from Chef Lisa Leong with some minor adjustments by me  to suit our taste. 

Oh yes, besides featuring the herbs and spices during the workshop, I've also discovered a range of new products launched by McCormick, natural food extracts!! Below is the whole range of natural food extract which are currently only available at Tott. I've bought a few flavours which I love most, hope I could try them out soon! 


Thursday, December 22, 2016

White Fruitcake

Have you started your Christmas fruitcake baking? No plans for extravagant Christmas party, but homemade simple Christmas fruitcake for gifting has became a ritual practise for me. ^0^ 


This so called white fruitcake is made with fine sugar instead of the usual brown sugar and molasses sugar. Beaten meringue is folded into the cake batter to achieve a more lighter texture fruitcake than the traditional version. After baking you can brush extra rum over the warm cake, but I omit this process so that it is kids friendly. 


Before baking

After baking

Ingredient
  • 500gm mixed fruits (soaked in rum for at least 1 week)
  • 185gm salted butter
  • 185gm fine sugar
  • 4 eggs, separated
  • 1 tsp vanilla extract
  • 315gm plain flour
  • 1 tsp baking powder
  • 1 tsp mixed spice
  • 1/2 tsp cinnamon powder
  • glaced cherries and blanched almonds for decorating

Method
  1. Drain mixed fruits. Add in 5 heap tbsp of flour and mix well to coat the fruits. Set aside.
  2. Using a electric whisk, cream butter and 100gm sugar until light and pale.
  3. Beat in yolks one at a time until well incorporated.
  4. Sift in flour and spice mixture and fold in alternate with mixed fruit into the butter mixture.
  5. In another clean dry bowl, beat egg whites with remaining sugar until soft peaks form.
  6. Fold the meringue in batches into the fruit batter.
  7. Spoon batter into two 9" loaf pan, filling 80% full. Smooth the top with a spatula. Arrange glaced cherries and almonds on top of the cake.
  8. Bake in preheated oven at 160 deg cel for 50mins or until a skewer inserted comes out clean.


Wednesday, December 21, 2016

椰奶玉米水晶汤圆 Crystal Rice Balls in Coconut Cream of Corn

Wishing all readers a Happy Winter Solstice Festival !!!

冬至快乐 !!


Something different from the usual glutinous rice balls I've made. These rice balls skin are translucent and you can see the fillings showing through!! I must admit that the dough using tapioca starch is not easy to work with unlike glutinous rice flour. ^0^''''' The texture is also more chewy compare to glutinous rice balls. Serve this with creamy cream of corn coconut milk is a perfect match! 


Crystal Rice Balls 
Fillings 
(A) Sesame Paste (approx. 25pcs)
  • 100gm black sesame seeds
  • 100gm fine sugar
  • 50gm salted cold butter

Method
  1. In a clean dry pan, toasted the sesame seeds over medium low heat till fragrant.
  2. Transfer the warm seeds into a food processor and blend until coarse grain. Add in sugar and continue to blend till powder form.
  3. Add in butter and process into a paste.
  4. Divide the black sesame paste into 25 equal portions. Roll into balls and place onto a lined tray. Chill or freeze till firm until use.

(B) Purple Chinese Yam Paste (approx. 15pcs)
  • 250gm steamed purple yam
  • 50gm fine sugar

Method
  1. Peel and cube Chinese purple yam. Steam for 30mins till soften. 
  2. Measure 250gm steamed yam cube and mash it while its till hot. Add in sugar and mix till smooth. Rest the paste for 15 mins to allow the excess moisture to evaporate. 
  3. Shape the paste into 20gm balls and place on a lined tray. Chill or freeze till firm until use.

Dough
  • 200gm tapioca starch
  • 200gm hot boiling water

Method
  1. Place tapioca starch into a mixing bowl. Add in hot water gradually and mixing at the same time till a rough dough is formed.
  2. Knead the hot dough till smooth. Cover the bowl with damp cloth and rest the dough for 20mins.
  3. Divide the dough into portion :  8gm for small rice balls or 15gm for medium. I've uses a ratio for dough to filling 3 : 4.
  4. Flatten the dough and wrapped into a portion of filling. Seal tightly and place on a lined tray. Cover the tray with cloth to prevent dying out the rice balls while continue with the wrapping of the balance dough and fillings.
  5. Bring a pot of water to boil. Add in rice balls, bring back to boil over medium heat. Add in a cup of cold water and continue to boil till the rice balls float to the serve. 
  6. Remove the crystal rice balls and submerge in another pot of cool water. Serve with cream of corn coconut milk.


Cream of Corn Coconut Milk 
Ingredient
  • 50gm sago pearls
  • 1 litre boiling water
  • 120gm rock sugar
  • 3 pandan leaves, knotted
  • 1 can cream of corn
  • 1 cup sweet corn kernels
  • 375ml organic light coconut milk
  • 1/8 tsp of salt

Method
  1. Soak sago pearls for 10mins and drain away water. Bring a pot of water to boil. Add in sago pearls, cook over medium heat for about 10mins until the pearls turn translucent. Drain through a sieve and rinse with cold water. Set aside.
  2. Boil water with rock sugar until sugar is well dissolved. Add pandan leaves and simmer for 10mins. Pour in cream of corn and corn kernels. Bring to boil. Add in coconut milk, salt and bring to a simmer. Discard pandan leaves.
  3. Add sago pearls and stir to mix well. Serve warm with crystal rice balls or chill in fridge before serving. 


Friday, December 9, 2016

Slow Cooker Pandan Kaya

Good old-schooled breakfast! Homemade pandan kaya spreaded on toast and soft boiled eggs with a cuppa of hot coffee! 

The basic ingredients for making this pandan kaya using slow cooker!! I've tried bain-marie and directly stove method. Thanks to my friend Catherine whom introduced this slow cooker method which is easy peasy to whip up this yummylicous coconuty egg jam! ^0^ No standing in front of the hot stove stirring the mixture constantly!! I love it! 


Ingredient
  • 6 eggs, approx 55gm each
  • 400ml organic light coconut cream
  • 200gm fine sugar
  • 2 tbsp fresh pandan juice extract
  • 1 tbsp plain flour
  • 50gm coconut powder

 Method
  1. Combine all ingredients in a mixing bowl and mix till well combine.
  2. Sieve the mixture into the slow cooker.
  3. Cover and cook on low heat for 1.5-2 hours, stirring occasionally in between until it thickens.
  4. Cool down and store in clean jar and chill. 
Notes : 
i) My small slow cooker only have auto and high heat function. So I've used auto heat throughout the cooking process.
ii) The mixture only started to thicken after 1 hour. It will curdles slightly. I used a sieve to go through the mixture to smoothen out the texture.
iii) I continue to cook for about 10mins. Mixture will thicken further as it cool down. 
iv) If the kaya curdles at the end of the cooking duration, use a electric whisk and beat till smooth. 


The mixture looks rather runny as per the video above after 1.5 hours of cooking. But it further thickens up upon cooling and chilling! 


Friday, December 2, 2016

Chocolate Chip & Peanut Butter Banana Bread

TGIF! Let's have a slice of hearty chocolate chip and peanut butter banana bread to start this beautiful  Friday morning! hehehe I'm too generous with the chocolate chips, as you can see that the loaf is literally covered with it. But I like it this way! ^0^


Ripen bananas ready for use in baking

Steps by steps process : cream butter and sugar, beat in eggs, stir in vanilla and peanut butter, mix in mashed bananas, sift in flour and mix, stir in milk and finally fold in chocolate chips. Pour batter into lined pan, top with more chocolate chips if desired and bake for 160 deg cel for 60mins. 

Ingredient
  • 250gm plain flour
  • 1 tbsp baking powder
  • 1/2 tsp salt
  • 60gm butter, room temperature
  • 90gm fine sugar
  • 60gm brown sugar
  • 180gm creamy peanut butter
  • 2 large bananas, mashed
  • 1 large egg
  • 1 tsp vanilla extract
  • 250ml milk
  • 1 cup chocolate chips 

Method
  1. Sift flour, baking powder and salt together.
  2. In a large mixing bowl, cream butter and sugar until combined.
  3. Beat in egg. Mix in peanut butter and vanilla and beat till creamy.
  4. Mix in mashed bananas.
  5. Add in flour mixture and fold in alternate with milk till batter is smooth. Fold in chocolate chips.
  6. Pour batter into lined loaf pan and spread out evenly. Scatter over extra chocolate chips if desired.
  7. Bake in preheated oven at 160 deg cel for 60 mins or until a skewer inserted comes out clean.
  8. Cool in pan for 10 mins before unmoulding onto wire rack to cool completely.


Wednesday, November 30, 2016

Chewy Fruitcake Cookies


These are the bottles of rum soak fruit (raisins, currants, mixed peel, cranberries) which I have prepared two years ago! Below picture was taken two years back whereby the dried fruits were freshly soaked in rum. You won't get such vibrant colour after soaking it for two years ok! ^0^ Therefore I've added some freshly chopped dried apricots, glaced cherries into the cookie dough so that they will look prettier! 


Oh we really love this fruity cookies! The cookies are not only eye candy but also extremely tasty. This will be great alternative for gifting besides the usual rich fruit cake!  I believe family and friends will be delighted to receive this festive looking cookies. 


Ingredients (approx. 20 cookies)
  • 180gm plain flour
  • 1/2 tsp salt
  • 1/2 tsp baking soda
  • 1 tsp cinnamon powder
  • 125gm unsalted butter
  • 70gm fine sugar
  • 50gm brown sugar
  • 1 egg
  • 1 tsp vanilla extract
  • 150gm dried fruits (mixture of rum soaked mixed fruit, dried apricots, glaced red and green cherries)

Method
  1. Sift plain flour, salt, baking soda and cinnamon powder. Set aside.
  2. Using a electric whisk, beat butter and sugar until light and fluffy. 
  3. Add in egg and vanilla and beat till well combined.
  4. Add in flour mixture, in 3 batches, beat until just incorporated. Do not overmix.
  5. Fold in dried fruits. Using a ice-cream or a spoon, drop dollop of batter onto lined baking sheet, leaving 2" space in between as the cookie will spread. Sprinkle some diced apricots, chopped red & green cherries on the top of the cookie dough.
  6. Bake in preheated oven at 180 deg cel for 12-15 mins until lightly brown.
  7. Cool on baking sheet for 5 mins before transferring onto a wire rack to cool down completely before storing. 

Tuesday, November 29, 2016

Cranberry Poached Pears

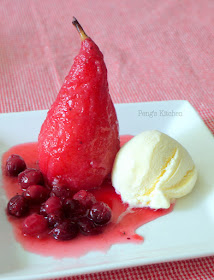
Everywhere is so christmasy now! My family do not celebrate Christmas but I do enjoy the Christmas spirit and feasting. ^0^ So delighted to spot some fresh cranberry at the supermarket, relatively cheap and therefore I've grabbed a few packets. This lovely sweet cranberry poached pears which is alcohol free so that kids can enjoy this dessert too! Very christmasy looking dessert right? A simple and elegant dessert to awe your guest if you are clueless of what to make for your Christmas party. :D 


What you need for making this jewelled cranberry poached pears : 150gm fresh cranberries, 1/8 cup dried cranberries, 1 vanilla pod, 1 small cinnamon stick, 1 fruity tea bag, 1 large orange peel, 1 large lemon peel, 2 tsp lemon juice, 3 tbsp honey, 1 tbsp fine sugar ....

 .....and of course the main ingredient fresh pears!! I'm using Belgium conference pear here. 

Peel the pear and slightly shaved off the bottom so that it can stand upright. Place the pears into a pot. Fill in water just enough to submerge all the pears. Slice the vanilla pod lengthwise and scrap out the seeds. Throw the pods and seeds into the pot. Add in cinnamon, peels, honey and sugar. Bring to boil. Lower heat and simmer for about 10 mins till pears are tender.  

 Add in fresh cranberries and continue to simmer for another 2 mins. Turn off fire.

Transfer the pears and cranberries syrup into a container. Add in tea bag and dried cranberries. Cool down and chill in fridge overnight. As cranberry has high pectin, the syrup will further thickens as it cool down!

Serve the chilled poached pear with cranberry syrup and of course a dollop of vanilla ice cream! 

Recipe ref : marthastewart.com

Thursday, November 24, 2016

Launching of "Bake and Celebrate : Cookies & Treats" Cookbook


I am happy to announce that one of my cookie recipe will be featured in this new "Bake and Celebrate : Cookies & Treats" cookbook! Thanks to Marshall Cavendish International (Asia) Ltd for this opportunity to be part of this joint cookbook.


The book will be sold at S$14.90 (inclusive GST) per copy when launched at the Singapore bookstores in December. This will an ideal gift for family and friends for the coming seasons! From now till 9 December 2016, local readers can get a special pre-order price of S$11.95, which is a 20% from the actual retail price. There will be a delivery charge of S$10 for orders of 4 copies and below. Free delivery for pre-orders of 5 copies and above. Kindly place your order to letsbakeandcelebrate@gmail.com! 


Monday, November 21, 2016

三杯鸡 Three Cups Chicken

This is a classic Chinese dish which is really popular. In the olden days, 1 cup oil, 1 cup soy sauce and 1 cup wine are used to make this rich fragrant chicken dish. That's why it is called Three Cups Chicken! As times pass-by, the recipe has evolved using less oil, less seasoning for healthier reasons. The crucial ingredient in this dish is the fresh basil leaves which gives a special aroma and taste. Do not omit it if you intend to prepare this dish! 


Ingredient
  • 4 whole chicken leg, chopped into bite-sizes
  • 1 tbsp corn oil
  • 2 tbsp sesame oil
  • 3 slices ginger
  • 8 cloves garlic, peeled
  • 6 shallots, roughly chopped
  • 2 dried chilli, softened and cut into sections 
  • 1/4 cup chinese cooking wine
  • 1 tsp red dates dark soy sauce
  • 1 tbsp light soy sauce
  • 2 stalk spring onion, chopped
  • 100gm fresh basil leaves

Method
  1. Marinate chicken pieces with 1 tsp sesame oil, 1 tsp red dates dark soy sauce,  1/2 tsp salt. Set aside for at least 30mins.
  2. Heat corn oil and sesame oil in a wok. Add in ginger and saute for 2 mins until golden at the edge. 
  3. Add in whole garlic, shallots and dried chilli, fry till garlic is caramelised.
  4. Add in marinated chicken pieces and toss evenly, fry for 3 mins.
  5. Add in wine, dark soy sauce and light soy sauce and mix well. Cover and cook over medium heat for 10 mins until the chicken are cooked through.
  6. Remove lid, toss in spring onion and basil leaves. If mixture is too dry, add in a couple tbsp of wine. Dish up and serve immediately.