Saturday, June 27, 2015

斑兰蛋花菜燕 Pandan Egg Drop Agar Agar

Expecting more hot and dry weather for the coming weeks! School reopening tomorrow and I will be back in duty of fetching my two kiddos back and fro from school under this terrible heat! Besides cooking more dessert like green bean soup, barley water etc....I've also make some cooling agar agar for the kids to beat the heat. Just simple ingredients used, no colorings or coconut milk added. Blue colour is extract from dried bluepea flowers whereas the green is natural pandan juice. The marble effect is by adding an egg in each batch of cooking.  Drink more water and stay hydrated everyone! 


Ingredient
  • 10 blades fresh pandan leaves, snip short
  • 1000ml water
  • 1 packet agar agar powder
  • 150gm fine sugar
  • 1 egg, lightly beaten

Method
  1. Blend pandan leaves with 500ml water and sieve to get first batch of pandan liquid. Process again with another 500ml water to get second batch of the liquid.
  2. Combine all pandan liquid into a pot with agar agar powder and sugar. (alternative : add eggs at this point of time to achieve different effect)
  3. Bring to boil, lower heat and stirring frequently and simmer till sugar is well dissolved.
  4. Slowly drizzle in beaten egg and stirring in clockwise at the same time.
  5. Turn off heat and pour the agar agar mixture into small jelly mould or pan.
  6. Cool completely and chill in fridge till serve.
* Note : For blue liquid, simmer 1/4 cup dried bluepea flower with 1000ml water for 5 mins to extract the blue liquid. Remove flowers before adding in agar agar powder and sugar. Cook as per above instructions.

Friday, June 26, 2015

Nut-Hugging Bear Cookies

This is the most adorable cookies I've ever bake! They are made famous by this Japanese chef named  Maa Tamagosan . I did not use her cookie dough recipe,  only use her idea as a reference. This butter cookie dough I tried turns out very well as it retained its shape, no spreading nor out of shape :D Hahaha I've too much varieties of nuts in my pantry, as you can see my bear cookies are hugging so many different kinds of nuts! Not a fan of nuts? Use dried fruits if you like! ^0^


The bear cookie cutter I bought at Ailin Bakery. I like the bear's hand as it is long enough to wrap up the nuts. 

Cut-out bear cookies before baking


Ingredient (approx. 45 cookies)
  • 120gm unsalted butter
  • 80gm fine sugar
  • 1/8 tsp salt
  • 34gm egg yolks 
  • 1 tsp vanilla paste
  • 240gm cake flour
  • assorted nuts (almond, pecans, walnut, cashew, pistachio)

Method
  1. Using a electric whisk, cream butter, salt and sugar until creamy and light.
  2. Beat in yolks and vanilla until well combine.
  3. Beat in flour briefly in 3 batches. Use hand to gather the dough together. Chill in fridge for 15-30 mins to firm up the dough if it is too soft.
  4. Dust a work surface with flour, roll out dough and using a bear cookie cutter (2" in height) to cut out the shapes. Place cookie on a line baking sheet.
  5. Place nut over the bear body and fold up the hands to hug the nuts. Use the end of a satay stick to print out the eyes and mouth.
  6. Bake the cookies in preheated oven at 160 deg cel for 20 mins or until the edges are lightly golden brown.
  7. Cool completely on wire rack before storing in air-tight container.

Thursday, June 25, 2015

Braised Chicken with Lychees & Capsicum

Oooh lychee season is here again! It reminds me of a recipe which has been in my draft, it is time to share with you this delicious braised chicken dish which incorporate with lychee! Instead of using fresh lychees, canned lychees is used as some of the sweet lychee syrup is needed for the braising sauce. I've used boneless chicken thigh meat as it is more tender and cook really fast too.  Yummilcious to go along with a bowl of warm rice! 


Recipe ref : Good Food Mag Apr 2013
Ingredient
  • 450gm boneless chicken thigh
  • 4 tbsp oil
  • 1 tbsp minced garlic
  • 1 canned lychee, reserved 120ml syrup
  • 80ml water
  • 1 small yellow capsicum, sliced
  • 1 red chill, chopped
Marinade for chicken
  • 1 tsp salt
  • 1/2 tsp pepper
  • 2 tbsp light soy sauce
  • 2 tbsp chinese wine
  • 1 tsp chicken stock powder
Seasoning
  • 1/2 tsp salt
  • 1 tbsp dark soy sauce
  • 1/2 tsp pepper

Method
  1. Cut the chicken thigh into bite sizes. Marinate for 30mins. (I chill it overnight)
  2. Heat oil in wok and sauté garlic.
  3. Add in chicken pieces and fry over high heat until browned.
  4. Add in lychees and toss well.
  5. Pour in water and lychee syrup. Add in seasoning. Cover and simmer for 10 mins.
  6. Remove the lid, add in capsicum and red chilli and toss briefly. Dish up and serve.


Cook Your Books #24 by Kitchen Flavours

Tuesday, June 23, 2015

Bacon & Mushroom Alfredo

It is actually very easy to homemake basic white creamy pasta sauce at home! Have you try it before? The taste is definitely way better than those off-shelves one. I am always happy to make this kind of creamy pasta for my family as they will polish up their plates within minutes and always ask for a second helping :D 


Browning the bacon and mushroom, removed from pan followed by making the base of the roux

Stirring in the cream, cheese and crisp bacon & mushroom, the rich and creamy white sauce is ready to toss into cooked pasta!


Recipe modified from : tasteandtellblog.com
Ingredient
  • 1/4 cup chopped bacon
  • 1/2 cup chopped fresh mushroom
  • 50gm unsalted butter
  • 60gm plain flour
  • 375ml chicken stock (dissolve 1/2 chicken stock cube with water)
  • 200ml whipping cream
  • 1 cup grated Parmesan cheese
  • 500gm lingunie or your choice of pasta
  • chopped parsley, for garnishing

Method
  1. Bring a large pot of salted water to a boil. Add pasta and cook until al dente. Reserve a cup of pasta water then drain the pasta. Keep warm in the pot.
  2. Meanwhile, cook the bacon in a pan over medium heat until crisp. Remove bacon and add in chopped mushroom. Pan fry till mushroom is softened and brown. Remove mushroom from pan.
  3. Add the butter into the pan and cook it till melted. Whisk in flour gradually, stirring constantly and cook for about 2 min till lightly brown.
  4. Slowly whisk in chicken stock and cream. Stirring constantly and cook till sauce is thickened.
  5. Add in Parmesan and stir until well melted. Stir in bacon and mushroom. Add in salt and pepper to taste.
  6. Pour the cheese mixture into the pot of pasta. Mix evenly. Add in pasta water as needed to thin out the sauce if desired.
  7. Serve immediately with chopped parsley.


This post is linked to the event, Little Thumbs Up organised by Bake for Happy Kids and My Little Favourite DIY, and hosted by Diana from the Domestic Goddess Wannabe

Monday, June 22, 2015

Korean Cold Noodles (Naengmyeon)

Our simple lunch today! Light and chilled noodle just right for this hot weather. The kids could not get enough of the lava egg! hahaha but too bad only one serving each ^0^ I've a small serving of spicy and non-spicy noodle each...slurpppp! In the end I could not resist and reached out for another helping of the spicy one :D Both are good, so depends which version you like best :D 


Hot & spicy sauce

Hot & Spicy Sauce
Ingredient
  • 1 Korean pear, peeled, cored, sliced
  • 1/4 large onion, sliced
  • 3 cloves garlic, peeled
  • 1 thumb size ginger
  • 1/3 cup corn syrup
  • 1/4 cup Korean chilli flakes
  • 2 tbsp Korean hot pepper paste
  • 1 tbsp toasted sesame seeds
  • 1 stalk spring onion, shredded
  • 2 tsp salt
  • 1 tbsp light soy sauce

Method
  1. Place all ingredients into a food processor. Blend till smooth.
  2. Scoop out sauce and place in a air-tight container. Chill in fridge.

Cold Spicy Noodle (Bibim-naengmyeon)

Chilled Broth

Chilled Broth
Ingredient
  • 4 dried shiitake mushroom
  • 4" piece of dried kelp
  • 10 dried large anchovies, heads removed
  • 3 tsp rice vinegar
  • 1 tsp salt
  • 2 tsp sugar

Method
  1. Boil 8 cups of water with mushroom, kelp and anchovies for 20 mins.
  2. Lower heat and simmer for another 20 mins. Cool down the broth. Strain and chill in fridge.
  3. To serve, combine 2 cups of the broth with vinegar, salt and sugar and stir well. 

Side Garnishing
Ingredient
  • 2 Japanese cucumber
  • 1 Korean pear
  • 4 Lava eggs
  • 1 package buckwheat noodles
  • toasted sesame seeds

Method
  1. Slice cucumber into think strips. Add 1/2 tsp salt, 2 tsp sugar and 2 tsp vinegar and mix well. Keep chilled.
  2. Peel and remove core of the pear. Slice and soak the pear in water and add 1 tsp sugar to prevent browning.
  3. Bring a pot of water to boil. Add noodles and cook for 5 mins. Drain away water and rinse a few time till water runs clear. Place a cup of ice cube over the noodle to keep to chill.
Buckwheat Noodles

To serve
(non spicy)
* Place some noodle in a serving bowl. Ladle over cold broth. Top with pickled cucumber, sliced pears and lava egg. Sprinkle toasted sesame seeds over.

(spicy version)
* Place some noodle in a serving bowl. Spoon some spicy sauce over and toss well to mix. Top with pickled cucumber, sliced pears and lava egg. Sprinkle toasted sesame seeds over.

Cold noodle in chilled broth (Mul-naengmyeon)

Saturday, June 20, 2015

Chicken Tenders Wrap with Creamy Potato Corn Soup

As promised to my kids, I've made this chicken tenders wrap for them. hahaha I refused to buy one for them when they saw a similar chicken wrap from some fast food restaurant. Rather then spending over $4 just for a miserable wrap, is so much economical and healthier to make some at home :D Besides the chicken tenders wrap, I've also made some creamy potato corn soup to complete this hearty meal.


Ingredients for the creamy soup


Creamy Potato Corn Soup
Ingredients
  • 2 tbsp olive oil
  • 1 onion, chopped
  • 2 potatoes, cubed
  • 350gm sweetcorn kernels
  • 400ml chicken stock 
  • 200ml dairy cream
  • Salt and freshly ground black pepper to taste

Method
  1. Heat olive oil in a pot over a medium heat. Add the onion and potato and sauté for five minutes, until softened.
  2. Add 200gm sweetcorn kernels and continue to cook for two more minutes.
  3. Add the stock, bring to the boil, then reduce the heat to simmer for five minutes, until the potato has cooked through.
  4. Cool slightly and blend in a food processor till mixture smooth. Transfer mixture back into the pot.
  5. Add in remaining 150gm sweet corn kernels. Bring to boil, stir in the cream, add salt and freshly ground black pepper to taste. Serve.

Golden Chicken Tenders

Spread mayonnaise over a warmed wrap, topped with cheese slices, fresh lettuce & tomatoes, finally top with a slice of fried chicken tenders, roll up and serve!


Crispy Chicken Tenders
Ingredient
  • 300gm chicken tenderloins
  • 1/2 cup buttermilk
  • 3/4 tsp salt
  • 1/2 tsp dried chilli flakes
  • 1/2 tsp garlic powder
  • 1/2 tsp paprika
For Coating
  • 125gm plain flour
  • 1/2 tsp black pepper
  • 1/2 tsp garlic powder
  • 1 tsp baking powder
  • 2 tbsp buttermilk

Method
  1. Combine the chicken tenders with all the marinade ingredients in a ziplog bag. Seal the bag tightly and smash it around to ensure the chicken tenders are evenly coated with the buttermilk and seasoning. Chill overnight.
  2. For the coating : combine flour, pepper, garlic powder and baking powder in a bowl, whisk well to incorporate.
  3. Add in buttermilk and stir with a fork to combine.
  4. Line a baking sheet. Remove chicken tenders from the marinade and toss into the flour mixture. Press the chicken firmly into the breading. Place the coated tenders on the baking sheet.
  5. Heat some oil in a medium saucepan. Over medium heat, slide in coated tenders into the hot oil, in batches. Cook until they are golden brown on both sides. Remove and drain well on kitchen papers. 

This post is linked to the event, Little Thumbs Up organised by Bake for Happy Kids and My Little Favourite DIY, and hosted by Diana from the Domestic Goddess Wannabe

Thursday, June 18, 2015

Cherry Cheesecake

I love making non-bake cheesecake as they are easy to assemble and my kids adore it as they think it tasted just like ice-cream. Usually for non-bake cheesecake it requires setting agent like gelatine to firm up the texture. But for this particular recipe from Nigella Lawson, no gelatine is needed! This cherry cheesecake tasted really like ice-cream hehehe....soft and creamy texture with sweet cherry topping!


The easy way out by using ready canned cherry topping. After the cheesecake is well set in fridge, spread on the cherry topping and piped simple patterns along the edge using fresh cream.

oops I was too anxious to slice up the cake therefore the centre was not really well set yet :D 

Recipe ref : Nigella Express
Ingredient
  • 125gm digestive biscuits crumbs
  • 75gm melted butter
  • 250gm cream cheese
  • 60gm icing sugar
  • 1 tsp vanilla extract
  • 1 tbsp lemon juice
  • 300ml thickened cream
  • 300gm cherry pie filling (or cherry conserve)

Method
  1. Blitz the biscuits in a food processor until beginning to turn to crumbs, then add the butter and whiz again to make the mixture clump.
  2. Press this mixture into a 20cm / 8 inch springform tin; press a little up the sides to form a slight ridge.
  3. Beat together the cream cheese, icing sugar, vanilla extract and lemon juice in a bowl until smooth.
  4. Lightly whip the double cream, and then fold it into the cream cheese mixture.
  5. Spoon the cheesecake filling on top of the biscuit base and smooth with a spatula. Put it in the fridge for 3 hours or overnight.
  6. When you are ready to serve the cheesecake, unmould it and spread the black cherry over the top.

Cook Your Books #24 by Kitchen Flavours

This post is linked to the event, Little Thumbs Up organised by Bake for Happy Kids and My Little Favourite DIY, and hosted by Diana from the Domestic Goddess Wannabe

Tuesday, June 16, 2015

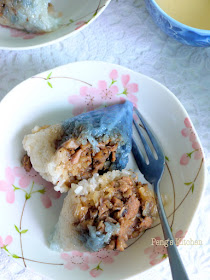
Nonya Chang (Rice Dumplings)

Finally this year I buckled up my courage and attempted this Nonya Rice Dumplings! Did not make a lot...only 25 pieces but the process already made me sweat big time hahaha...I've to go through the wrapping method via you tube over and over again before I decided to start on this project :D A few hiccups along the way which I've to unwrapped and redo it all over again. Though some of the rice dumplings are not in nice shape but I'm glad that all did not burst during the boiling process!  My kids were so eager and getting ready to taste test when I'm trying to open one after cooking. Thumbs up from them and hubby! What do you think of my maiden Nonya Rice Dumplings? ^0^


Preparation of the meat fillings

Rice soaked, bamboo leaves softened, meat filling done....ready to wrap!

One of the more better looking wrapped dumpling before cooking

Ingredient (approx 25 pcs)
  • 50 pcs dried bamboo leaves (give buffer of 20% more in case some torn)
  • 1 kg glutinous rice 
  • 1 kg pork shoulder butt
  • 5 tbsp rice bran oil
  • 8 garlic, peeled
  • 10 shallots, peeled
  • 12 dried chinese mushroom, softened and diced 
  • 5 tbsp coriander powder (freshly grinded from toasted coriander seeds)
  • 1 tsp five spice powder
  • 2 tbsp fine sugar
  • 2 tsp white pepper 
  • 1 tsp salt
  • 2 tbsp dark soy sauce
  • 150gm candied winter melon, diced
  • 25 pcs pandan leaves, cut into 1" length

Prior preparation of the bamboo leaves and glutinous rice

* Soak bamboo leaves in a large pail of water overnight. Drain away the water. Place leaves into a large pot and fill in water with 1 tbsp salt. Bring to boil for about 5 mins. Leave it to cool down. Rinse the leaves and wipe dry. Ready to use.

* Add 20 dried bluepea flowers and 1.5 cups water into a saucepan. Bring to boil and simmer for 3 mins. Turn off heat and let it steep till cool down completely. Strain the liquid. Divide glutinous rice into 700gm and 300gm. Rinse each portion till water runs clear. Soak 700gm rice with water and 300gm rice with 1.5 cups bunga telang (bluepea flower) liquid. Soak both rice overnight. Drain away water. Add in 1 tbsp salt, 1 tsp pepper and 1 tbsp sesame oil into the plain portion. Add 1 tsp salt, 1/4 tsp pepper and 1 tsp sesame oil into the blue rice. Coat the rice evenly with the seasoning.


Method
  1. Filling can be make one day in advance and chill. Place garlic and shallots in a food processor and blend till smooth.
  2. Blanch pork in boiling water for 1 min. Drain away water. Top up pot with water and and bring to boil again. Lower heat to medium and cook the pork for 30 mins. Remove pork and reserve 1.5 cup of the stock. When the pork is cooled enough to handle, diced into small cubes.
  3. Heat oil in a pan. Add garlic and shallots paste and saute for 3 mins till fragrant.
  4. Add mushroom and fry for 2 mins. Add in pork and mix evenly.
  5. Add in the rest of the seasoning and reserved stock. Mix evenly. Bring the mixture to boil. Lower heat and simmer for 5 mins until the sauce thickens, stirring constantly. Cool down the mixture completely before chilling in fridge in a air-tight container.
  6. Overlap 2 pcs of bamboo leaves (smooth sides up) and fold into a cone. Place in a piece of pandan leave. Fill in a tbsp of bluepea glutinous rice, 2 tbsp meat fillings. Cover with a tbsp of plain glutinous rice. Wrap up and tie up with a raffia string. Repeat till all rice are use up.
  7. Bring a large pot of water to boil (I've use 2 pots, divide the dumplings into each pot). Add in 1 tbsp salt and handful of chopped pandan leaves. Add in wrapped rice dumplings, fully submerged into the water. Cook over medium low heat for 1 hour or until cook.
  8. Remove the cooked dumplings from the pot and hang up to drip dry for 30 mins. Ready to savour! 


Friday, June 12, 2015

Steamed Cabbage Cake

I've done steamed yam cake and radish cake, and this is the first time I come across this steamed cabbage cake! Surprisingly it turned out really tasty as the texture is not too soft nor stiff. Tasted quite similar to steamed radish cake, but I find this steamed cabbage cake tasted much more sweeter as daikon radish usually gives a bitter after taste. Even my kids love this steamed cabbage cake and we have this for lunch and the leftovers,  I pan-fried it till crisp and golden for breakfast the next day!


The ingredients : rice flour, potato starch, dried mushroom, chinese sausages, black fungus, dried shrimps, carrot, garlic and cabbage

Stir-frying the fillings, add in mixed batter and fry till thickens

Before and after steaming


Recipe ref : Good Food Magazine May 2015
Ingredient
Batter
  • 300gm rice flour
  • 50gm potato flour
  • 1100 ml water
Filling
  • 4 tbsp oil
  • 30gm dried shrimps, softened and chopped
  • 1 tbsp chopped garlic
  • 20gm dried chinese mushroom, softened and diced
  • 80gm chinese sausages, diced
  • 500gm cabbage, thinly sliced
  • 50gm carrot, shredded
  • 5gm black fungus, soaked and shredded
Seasoning
  • 2 tsp salt
  • 1 tsp chicken stock granules
  • 1 tbsp sugar
  • 1/2 tsp pepper
Garnishing
  • fried shallots
  • chopped spring onion
  • toasted sesame seeds
  • sliced red chillies

Method
  1. Mix the batter ingredients and set aside.
  2. Heat oil in a wok. Saute dried shrimps until crisp and fragrant. Add garlic and fry till fragrant.
  3. Add mushroom and sausage and fry for 2 mins.
  4. Add in cabbage, carrot, black fungus and seasoning. Stir fry till cabbage is softened.
  5. Stir the batter and pour it into the wok. Stir over low heat until the mixture thickens.
  6. Pour the mixture into a greased square pan or individual small moulds.
  7. Steam over preheated steamer for 1 hour (big pan) or 25 mins (small moulds) until cooked.
  8. Cool completely before unmoulding and slicing.
  9. Garnish and serve.

Cook Your Books #24 by Kitchen Flavours

Tuesday, June 9, 2015

Kueh Kledek

Fried Sweet Potato Ball with Pork and Candied Winter Melon

Though not difficult to make this Nonya snack, it involves quite some work e.g.. boiling, slicing, steaming, mashing, kneading, wrapping, frying.....hahaha thought of it I'm already sweating therefore been pending this recipe for a very long time ^-^""" Since I do not want to stuck in the kitchen half-day just to make this, I've chosen to break down the work into 2 days.  First day preparation of the filling then chill it. The following day make the dough for the wrapping :D 

If you are a fan of Nonya Chang (rice dumplings) and Deep Fried Sweet Potato Balls (番薯蛋) , I think you will like this version too. Initially I thought I've made too much of this Kueh Kledek (I did not halve the recipe), after giving some to a friend, the balance were actually polished up by us the very next day! 


Kueh chang filling - similar to Nonya rice dumplings fillings which consist of pork and mushroom infused with ground coriander, pepper and candied winter melon

Toasted coriander seeds grinded till fine 

Ingredients for the filling : pork shoulder butt, dried mushroom, shallots, garlic, coriander powder, white pepper, sugar, candied winter melon

Cooking the filling

Meat Filling
Ingredient
  • 500gm pork shoulder butt
  • 5 tbsp rice bran oil
  • 5 garlic, peeled
  • 10 shallots, peeled
  • 8 dried chinese mushroom, softened and diced 
  • 4 heap tbsp coriander seeds, toasted and grinded till fine
  • 100gm fine sugar
  • 1 tbsp white pepper powder
  • 1 tsp salt
  • 2 tbsp dark soy sauce
  • 100gm candied winter melon, diced

Method
  1. Filling can be make one day in advance and chill. Place garlic and shallots in a food processor and blend till smooth.
  2. Bring 4 cups of water to boil. Place in pork and and bring to boil again. Lower heat to medium and cook the pork for 30 mins. Remove pork and reserve 200 ml of the stock. When the pork is cooled enough to handle, diced into 1 cm cubes.
  3. Heat oil in a pan. Add garlic and shallots paste and saute for 3 mins till fragrant.
  4. Add mushroom and fry for 2 mins. Add in pork and mix evenly.
  5. Add in the rest of the seasoning and reserved stock. Mix evenly. Bring the mixture to boil. Lower heat and simmer for 5 mins until the sauce thickens, stirring constantly. Cool down the mixture completely before chilling in fridge in a air-tight container.

Making the dough, wrapping up with filling and finally proceed to frying

Sweet Potato Dough
Ingredient
  • 900gm orange flesh sweet potatoes, net wgt after peeling
  • 2 tbsp sugar
  • 200gm glutinous rice flour
  • 100gm rice flour
  • 100-150ml water

Method
  1. Peel the sweet potato and dice. Steam the sweet potatoes until soft, about 20mins.
  2. Transfer the steamed sweet potato in a large mixing bowl. Add in sugar and mash until smooth while is still hot.
  3. Knead in flour. Add water, a little at a time until the dough is firm, smooth and not crumbly.  You may not need to add all the water depending on the moisture of the sweet potato. Cover with damp cloth and set aside to cool down.

To make the dumpling :
  1. Divide the dough into 35 portion, 40gm each. Flatten each dough and scoop a tablespoon of filling onto the centre, seal the edges and lightly roll  to form a round ball. Repeat till all the ingredients are used up. (I've got leftover fillings)
  2. Heat oil in a wok. Drop in balls, a few at a time and deep fry until golden brown. Drain well on kitchen paper before serving.
* Unfinished portions can be chilled in fridge, to serve, just grill in hot oven for 10mins until heated through.


Recipe ref : Good Food Magazine Jun 2012

Cook Your Books #24 by Kitchen Flavours