Thursday, February 27, 2014

柱侯萝卜焖牛腩 Braised Beef Brisket with Daikon

As I've mentioned I adore baked pork chop rice from the local HongKong Cafe, the 2nd choice will be the Cantonese Braised Beef Noodle! But is rather not economical to have it frequently at the cafes as the portion served is not worth it for the price paid >.< So is time to whip up one at home! This is my first time cooking a Chinese style braised beef and it is not as complicated as I thought, just need some organising (to gather up all the ingredients) and patience (the stew needs to sit for at least 6 hours, preferably overnight for it to be tender enough) :D 

The wait is worthwhile....it taste so so GOOD that I've it for two straight days for lunch and dinner hahaha....I can't possibly polish up the whole big pot of braised beef right? Nice food must share yah, so I've packed some for my sister and some to my inlaw's house during our weekly dinner ;) Try cooking this dish for your family and am sure they will give double thumbs up! 


Wobbly and melts-in-the mouth beef tendon!

Wholesome pot of braised beef waiting to sit for overnight before it can be served!

Ingredients (10 servings)
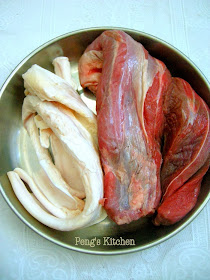
  • 1kg beef brisket (I've used beef shin)
  • 500gm beef tendon
  • 800gm white radish
  • Chicken Stock to immerse all the ingredients (used 1 cube non MSG chicken bouillon cube)
  • 100gm old ginger
  • 5 shallots
  • 5 cloves garlic


Spices
  • 2 licorice slice
  • 1 cardomon
  • 1 dried tangerine peel, softened
  • 1 cassia bark stick
  • 1 star anise
  • 1/2 tsp white peppercorn
  • 2 blades bay leaf
  • 1/3 tsp szechuan peppercorn


Condiments & Flavouring
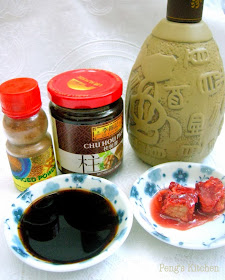
  • 100gm Chu Hou sauce 柱候醬
  • 2 pieces red fermented bean curd 红南乳
  • 5gm five spice powder 五香粉
  • 2 heap tbsp sugar 白糖
  • 2 tbsp light soy sauce 生抽
  • 1 tbsp dark soy sauce 酱油
  • 100ml fen jiu 汾酒 (or replaced with shoaxing wine)

Beef Tendon & Beef Shin

Method
  1. Trim away all visible fat on beef shin and beef tendon. Cut them into large cubes.
  2. Peel white radish and cut into cubes
  3. Cut ginger (retained skin) into thick slices. Finely chopped shallots and garlic.
  4. With a dry saucepan, lightly pan sear the beef on both sides until the surface begins to brown a little. Dish out and set aside. Do likewise for the beef tendon.
  5. Add oil in a wok, stir fry shallots, garlic and ginger until aromatic.
  6. Return the beef and tendon chunks into the wok and all all the condiments and flavorings (except sugar & wine). Mix well before adding in the spices ingredients. 
  7. Add enough water along with the bouillon cube to immerse everything. Bring to boil and add the sugar and wine. Cover and simmer on low heat for 10mins.
  8. Transfer the mixture into a casserole and add more water to cover the contents if necessary.
  9. Continue to simmer for 1 hour or until soften. Add white radish and bring to boil again. Cover and cook for another 30mins. Turn off heat and let everything sit for at least 6 hours, preferably overnight.
  10. The next day, check that the white radish and beef tendon has become soft and tender. Transfer adequate amount of stew into a clay pot and bring to boil again.
  11. Serve immediately with steamed rice or blanched chinese egg noodles.

Fantastic Set Meal ^0^....I cooked a pot of Old Cucumber Soup + a plate of blanched Kai Lan to go along with the braised beef brisket, not worrying the body will be over 'heaty' after this hearty meal ^0^


Old Cucumber Soup....recipe adapted from Noobcook.com


Blanched Kai Lan with Oyster Sauce


I am submitting this post to Asian Food Fest ( Hong Kong + Macau ) – Jan+Feb Month hosted by Annie of Annielicious Food

Wednesday, February 26, 2014

瑞士鸡翼 Swiss Wings

No matter how old are you, am sure you will love this braised sweet soy chicken wings! Unlike the usual braised wings I've done before, this Swiss Wings recipe does not require any spices like cinnamon, star anise or tangerine peel to enhance the taste. Just a couple slices of ginger and spring onion plus good quality soy sauce and lots of rock sugar will do :D Sounds simple enough right? It is fast and simple to prepare and also super yummylicious as they were all gone within minutes when the dish reached the dining table ^0^.


Recipe source : Wendyinkk
Ingredient
  • 12 pcs chicken mid-wings
  • 1 medium bowl icy cold water (enough to submerge all the wings)
Poaching liquid
  • 200gm brown rock sugar
  • 100gm Lee Kum Kee dark soy sauce
  • 60gm Lee Kum Kee light soy sauce
  • 2 tsp Shaoxing wine
  • 2 cups water
  • 1 non msg stock cube
  • 2 spring onion, white part
  • 5 slices ginger

Method
  1. Bring a saucepan of water to boil. Put in mid-wings and cook for 1 minute or until the skin firms up. 
  2. Drain away water and dunk them into the cold water immediately. Let them sit in the cold water for 5 mins.
  3. Combine the poaching liquid ingredients together in a saucepan and bring to boil. Lower heat and simmer until the rock sugar has all melted. 
  4. Remove the ginger and spring onion and put in the mid-wings. Let it gently simmer for 15 mins. (no high heat used to bring back to boil)
  5. Remove the wings from the poaching liquid and serve.
Note : The poaching can be reheated and use to cook for subsequent batch of mid-wings.


I am submitting this post to Asian Food Fest ( Hong Kong + Macau ) – Jan+Feb Month hosted by Annie of Annielicious Food

Tuesday, February 25, 2014

碗仔翅 Wan Zai Chee

This is another hearty one dish meal my family enjoys a lot :D This used to be a popular street food in Hong Kong, but now they are usually available in most local eateries. When I told my the other half that I'm cooking 碗仔翅 aka. Imitation Shark Fin Soup and he thought there is real fins added inside. hahaha sorry only bean vermicelli 粉丝 as substitute ^0^ and he gave me an amusing look.....speechless


Recipe source : Christine Recipes
Ingredient
  • 80gm chicken breast, thinly sliced
  • 80gm lean pork, thinly sliced
  • 40gm dried shitake mushroom, softened & thinly sliced
  • 20gm black fungus, softened & thinly shredded
  • 60gm bean vermicelli, softened & roughly shredded
  • 2 eggs, lightly beaten
  • 6 cups water
  • 1 chicken stock cube (non msg)
  • 2 tbsp dark soy sauce
  • sesame oil
  • salt & pepper to taste
  • 4 tbsp water chestnut powder ,马蹄粉
  • 4 tbsp water

Method
  1. Marinate chicken & lean pork lightly with 1/2 tsp sesame oil, dash of pepper, 1 tsp light soy sauce, 1/2 tsp cornflour. Set aside.
  2. Place water and stock cube into a medium pot. Bring to boil.
  3. Add in meat, mushroom and black fungus. Return to boil and cook for 3 mins.
  4. Add in soaked bean vermicelli and cook briefly. Add in dark soy sauce and seasoning.
  5. Dissolve water chestnut powder with 4 tbsp water and drizzle into the pot. Bring to boil till thickens.
  6. Drizzle over beaten egg and stir lightly. Turn off heat immediately.
  7. Ladle into small bowl, add in some dark vinegar (浙醋), extra pepper and sesame oil if desired and serve immediately.


I am submitting this post to Asian Food Fest ( Hong Kong + Macau ) – Jan+Feb Month hosted by Annie of Annielicious Food

Monday, February 24, 2014

豉油皇炒麵 Supreme Soy Sauce Fried Noodles

The pack of fresh egg noodle I've bought weighed 400gm which is enough for me to serve over 2 meals ;) To clear the other half of the noodle I tried out another simple stir-fried noodle from Christine Recipes again! I never tried using fresh egg noodle for frying and it turns out surprisingly good. The noodle tasted springy (will lose its springiness if over cooked during parboiled) and each strand is well coated with the savory soy sauce. No wonder this fried noodles is so well liked by the Hongkongners whereby they can have it every morning as breakfast! But I do not mind having a plate of this noodle anytime of the day hahaha....


Recipe source : Christine Recipes
Ingredient
  • 200gm fresh egg noodle
  • 100gm trimmed bean sprouts
  • 40gm spring onion, chopped into 3" length
  • 1 small onion, sliced
  • 1 thumb sized ginger, shredded
  • 1 shallot, sliced
  • toasted sesame seeds for garnish
Sauce :
  • 2 tbsp water
  • 1.5 tbsp light soy sauce
  • 3 tsp dark soy sauce
  • 2 tsp brown sugar
  • 2 tsp oyster sauce
  • sesame oil to taste

Method
  1. Combine all the sauce ingredients and mix well. Set aside.
  2. Bring a pot of water to rolling boil. Blanch noodles for 1-2 mins until just cook. Do not overcook  as it will turn mushy. Drain well and set aside.
  3. Heat some oil in wok over high heat. Stir fry bean sprouts and spring onion until slightly softened. Dish up and set aside.
  4. Add in 2 tbsp oil in the same wok. Saute ginger and shallot until fragrant. Add in onion and stir fry till translucent.
  5. Toss in noodles and mix evenly. Sprinkle the sauce gradually and stir fry till the sauce is well blended with the noodle. Adjust taste accordingly. Add in bean sprouts and spring onion and quickly toss to combine. Dish up. Garnish with sesame seeds and serve immediately.
I am submitting this post to Asian Food Fest ( Hong Kong + Macau ) – Jan+Feb Month hosted by Annie of Annielicious Food

Saturday, February 22, 2014

港式炸醬麵 Hong Kong ‘Zha Jiang’ Noodles

I never know that Hong Kong have their own version of 'Zha Jiang Mein' till I found out the recipe from Christine Recipes :D How is it different from other versions like 上海炸酱面 (Shanghai),台湾炸酱面 (Taiwan),韩国炸酱面 (Korea)? My kids absolutely adored this Hong Kong 炸酱面 as it tasted sweet and tangy as tomato sauce and tomato paste are used. 


Recipe source : Christine Recipes
Ingredient
  • 300gm pork fillet, sliced thinly
  • 3 cloves garlic, crushed
  • fresh egg noodles
  • sesame oil 
  • spring onion, diced
Marinade :
  • 1.5 tsp light soy sauce
  • 1 tsp corn flour
  • 3/4 tsp sugar
  • 2 tsp chinese wine
  • dash of pepper
Sauce : mix together except cornflour thickener
  • 300ml water
  • 4 tbsp chilli bean paste
  • 6 tbsp ketchup
  • 1.5 tbsp tomato paste
  • 1.5 tbsp rice vinegar
  • 3 tbsp sugar
  • salt to taste
  • 1 tsp chili oil
  • cornflour thickener (3 tsp cornflour + 3 tbsp water)

Method
  1. Marinate the pork for at least 30mins.
  2. Heat some oil in a pan over medium heat. Saute garlic until fragrant.
  3. Add in pork and stir fry until the meat turns white.
  4. Pour in the sauce ingredients and bring it to boil. Simmer for about 5 mins. Add in cornflour mixture to thicken the sauce. Turn off heat.
  5. Blanch egg noodle in boiling water for about 1-2 mins. Drain well and toss in some sesame oil.
  6. Ladle some meat sauce over the noodle, garnish with spring onion and serve immediately.


I am submitting this post to Asian Food Fest ( Hong Kong + Macau ) – Jan+Feb Month hosted by Annie of Annielicious Food

Friday, February 21, 2014

Earl Grey Tea Cake

Oh weekend is around the corner!! Time to slow down and enjoy this coming short weekends :D Won't it be wonderful to laze around in the afternoon and enjoy a simple tea session with your love ones? ^0^ I hope everyone will have a nice & wonderful weekends ahead! 


Recipe source : Anncoo Journal 
Ingredient
  • 150gm plain flour
  • 1/8 tsp baking powder
  • 150gm butter
  • 120gm icing sugar
  • 1/2 tbsp honey
  • 3 eggs
  • 1/8 tsp salt
  • 5gm Earl grey tea dust from 2 tea bags
  • 15gm ground almond
  • 1 tbsp fresh milk
  • lemon zest from 1 large lemon
Lemon syrup for glazing : 50gm sugar + 100gm boiling water, stir well then add 2 tbsp lemon juice in it, mix well & set aside.


Method
  1. Sift flour and baking powder together twice, set aside.
  2. Cream butter, icing sugar and honey until light & fluffy.
  3. Beat in eggs one at a time, add salt, tea dust, ground almonds, lemon zest and milk. Mix well.
  4. Using a spatula, fold in the flour mixture.
  5. Pour batter into a lined loaf pan. Bake in preheated oven at 160 deg cel for 45mins or a skewer inserted into the centre comes out clean.
  6. When the cake is done, unmould immediately and peel away parchment paper. Brush with lemon syrup while cake is still warm.
  7. Cool completely before serving.

I'm sharing this post with Little Thumbs Up February 2014 Event - Lemon hosted by Grace Phua of Life Can Be Simple

Tuesday, February 18, 2014

咸蛋奶黄包 Salted Egg Yolk Custard Buns

I'm supposedly to make a golden lava bun 流沙包, but it turned out looking like a normal custard bun….arrgghhhhh Guess I've made some mistake somewhere?? I've used tapioca starch instead of potato starch, is this the reason that the buns turned out custardy instead of being lava state? Well have to attempt another batch to confirm this, but no I'm not remaking another batch yet as I've still have 12 portions of cooked filling in my freezer!! 

Despite the outcome, overall I'm still happy with the taste of these steamed buns! Rich and flavorful custard filling encased in a soft and fluffy bun, taste so yummlicious that I've eaten 2 buns while is still warm :D


The filling….this is before freezing

Wrap in frozen filling and ready to be steamed after resting for another 30mins

The size before and after steaming…After steaming is still relatively small :D


Custard Filling
Ingredient (18 portions)
  • 125gm unsalted butter
  • 30gm custard powder
  • 60gm sugar
  • 50gm evaporated milk
  • 10gm potato starch
  • 5gm corn flour
  • 5 salted egg yolks, cooked

Method
  1. Mash cooked salted egg yolks till fine.
  2. Cream butter and sugar till fluffy.
  3. Beat in custard powder, flour and milk evenly.
  4. Beat in mashed egg yolk till well combined.
  5. Steam the mixture for 10 mins. Cool completely before dividing into 18 equal portions. Freeze till firm before using.

Bao Dough
Ingredient (6 buns)
  • 150gm Hong Kong flour, 香港水仙面粉
  • 1/2 tsp instant yeast
  • 1/2 tsp double action baking powder
  • 80gm milk
  • 15gm sugar
  • pinch of salt
  • 10gm shortening

Method
  1. Combine flour, yeast, baking powder, sugar and salt in a mixing bowl. 
  2. Add in milk and combine into a rough dough.
  3. Add in shortening and knead till dough is smooth and pliable.
  4. Cover with damp cloth and rest for 30mins.
  5. Knead lightly and divide dough into 6 equal portions, approx 43gm each. Roll into rounds.
  6. Flatten each dough into a flat disc and wrap with a portion of frozen filling. Seal the seam tightly and place on a paper liner. Cover and rest for another 30mins.
  7. Steam in preheated steamer for 4 mins till cooked.
  8. Serve immediately.
Yum Cha Time!


I am submitting this post to Asian Food Fest ( Hong Kong + Macau ) – Jan+Feb Month hosted by Annie of Annielicious Food

Monday, February 17, 2014

菠萝包 Pineapple Buns (Bo Luo Bao)

This is one of my favourite bread of all! I will usually grab one from Crystal Jade Bakery whereby they have pretty good tasty Bo Luo Bao, very buttery and crumbly crust and soft bread. There are two kinds of Bo Luo Bao available at this bakery, one without filling and the other with sweet char siew filling. But I like the simple one which is without the filling ;) Glad that my Bo Luo Bao turned out pretty decent looking :D Made 8 pieces and only 1 left the following day! *Reserved for dear son hahahaha


Bread dough and cookie dough topping

Roll the cookie dough topping between 2 plastic sheets! Neat and clean and flouring is not necessary at all! 


Using a dough scrapper to make the markings on the surface, proof for another 40mins before baking.


Buttery, sweet and crunchy topping with soft and fluffy crumbs! yummy! On the second day, the crumb was not as soft but no worries….I've popped them into oven and grill for 5 mins, they returned to their original crunchy crust and soft texture, as good as freshly baked :D


Recipe source : caroleasylife.blogspot.com

Water Roux
Ingredient
  • 250ml water
  • 50gm bread flour

Method
  1. Place bread flour in a saucepan. Whisk in water till well combined.
  2. Turn on stove and cook over medium low heat, stirring constantly till thickens.
  3. Turn off heat and cool down completely before using.
  4. Balanced water roux and be stored in air-tight container and chill for 3 days.

Cookie Dough Topping
Ingredient (8 portions)

  • 60gm unsalted butter, softened
  • 40gm sugar
  • 25gm beaten egg
  • 120gm bread flour

Method
  1. Using a electric whisk, cream butter and sugar until light.
  2. Add in beaten egg gradually and beat till fluffy.
  3. Sift in flour and fold. Gather the mixture together till a soft dough is formed.
  4. Wrap up the cookie dough and chill in fridge for at least 1 hour till firm.

Pineapple Buns
Ingredient (8 buns)
  • 100gm water roux
  • 270gm bread flour
  • 30gm cake flour
  • 1 tsp instant yeast
  • 50gm beaten egg
  • 40gm sugar
  • 1/4 tsp salt
  • 80gm milk (need not use all)
  • 30gm softened butter

Method
  1. Combine the first 8 ingredients in a mixing bowl (do not add milk all at once) and knead till a soft dough is formed. 
  2. Add in softened butter and knead for 10mins until dough is smooth and elastic.
  3. Proof dough in a enlosed warm area for 60mins or until double in bulk.
  4. Meanwhile take out the chilled and firmed cookie dough and divide into 8 equal portions. Shape into round. 
  5. Punch down dough and knead lightly. Divide dough into 8 equal portions. Shape into round.
  6. Place a portion of cookie dough between a plastic sheet. Roll out into a round circle enough to encase the bread dough.
  7. Put a bread dough onto the centre of the rolled out cookie dough. Gently flip onto your palm and peel off the plastic sheet. Flip over again and seal the edge lightly. Not necessary to pinch tight. Place the wrapped bun onto a lined baking sheet, seam side down. Use a dough scrapper and make patterns marking on the surface of the bun. Repeat the process with the remaining cookie dough and bread dough.
  8. Proof for another 40mins. Glaze the surface with some beaten egg.
  9. Bake in preheated oven at 180 deg cel for 25mins or until golden brown.


I am submitting this post to Asian Food Fest ( Hong Kong + Macau ) – Jan+Feb Month hosted by Annie of Annielicious Food
Sunday, February 16, 2014

紅豆砵仔糕 Red Bean Rice Cakes

I first get to know this Hong Kong snack through HK drama. Never get to taste the real stuff and was rather curious how it will taste like :D I've actually attempted the recipe twice as I was not really happy with the first one. The taste is fine, just that the texture is too soft and sticky for my liking :D So for the 2nd attempt, I've omitted the glutinous flour and reduce the liquid volume…..turn out soft and yet slightly chewy…the way I liked!

1st Attempt


2nd Attempt


Recipe ref : Bon's Kitchen &  travellingfoodies
Ingredient
  • 50gm rice flour 粘米粉
  • 15gm wheat starch 澄粉
  • 10gm water chestnut starch 马蹄粉
  • 60gm brown sugar 冰片糖
  • 220ml water
  • cooked sweetened red beans

Method
  1. Place 100ml water and sugar in a saucepan. Bring to boil till sugar are completely dissolved. Cool down the mixture slightly.
  2. Combine all flour in a mixing bowl. Add in balanced water and stir to dissolve. Whisk in sugar syrup till well combine.
  3. Meanwhile, place small bowls into a steamer and heat up together with water. Bring water to rolling boil.
  4. Place some red beans over the bowl, pour in some flour mixture till 3/4 full. Add in more red beans. Cover and steam for 20-30 mins depending on the size of the pudding. Sprinkle more red beans after 10 mins in steaming if desired.
  5. Cool down for 30mins before unmoulding. 


I am submitting this post to Asian Food Fest ( Hong Kong + Macau ) – Jan+Feb Month hosted by Annie of Annielicious Food