Saturday, April 27, 2013

Steamed Tapioca with Coconut Cream

After baking the tapioca cake, with some balance tapioca therefore decided to make this little dessert. Surprisingly my boy loves this alot especially the thick coconut cream >.< I've twit the recipe slightly by simmering the steamed tapioca in the sugar syrup therefore it looks slightly on the darker side :) 


Ingredient
  • 500gm peeled tapioca, cut into 5cm long
  • 1/2 cup palm sugar
  • 1 cup warm water

Method
  1. Steam the peeled tapioca in a preheated steamer for 30-45mins until translucent and softened.
  2. Put the palm sugar and water in wide pan and bring to boil till sugar is well dissolved.
  3. Put in steamed tapioca and simmer for 5 mins, turning frequently to ensure all sides are well coated with the sugar syrup.
  4. Remove tapioca and place on serving plate. Drizzle with coconut sauce and serve.

coconut sauce : Put all ingredients into a saucepan and bring to boil till the coconut milk thickens.
  • 200ml coconut milk
  • pinch of salt
  • 1 pandan leaf, cut into pieces
  • 2 tsp tapioca flour


Friday, April 26, 2013

Baked Tapioca Cake

Oops why the centre of the cake sunk slightly? It balloon quite high during the baking time. I turned on the grill function and let it to grill while I went out the house for a while thinking it should be fine to let it cool down in the oven >.< Nevertheless my hubby and kids enjoy this chewy nonya kueh alot!  

Kueh Bingka Ubi


Ingredient
  • 500g peeled tapioca
  • 120gm sugar
  • 1 egg
  • 200ml thick coconut milk
  • 70ml water
  • 1 tsp vanilla paste

Method
  1. Pre-heat oven at 180 deg cel.
  2. Blend peeled tapioca in food blender till fine. Lightly squeeze away excess liquid.
  3. Combine all ingredients and stir well.
  4. Grease a 6"x6" pan with some oil and lined with baking paper.
  5. Pour batter into pan and bake for 35mins.
  6. Turn on top grill and grill for 10mins or until golden brown.
  7. Cool completely before slicing .


Wednesday, April 24, 2013

Banana Milk Tea Buns

Oh so cute! First time baking bread bun in a muffin cup and turns out looking really like a muffin ^.^ Even my boy prefers to call it a muffin even though I told him is a bread! ~.~ Though the tea flavour is not very distinctive but they are very soft and fluffy! The flavourful bananas kneaded into the dough may have camouflaged the milk tea taste :) A very easy dough to handle as long as you do not add too much milk tea at one go :D


shaped proofed dough into 6 portions...

 wrapped in a slice of banana...

sealed up and placed into a muffin cup for 2nd proofing...


Ingredient (6 buns)
  • 200gm bread flour
  • 20gm sugar
  • 2gm salt
  • 4gm instant yeast
  • 20gm unsalted butter, softened
  • 120gm milk
  • 3 black tea bags
  • 50gm bananas + extra 1 banana as fillings

Method
  1. Place milk and tea bags in a saucepan and bring to boil. Turn off heat and steep till cool completely. Discard teabags and reserve 100gm milk tea for use.
  2. Combine flour, sugar, salt and instant yeast in a mixing bowl.
  3. Add in 50gm bananas and mix well.
  4. Add in 80gm milk tea and knead till a dough is formed. Add more milk tea if the dough is too dried.
  5. Add in butter and knead for 10mins till dough is smooth and elastic. Cover with damp cloth and proof for 1 hour or until double in bulk.
  6. Punch down dough to release gas and knead lightly. Divide into 6 equal portions and roll round. Rest for 10mins.
  7. Roll out each dough and wrap with a slice of banana. Seal edge tightly and place the dough into a muffin cup. Proof for another 40 mins until the dough raise to the edge of the cup cases.
  8. Bake in preheated oven at 180 deg cel for 20mins until golden brown.
Recipe adapted from 爱上面包 :我的甜蜜烘培厨房


Tuesday, April 23, 2013

Green Tea Crepes

What to serve for breakfast or teabreak for the kids? Try this simple and delicious green tea crepes! I only tasted a slice, the rest all wiped out by my 2 little hungry monsters ^.^


Recipe source : xinshipu.com
Ingredient (6 crepes)
  • 5 tbsp cake flour
  • 1 tsp green tea powder
  • 2 tbsp sugar
  • 1 egg
  • 1 tsp mirin
  • 120ml milk
  • 1 tsp olive oil

Method
  1. Sift flour and green tea powder into a mixing bowl.
  2. Combine egg, mirin, milk and olive oil, mix well.
  3. Beat in milk mixture into flour and mix well. Set aside for 30mins.
  4. Heat a pan and lightly grease. Wipe away excess oil. Lower heat and scoop 2 tbsp of the batter and drizzle into pan. Swirl the pan to form a thin circle.
  5. Cook for 1 min till set. With a spatula, gently remove the crepe from the pan. Repeat with balance batter.
  6. To serve, fold the crepes into triangular and serve with whipped cream and fruits at the side.


Saturday, April 20, 2013

Purple Sweet Potato Rose Buns

Oh so sweet and pretty when I've shaped them into little rose buds!! Is been quite some time I've made steamed buns :) This recipe uses only 4 ingredients without added sugar and shortening, therefore I'm worry that they will turn out like stone and taste bland. Luckily the end results is not too bad, slightly sweet taste, most likely from the purple sweet potato and texture is soft when served immediately after steaming :) 


Ingredient
  • 250gm hong kong flour, 水仙面粉
  • 200gm steamed purple sweet potato
  • 6-8 tbsp warm water (may need more tbsp if dough is too stiff)
  • 3gm instant yeast

Method
  1. Mash sweet potato while is still warm.
  2. Dissolve yeast in warm water.
  3. Stir in yeast water into flour.
  4. Add in mashed sweet potato and knead till a smooth and pliable dough is formed. (depending on the moisture of the sweet potato, adjust amount of water by adding more tbsp one at a time)
  5. Cover with a damp cloth and proof for 1 hour until double in bulk.
  6. Knead lightly and divide dough into 80gm each, you will get 6 portions of dough. Extra dough to be roll into 6 small flower buds.
  7. Cut one portion of the dough into 5 pieces and roll into 10cm rounds. Overlay the 5 rounds and place a flower bud at one end (see pic above). Roll it up and cut into halves. Place cut side down on a paper liner. Repeat with the rest of the dough.
  8. Cover and proof for another 30mins.
  9. Steam over preheated steamer on high heat for 12mins. Best serve warm.


Friday, April 19, 2013

Sweet Potato Chiffon

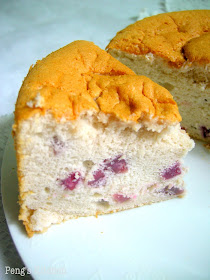
This is my another attempt of baking chiffon in a round pan rather than the usual tube pan ;) Pureed purple sweet potato is used in this recipe but why it did not turn out purplish? :P When I mixed the puree to form a batter it actually turns out greyish! yeeks! hahaha...I remembered a blog post by Wendy on her blueberry lemon chiffon cake  whereby she used lemon juice to adjust the colour pigmentation as certain natural colour like in fruits or vegetable will dispersed during the baking process :) Yes amazingly when I added teaspoon of lemon juice into the batter, the greyish tone just disappear! 


If you look carefully at the picture below, you will see that the top is slightly damp >.<" Ahhhh never ever rush to bake when short of time hahaha...As I was rushing out to fetch my girl, I baked the chiffon for 40mins instead of the usual 45mins :P But overall the cake taste nice as commented by my hubby. 


Ingredient
  • 4 egg yolks
  • 40ml cooking oil
  • 110g mashed sweet potato
  • 100ml unsweetened soy milk
  • 1/4 tsp salt
  • 60gm sugar
  • 100gm cake flour
  • 4 egg whites
  • 1/2 tsp cream of tartar
  • 80gm sugar
  • 100gm diced purple sweet potato, steamed
  • 3 tsp lemon juice

Method
  1. Blend mashed sweet potato with milk till smooth.
  2. Combine egg yolks, oil, sweet potato mixture, salt and sugar in a mixing bowl. Fold in sifted flour until batter forms. Stir in 2 tsp lemon juice to adjust the colour pigment.
  3. Beat egg whites and cream of tartar until mixture forms soft peaks. Gradually add in sugar, beating at high speed until frothy and stiff peak forms.
  4. Gently fold beaten egg white foam into egg yolk batter until blended.
  5. Coat diced sweet potato with 1 tsp lemon juice. Toss lightly with a tsp of flour. Fold into batter.
  6. Pour batter into ungreased 8" loosebased round pan. Bake in preheated oven at 180 deg cel for 40-45 minutes.
  7. Remove from oven, invert cake onto wire rack to cool completely before unmoulding.


Wednesday, April 17, 2013

Hokkaido Chiffon Cupcakes

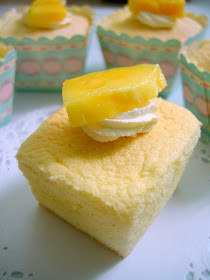
Finally attempted this popular hokkaido chiffon cupcakes which I've pending for very long! I actually been waiting to get hold of some hokkaido fresh milk to make this little cupcakes :) I've savoured some of the hokkaido cupcakes made by Catherine and it tasted so good that I decided to use hers recipe rather than google for any other recipes :) Instead of filling the cupcakes with custard cream, I've created a different fillings with some of my balanced mango curd & homemade banana chocolate jam!! My kids and hubby simply love this cupcakes and they can consume 2 at a go as the cupcakes are rather small in sizes ^.^

Hokkaido Chiffon Cupcakes with Mango Curd Cream
Hokkaido Chocolate Cupcakes with Chocolate Banana Cream


Hokkaido Chiffon Cupcakes
Recipe source : Tigg3r's Delectable Fare
Ingredient (approx 9-10 cupcakes)
  • 3 egg yolks
  • 30gm sugar
  • 45gm oil
  • 65gm cake flour
  • 60ml milk (prefarably Hokkaido Milk, see pic above)
  • 1/2 tsp vanilla paste
  • 3 egg whites
  • 45gm sugar
  • 1/4 tsp cream of tartar 

Method
  1. Sift flour and add sugar. Add in yolks, milk, corn oil and whisk until thoroughly blended. Beat in vanilla paste.
  2. Using a electric whisk, beat whites and cream of tartar until foamy. Gradually add in sugar and whisk on high speed until stiff peak.
  3. Scoop 1/3 of the egg whites into the yolk batter and blend well. Pour the batter into the remaining egg whites and quickly fold till combined.
  4. Scoop the batter into cupcake holders until 80% full. Tap the holder lightly to remove excessive air pockets.
  5. Bake in preheated oven at 20mins or until skewer comes out clean when inserted into cupcake.
  6. Cool cupcakes completely on wire rack before piping the cream into the cupcakes.
  7. Chill well in fridge before serving.

Mango Curd Cream Filling
  1. Whip cream till stiff peak and mix in mango curd.
  2. Fill the mixed cream into a piping bag with piping tip #12 and pipe the cream into the middle of the cupcake.
  3. Pipe a little cream on the top, dust with snow powder before placing a piece of cut fruit.


Fresh from oven and deflate after cooling down


I did not wait for it to chill long enough before slicing, therefore the cream is still a bit runny :P


Hokkaido Chocolate Cupcake with Chocolate Banana Cream
Ingredient (approx 9-10 cupcakes)
  • 3 egg yolks
  • 30gm sugar
  • 45gm oil
  • 60gm cake flour
  • 10gm cocoa powder
  • 60ml milk (prefarably Hokkaido Milk)
  • 1/2 tsp vanilla paste
  • 3 egg whites
  • 45gm sugar
  • 1/4 tsp cream of tartar 

Method
  1. Sift flour & cocoa powder and add sugar. Add in yolks, milk, corn oil and whisk until thoroughly blended. Beat in vanilla paste.
  2. Using a electric whisk, beat whites and cream of tartar until foamy. Gradually add in sugar and whisk on high speed until stiff peak.
  3. Scoop 1/3 of the egg whites into the yolk batter and blend well. Pour the batter into the remaining egg whites and quickly fold till combined.
  4. Scoop the batter into cupcake holders until 80% full. Tap the holder lightly to remove excessive air pockets.
  5. Bake in preheated oven at 20mins or until skewer comes out clean when inserted into cupcake.
  6. Cool cupcakes completely on wire rack before piping the cream into the cupcakes.
  7. Chill well in fridge before serving.

Chocolate Banana Cream 
  1. Whip cream till stiff peak and mix in chocolate banana jam.
  2. Fill the mixed cream into a piping bag with piping tip #12 and pipe the cream into the middle of the cupcake.
  3. Pipe a little cream on the top, dust with snow powder before placing a piece of cut fruit.

Tuesday, April 16, 2013

Ayam Percik (Kelantan)

No more procrastinating after seeing Kelly's & Vivian's Ayam Percik! The gravy is so flavourful and super addicting! Great with a huge bowl of warm white rice :) As I do not want to intake too much carbohydrates, moreover this dish is extremely rich and sinful, I serve the grilled chicken on a bed of  smooth & creamy Mashed Cauliflower 'Mashed Potato'! ^.^


Ingredient
  • 2 chicken thighs
  • 200ml coconut milk
  • 3 cardamoms
  • 3 cloves
  • 1 stalk lemongrass, bruised
  • 1 tbsp tamarind paste
  • 1 tsp salt
  • 1/2 tsp pepper
  • 1 tsp sugar
  • 1 tsp potato starch mixed with water
Spice paste : Blend till fine
  • 3 cloves garlic
  • 1 thumb sized ginger
  • 3 shallots
  • 4 dried chilli, soaked & drained
  • 1/4 cup water
  • 1 stalk lemongrass

Method
  1. Marinate chicken thighs with spice paste for at least 1/2 hours.
  2. Transfer everything into a pot or pan and pour half the coconut milk over it. Add in cardamon, cloves and lemongrass and cook over medium heat until chicken is partly cooked, for about 15mins. Season with tamarind paste, salt & sugar halfway through.
  3. Take the chicken out from the pot, reserving the coconut milk mixture. Place the chicken on a baking tray and grill for 10mins.
  4. Meanwhile, discard the cardamom and cloves from the gravy. Add the remaining coconut milk and the starch water and simmer until thick. Adjust taste if necessary.
  5. Coat the chicken with some of the coconut sauce and continue to grill for another 5 mins.
  6. Serve with rice and ladle more gravy over the chicken.


Monday, April 15, 2013

Rosemary Cheesy Salmon by HCP


This was actually the first dish I tried when I got the Happy Call Pan! The pan actually helps to reduce any oil splattering around especially when frying fish :) Most importantly it reduces any fishy smell lingering in the kitchen! Love it! :D


Ingredient

  • 300gm salmon fillet
  • 1/2 tbsp butter, softened
  • 1/2 tbsp honey
  • 2 tsp dried rosemary
  • 1 tsp black pepper
  • 1 slice cheddar cheese, shredded
  • handful of broccoli, blanched

Method
  1. Combine butter, honey, rosemary & pepper together. Rub the mixture evenly over fish fillet. Set aside for 10mins.
  2. Heat up HCP for 1 min. Add fish, skin side down and closed pan (locked). Cook for 3min on medium heat.
  3. Flip the pan and cook the other side of the fish fillet for 2mins. Flip over the pan again, place shredded cheese over fish and scatter blanched broccoli around the fish.
  4. Sprinkle extra black pepper and pinch of salt over the broccoli. Close the lid (do not lock) and cook till cheese melted. Serve immediately.

Recipe adapted from munchministry.com


Saturday, April 13, 2013

Cek Mek Molek - Beautiful Lady

Sweet little treats which me and my boy loves it a lot :) No leftovers for hubby hahaha....I've actually attempt this fried sweet potatoes twice! First attempt taste not really good as I added too much flour to the mashed sweet potatoes resulting a rather doughy texture after frying. After the not so successful attempt, second try fare much better! ^.^


Ingredient (yields 10 pieces)
  • 280gm steamed sweet potatoes
  • 60-70gm plain flour (add gradually...)
  • sugar for filling

Method
  1. Mash sweet potatoes while is still hot, mix in flour and knead till a pliable dough is formed. Add less or more flour when necessary.
  2. Divide dough into 30gm each.
  3. Lightly dust hand with flour and flatten dough each dough. Fill in 1 tsp sugar. Seal it and shape it into an oblong shape with pointed ends. Repeat with remaining dough.
  4. Deep fry the cek mek in hot oil on medium heat until a crust form on the outside. Drain well and cool down slightly before serving. Caution the sugar syrup is hot!


1st attempt...too doughy :(

2nd attempt...much better!! :)